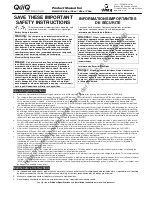
SAVE THESE IMPORTANT
SAFETY INSTRUCTIONS
This manual contains important safety, operating, and
installation instructions – read before using charger.
Battery Safety Information
Warning:
Use charger only on battery systems with an
algorithm selected that is appropriate to the specific battery type.
Other usage may cause personal injury and damage. Lead acid
batteries may generate explosive hydrogen gas during normal
operation. Keep sparks, flames, and smoking materials away
from batteries. Provide adequate ventilation during charging.
Never charge a frozen battery. Study all battery manufacturers’
specific precautions such as recommended rates of charge and
removing or not removing cell caps while charging.
Electrical Safety Information
Danger:
Risk of electric shock. Connect charger power cord
to an outlet that has been properly installed and grounded in
accordance with all local codes and ordinances. A grounded
outlet is required to reduce risk of electric shock – do not use
ground adapters or modify plug. Do not touch uninsulated
portion of output connector or uninsulated battery terminal.
Disconnect the AC supply before making or breaking the
connections to the battery while charging. Do not open or
disassemble charger. Do not operate charger if the AC supply
cord is damaged or if the charger has received a sharp blow,
been dropped, or otherwise damaged in any way – refer all repair
work to qualified personnel. Not for use by children.
INFORMATIONS IMPORTANTES
DE SÉCURITÉ
Conserver ces instructions. Ce manuel contient des instructions
importantes concernant la sécurité et le fonctionnement.
Information de Sécurité de la Batterie
Attention:
Utiliser seulement sur les batteries 72V avec un
algorithme approprié au type spécifique de batterie – voire le
manuel. D´autres types de batteries pourraient éclater et causer
des blessures ou dommages. Les batteries peuvent produire des
gaz explosives en service normal. Ne jamais fumer près de la
batterie et éviter toute étincelle ou flame nue à proximité de ces
derniers. Fournisser la bonne ventilation lors du chargement. Ne
jamais charger une batterie gelée. Prendre connaissance des
mesures de précaution spécifiées par le fabricant de la batterie, p.
ex., vérifier s´il faut enlever les bouchons des cellules lors du
chargement de la batterie, et les taux de chargement
recommandés.
Information de Sécurité Électrique
Danger:
Risque de chocs électriques. Ne pas toucher les
parties non isolées du connecteur de sortie ou les bornes non
isolées de la batterie. Toujours connecter le chargeur à une prise
de courant mise à la terre. Ne pas ouvrir ni desassembler le
chargeur – referer toute reparations aux personnes qualifiés. Pas
à l´usage des enfants.
Operating Instructions
1.
Always use a grounded outlet. When using an extension cord, avoid excessive voltage drops by using a grounded 3-wire 12 AWG cord.
2.
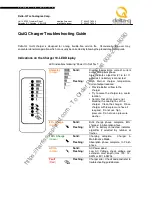
The charger will automatically turn on and go through a short LED indicator self-test (Models 912-xx0x will flash all LED’s in an up-down sequence and
Models 912-xx1x will alternatively flash its LED RED-GREEN) for two seconds. If the charger is connected to battery pack, a trickle current will be applied
until a minimum voltage is reached. If the charger is used in an off-board application and the charger is waiting to be plugged into a battery pack, the
charging algorithm number will be displayed for 11 seconds (see “Check / Change Charging Algorithm”) before ultimately displaying an under-voltage fault
(fault disappears when plugged into battery pack).
3.
Once a minimum battery voltage is detected, the charger will enter the bulk charging constant-current stage. Models 912-xx0x will display the current to the
battery on the bargraph and Model 912-xx1x will flash its LED GREEN off more than on to indicate <80% charge status. The length of charge time will vary
by how large and how depleted the battery pack is, the input voltage (the higher, the better), and ambient temperatures (the lower, the better). If the input AC
voltage is low (below 104VAC), then the charging power will be reduced to avoid high input currents (Models 912-xx0x ‘AC’ LED and Models 912-xx1x single
LED both flash YELLOW). If the ambient temperature is too high, then the charging power will also be reduced to maintain a maximum internal temperature
(Models 912-xx0x bargraph flashes and Models 912-xx1x single LED flashes YELLOW)
.
4.
When the battery is at approximately 80% state of charge, the bulk stage has completed and an >80% charge indication is given (Models 912-xx0x turn on
the ‘80%’ LED and Models 912-xx1x will flash its LED GREEN on more than off). In the next phase known as the absorption or constant-voltage phase, the
last 20% of charge is then returned to the battery. The charging could be terminated at this point if the vehicle requires immediate usage, however, it is
highly recommended to wait until 100% charge indication is given to ensure maximum battery capacity and life.
5.
A low current “finish-charge” phase is next applied to return and maintain maximum battery capacity (Models 912-xx0x will flash the ‘100%’ LED).
6.
When Models 912-xx0x ‘100%’ LED or Models 912-xx1x single LED is continuously GREEN, the batteries are completely charged. The charger may now be
unplugged from AC power (always pull on plug and not cord to reduce risk of damage to the cord). If left plugged in, the charger will automatically restart a
complete charge cycle if the battery pack voltage drops below a minimum voltage or 30 days has elapsed.
7.
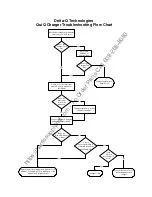
If a fault occurred anytime during charging, a fault indication is given by flashing RED with a code corresponding to the error. There are several possible
conditions that generate errors. Some errors are serious and require human intervention to first resolve the problem and then to reset the charger by
interrupting AC power for at least 15 seconds. Others may be simply transient and will automatically recover when the fault condition is eliminated. To
indicate which error occurred, a fault indication will flash RED a number of times, pause, and then repeat.
[1 FLASH] Battery Voltage High: auto-recover
[2 FLASH] Battery Voltage Low: auto-recover
[3 FLASH] Charge Timeout: the charge did not complete in the allowed time. This may indicate a problem with the battery pack (voltage not attaining the
required level), or that the charger output was reduced due to high ambient temperatures.
[4 FLASH] Check Battery: the battery pack could not be trickle charged up to the minimum level required for the charge to be started. This may indicate that
one or more cells in the battery pack are shorted or damaged.
[5 FLASH] Over-Temperature: auto-recover. Charger has shutdown due to high internal temperature which typically indicates there is not sufficient airflow for
cooling – see Installation Instructions 1). Charger will restart and charge to completion if temperature comes within accepted limits.
[6 FLASH] QuiQ Fault: an internal fault has been detected. If Fault 6 is again displayed after interrupting AC power for at least 15 seconds, the charger must
be brought to a qualified service depot.
Maintenance Instructions
1.
For flooded lead-acid batteries, regularly check water levels of each battery cell after charging and add distilled water as required to level specified
by battery manufacturer. Follow the maintenance and safety instructions recommended by the battery manufacturer.
2.
Make sure charger connections to battery terminals are tight and clean.
3.
Do not expose charger to oil, dirt, mud or to direct heavy water spraying when cleaning vehicle.
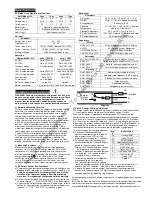
See flip side for
Product Specifications
and
Installation Instructions
for qualified personnel.
Unit 3 – 5250 Grimmer St.
Burnaby, BC, Canada V5H 2H2
Tel: 604.327.8244 Fax: 604.327.8246
www.delta-q.com
https://harrissupplyind.com - To Order Parts Call 608-268-8080

