FOR DELTA 12” WOOD LATHE ONLY
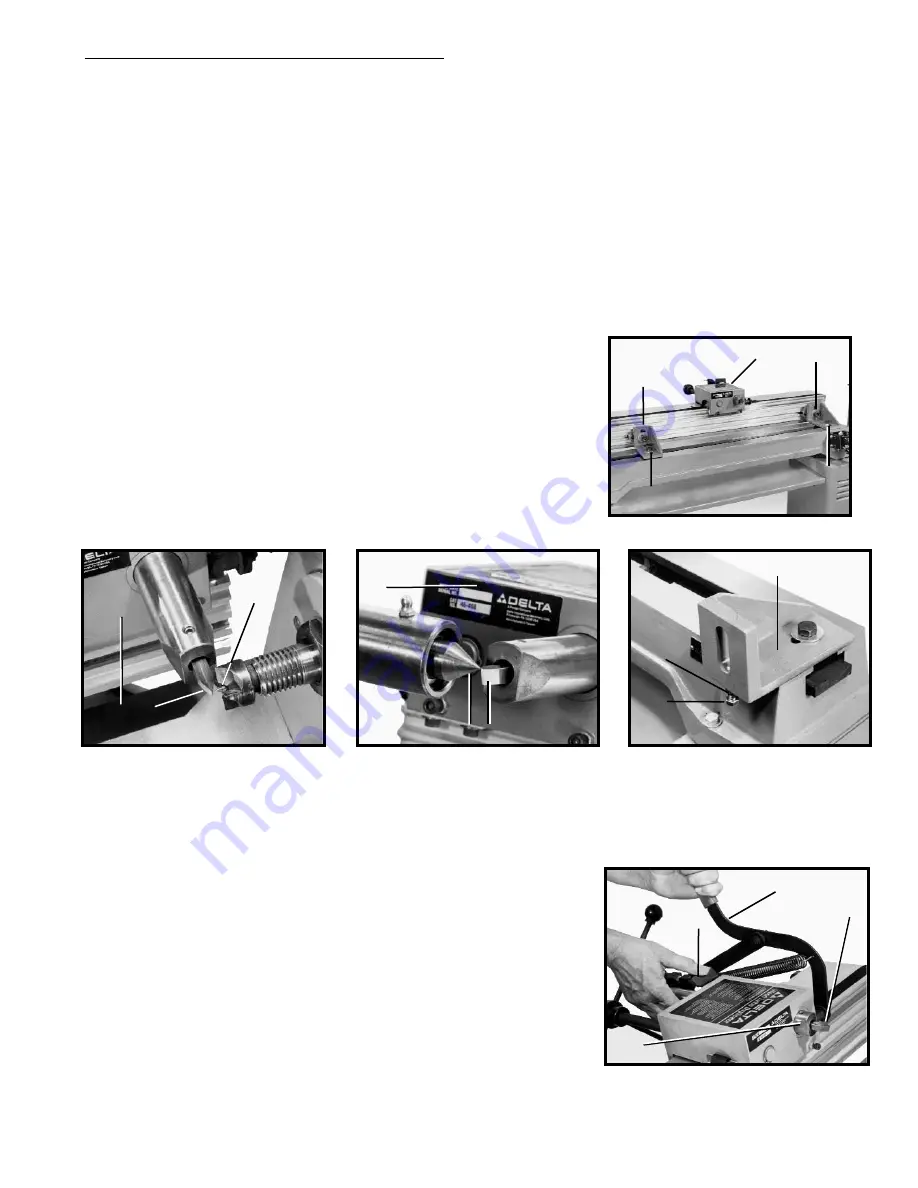
10. Move duplicator carriage (N) Fig. 64 to the left until the cutting tool is in the same plane as headstock center (O) Fig. 65.
Loosen two socket head bolts (A) and (B) Fig. 64. Slide duplicator in or out until point of cutting tool (P) Fig. 65, is aligned verti-
cally (up or down) with point of headstock center (O). Snug-up socket head bolt (A) Fig. 64.
A.
Move duplicator carriage (N) Fig. 64 to the right until point of cutting tool (P) Fig. 66 is in the same plane with point of
tailstock center (U). Slide duplicator in or out until point of cutting tool (P) is aligned vertically (up or down) with point
of tailstock center (U).
B.
Snug-up socket head bolt (B) Fig. 64. Recheck to make certain point of cutting tool is aligned vertically (up or down)
with point of cutting tool at the tailstock centers and tighten two socket head bolts (A) and (B).
C.
Move carriage assembly (N) Fig. 64 to the headstock until point of cutting tool (P) is on the same vertical plane with head-
stock center (O) Fig. 65.
D.
If the point of cutting tool (P) Fig. 65 is above or below the headstock center (O), loosen two bracket bolts (C) and (D)
Fig. 64.
E.
If the point of cutting tool (P) Fig. 65 is below the headstock center (O), loosen locknut on mounting bracket, one of which
is shown at (E) Fig. 67, and turn leveling screw clockwise until the edge of cutting tool (P) Fig. 65 contacts headstock cen-
ter (O). If the point of cutting tool (P) Fig. 65 is above the headstock center (O), turn leveling screw (F) Fig. 67 counter-
clockwise until the edge of cutting tool (P) Fig. 65 contacts headstock center (O). Snug-up locknut (E) Fig. 67.
F.
Move the carriage assembly (N) Fig. 66 to the tailstock until the point of
cutting tool (P) Fig. 66 is on the same plane with tailstock center (U).
G.
If the point of cutting tool (P) Fig. 66 is below tailstock center (U), loosen
locknut (E) Fig. 67 on mounting bracket (G) at the tailstock end of the
lathe and turn leveling screw (F) until the edge of cutting tool (P) Fig. 66
contacts tailstock center (U). If point of cutting tool is above tailstock
center (U), turn leveling screw (F) Fig. 67 counterclockwise until the
edge of cutting tool (P) Fig. 66 contacts tailstock center (U). Snug-up
locknut (E) Fig. 67 on mounting bracket (G) at tailstock end of the lathe.
H.
Recheck to make certain point of cutting tool is contacting headstock
and tailstock centers. Readjust if necessary.
I.
Firmly tighten two locknuts, one of which is shown at (E) Fig. 67. Tighten
mounting bolts (A), (B), (C), and (D) Fig. 64.
13
Fig. 64
Fig. 65
Fig. 66
Fig. 67
OPERATING CONTROLS AND ADJUSTMENTS
Fig. 68
ADJUSTING TOOL ADVANCEMENT ARM
The tool advancement arm (F) Fig. 68 automatically regulates the depth of cut
of the cutting tool (A).
2.
To increase the depth of cut, pull back on handle (B) Fig. 68 and push
engagement lever (C) forward. Each stop on the engagement lever (C) will
increase the depth of cut by 1/8” increments to one full inch.
IMPORTANT:
Always pull back on handle (B) before advancing tool engagement lever (C).
D
B
C
A
C
B
A
N
P
O
N
U P
F
E
G
N
F
Summary of Contents for 46-408
Page 19: ...19 NOTES...


