9
1.
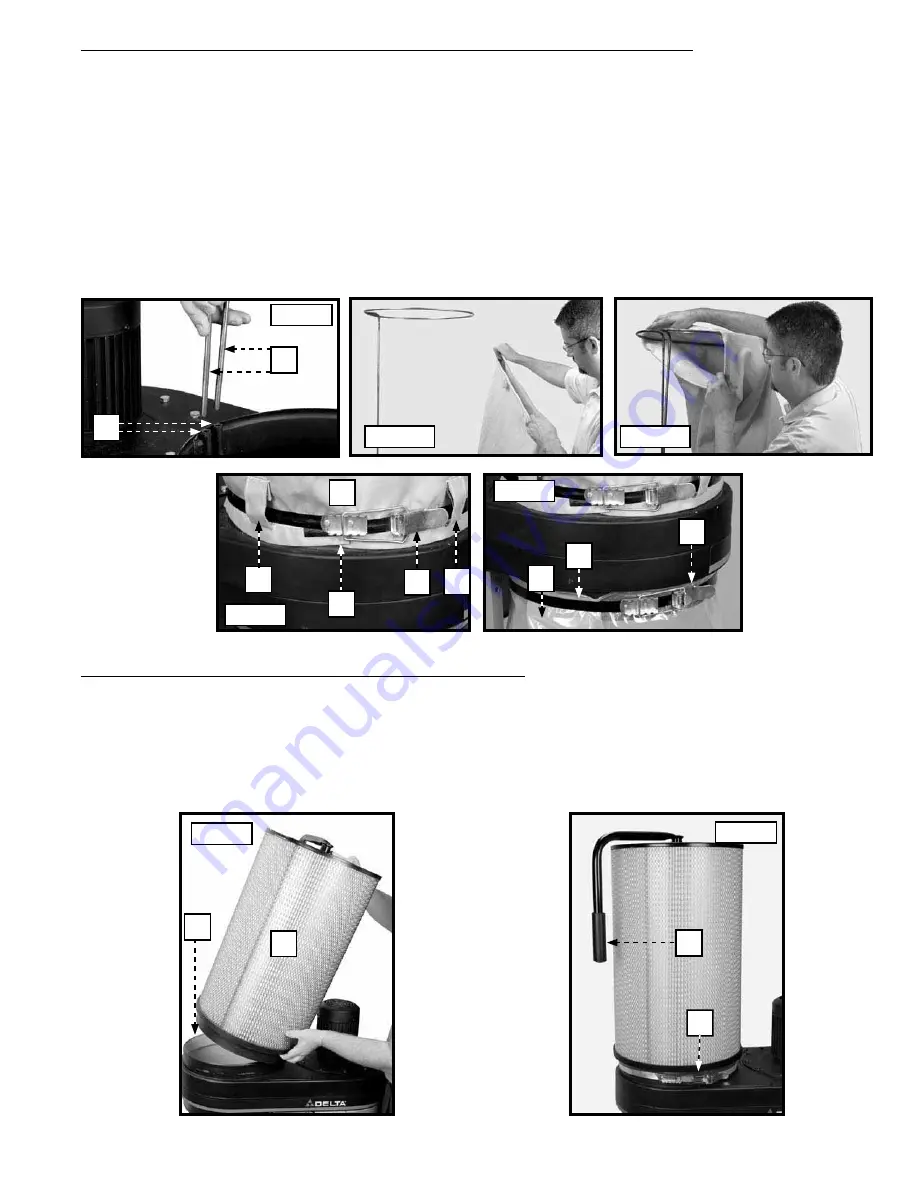
Insert the bag support rod (A) Fig 10 into the two holes (B) in the motor assembly.
2.
Since the diameter of the filter bag is smaller than the loop of the support rod, use both hands to flatten it
(Fig. 11).
3.
Place the filter bag over the support rod (Fig. 12).
4.
Place the locking band (H) Fig. 13 around the filter bag (F), and through the filter bag loops (L). Fasten the filter bag
to the drum by locking the clamp (J) Fig. 13.
IMPORTANT:
Position the band in the channel of the drum before you lock the clamp.
5.
Place the plastic collection bag (M) Fig. 14 and the remaining locking band (N) around the lower lip of the drum (Fig.
14). Ensure that the remaining locking band (N) Fig. 14 is in the belt loops of the dust collection bag (M). Fasten
with the locking clamp (O).
IMPORTANT:
Position the band in the channel of the drum before you lock the clamp
HOW TO ATTACH THE FILTER AND DUST COLLECTION BAGS TO THE DRUM
Fig. 10
Fig.13
Fig.14
L
J
H
F
O
N
A
B
L
M
Fig. 11
Fig. 12
HOW TO ATTACH THE 50-720 CT FILTER TO THE DRUM
Fig.14B
Fig.14C
If your unit is equipped with the 50-720 CT filter (A) Fig. 14B, place the filter over the lip of the motor assembly (B). Push
down to seat it correctly.
Attach the steel band belt (C) Fig. 14C around the base of the filter and tighten it as shown in Fig. 14C.
As with all filters, dust will collect on the inside of the cannister and the filtering action will be lessened. Every so often, grasp
the handle (D) Fig. 14C and turn it completely around several times. The dust will be loosened and will fall down into the col-
lection bag.
A
B
C
D


