5 - 5
5
Installation and Wiring
5.4 UPS
Installation
NOTE:
When handling or moving the UPS, please use appropriate equipment (e.g. forklift).
Please follow the steps below:
1
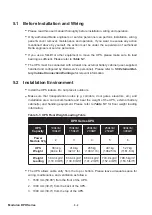
Before installing the UPS in a designated installation area, please double check
ZKHWKHUWKHDUHD¶VÀRRUZHLJKWORDGLQJLVVXႈFLHQWWREHDUWKH836H[WHUQDOEDWWHU\
cabinet(s) and handling equipment (e.g. forklift) to avoid accidents. For UPS floor
weight loading information, please refer to
7DEOH
.
2
After the UPS is moved to the designated installation area, use a #17 wrench to
VWDELOL]HWKH836IRXUOHYHOLQJIHHWRQWKHÀRRU3OHDVHQRWHWKDWWKH836PXVWVWDQG
RQWKHÀRRUVWDEO\DQGOHYHOO\ZLWKRXWDQ\WLSSLQJ
3
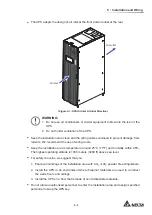
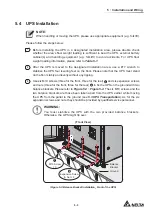
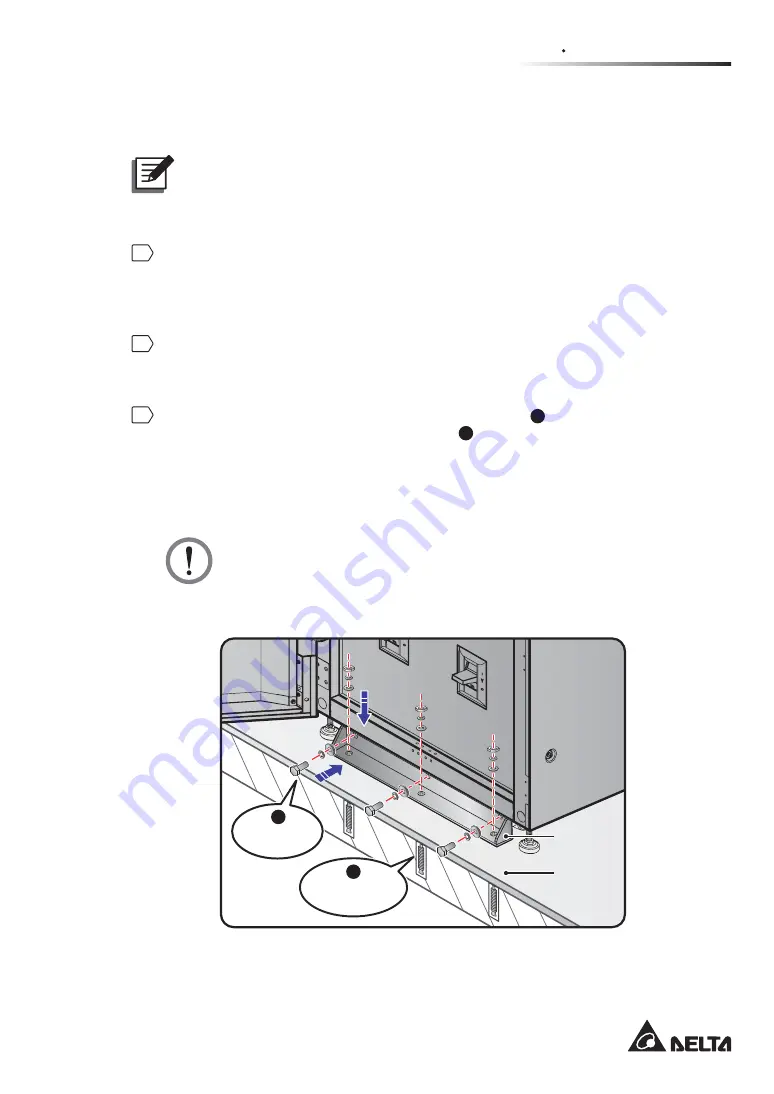
Use six M10 screws (three for the front, three for the rear)
1
and six expansion screws
and nuts (three for the front, three for the rear)
2
WR¿[WKH836RQWKHJURXQGZLWKWZR
balance brackets. Please refer to
)LJXUH
~
)LJXUH
. The six M10 screws and the
two balance brackets are those been taken apart from the UPS earlier while moving
the UPS from the pallet to the ground (see
8367UDQVSRUWDWLRQ
). As for the six
H[SDQVLRQVFUHZVDQGQXWVWKH\VKRXOGEHSURYLGHGE\TXDOL¿HGVHUYLFHSHUVRQQHO
WARNING:
You must stabilize the UPS with the two provided balance brackets.
Otherwise, the UPS might tip over.
BYP
ASS BREAKER
MANUAL
BYP
ASS BREAKER
(Front View)
Ground
Balance
Bracket
M10 Screw
× 3
1
Expansion Screw
& Nut × 3
2
)LJXUH%DODQFH%UDFNHW,QVWDOODWLRQB)URQWRIWKH836
Summary of Contents for DPH-300K
Page 8: ......
Page 14: ......
Page 60: ......
Page 76: ......
Page 227: ...8 1 8 Optional Accessories 8 Optional Accessories ...
Page 230: ......
Page 231: ...9 1 9 Maintenance Maintenance ...
Page 233: ...A1 1 Appendix 1 7HFKQLFDO 6SHFL FDWLRQV Technical 6SHFL FDWLRQV A1 A1 ...
Page 236: ......
Page 237: ...A2 1 Appendix 2 Warranty Warranty A2 A2 ...
Page 240: ... ...

