background image

17

Chapter 4    System Configurations

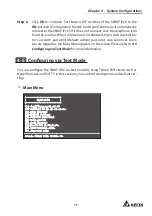
Step  6  Click OK to continue. Set the two DIP switches of the SNMP IPv6 to the 

ON position (Configuration Mode), and HyperTerminal will automatically 
connect to the SNMP IPv6). If it does not connect, click the telephone icon 
from the tool bar. When connection is established, log in with Administra-
tor’s account/ password (default: admin/ password, case sensitive). Once 
you are logged in, the Main Menu appears on the screen. Please refer to 

4-5 

Configuring via Text Mode

 for more information.

4-5

Configuring via Text Mode

You can configure the SNMP IPv6 via text mode by using Telnet/ SSH clients such as 
HyperTerminal and PuTTY. In this section, you can find descriptions and default set-
tings.


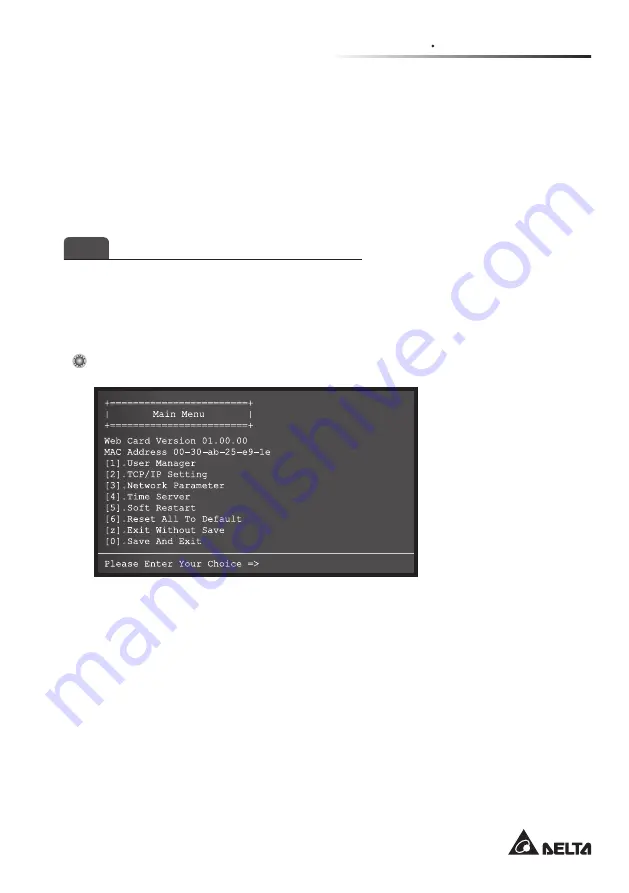
Main Menu

Web Card Version 01.00.00

MAC Address 00-30-ab-25-e9-1e

[1].User Manager

[2].TCP/IP Setting

[3].Network Parameter

[4].Time Server

[5].Soft Restart

[6].Reset All To Default

[z].Exit Without Save

[0].Save And Exit

Please Enter Your Choice =>

+========================+

|                        |

+========================+

Main Menu

Summary of Contents for InsightPower SNMP IPv6

Page 1: ...www deltapowersolutions com Delta InsightPower SNMP IPv6 for UPS User Manual The power behind competitiveness ...

Page 2: ...e of this product Any disposition duplication dissemination reproduction modification translation extraction or usage of this Manual in whole or in part is prohibited without the prior written permission of Delta Given that Delta will continuously improve and develop the product changes may be made to the information in this Manual at any time without obligation to notify any person of such revisi...

Page 3: ... 11 4 1 Configuring via InsightPower SNMP IPv6 for UPS Web 11 4 2 Configuring with EzSetting 13 4 3 Configuring via Telnet 15 4 4 Configuring through COM Port 15 4 5 Configuring via Text Mode 17 Chapter 5 InsightPower SNMP IPv6 for UPS Web 24 5 1 Monitor 25 5 1 1 Information 25 UPS Properties 25 Battery Parameters 26 In Out Parameters 26 Identification 26 Status Indication 27 ShutdownAgent 27 5 1 ...

Page 4: ...ecific Schedule 36 Event Level 37 5 3 System 38 5 3 1 Administration 38 User Manager 38 TCP IP 39 Web 40 Console 41 FTP 42 Time Server 42 Syslog 43 Batch Configuration 44 Upgrade 45 5 3 2 Notification 46 SNMP Access 46 SNMPv3 USM 46 SNMP Trap 47 Mail Server 48 Wake On LAN 50 Chapter 6 SNMP Device Firmware Upgrade 51 Chapter 7 Troubleshooting 54 Appendix A Specifications 61 Appendix B Warranty 62 ...

Page 5: ...mpt to fix replace internal components When repair is needed refer all servicing to the nearest Delta service center or authorized distributor z z Do not allow any objects or liquids of any kind to penetrate the unit z z Always follow this User Manual to install and operate this unit z z Do not play the included CD on a conventional CD player This could generate loud noise at a level that could re...

Page 6: ...via the SNMP IPv6 2 2 Features z z Network UPS management Allows remote management of the UPS from any workstation through Internet or Intranet z z Remote UPS monitoring via SNMP HTTP Allows remote monitoring of the UPS using SNMP NMS Delta MIB Management Information Base or a Web Browser z z UPS and system function configuration from any client password protected Set the UPS and system parameters...

Page 7: ...D 02 C 000624 2 3 Package Contents Please carefully verify the SNMP IPv6 and the included accessories Contact your dealer if any item is missing or damaged Should you return the items for any rea son ensure that they are carefully repacked using the original packing materials came with the unit 3 1 2 5 4 No Item Quantity 1 InsightPower SNMP IPv6 for UPS 1 PC 2 RJ45 to DB9 cable 1 PC 3 Software Use...

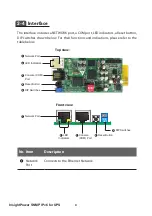
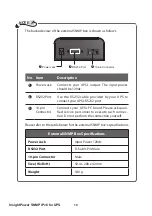
Page 8: ...s shown below For their functions and indications please refer to the table below Top view 1 Network Port 2 LED Indicators 3 Console COM Port 4 Reset Button 5 DIP Switches 1 2 ON Front view 1 Network Port 2 LED Indicators 3 Console COM Port 4 Reset Button 5 DIP Switches No Item Description 1 Network Port Connects to the Ethernet Network ...

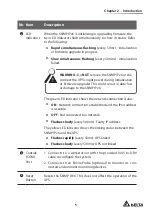
Page 9: ... loss or damage to the SNMP IPv6 The green LED indicator shows the network connection status z z ON Network connection established and the IPv4 address is useable z z OFF Not connected to a network z z Flashes slowly every 500ms Faulty IP address The yellow LED indicator shows the linking status between the SNMP IPv6 and the UPS z z Flashes rapidly every 50ms UPS linked z z Flashes slowly every 50...

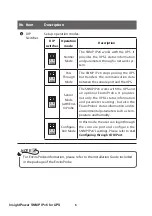
Page 10: ...ort and the UPS 1 2 ON Sensor Mode with Envi roProbe The SNMP IPv6 works with the UPS and an optional EnviroProbe It provides not only the UPS s status information and parameter readings but also the EnviroProbe s status information and its environmental parameters such as tem perature and humidity 1 2 ON Configura tion Mode In this mode the user can login through the console port and configure th...

Page 11: ...f your UPS does not have any SNMP slot please install it in an optional external SNMP box z z Please follow the procedures below to install the SNMP IPv6 into your UPS s SNMP slot Step 1 Remove the cover and the two screws shown from the UPS s SNMP slot see Figure 3 a UPS SNMP slot Figure 3 a NOTE Please note that due to different design the location of screws for each UPS s SNMP slot might be dif...

Page 12: ...ollow the location of screw holes on the SNMP slot to select the suit able cover and use the two screws that you just removed to fix the cover on the SNMP slot see Figure 3 d Figure 3 d z z Please follow the procedures below to install the SNMP IPv6 into an external SNMP box Step 1 Remove the two screws shown from the external SNMP box see Fig ure 3 e SNMP slot External SNMP box Figure 3 e ...

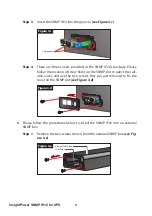
Page 13: ...SNMP IPv6 into the grooves see Figure 3 g Two grooves Figure 3 g Step 4 There are three covers provided in the SNMP IPv6 s package Please follow the location of screw holes on the external SNMP box to select the suitable cover and use the two screws that you just removed to fix the cover on the external SNMP box see Figure 3 h Figure 3 h ...

Page 14: ...e the RS232 cable provided by your UPS to connect your UPS s RS232 port 3 10 pin Connector Connects your UPS s PC board Please ask quali fied service personnel to execute such connec tion Do not perform the connection yourself Please refer to the table below for the external SNMP box s specifications External SNMP Box Specifications Power Jack Input Power 12Vdc RS232 Port D Sub 9 Pin Male 10 pin C...

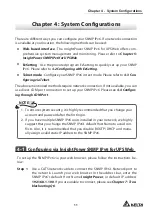
Page 15: ...ct COM port connection to set up your SNMP IPv6 Please see 4 4 Configur ing through COM Port NOTE 1 To ensure system security it is highly recommended that you change your account and password after the first login 2 If you have multiple SNMP IPv6 units installed in your network we highly suggest that you change the SNMP IPv6 s default Host Name to avoid con flicts Also it is recommended that you ...

Page 16: ...rmission for the account types is shown as follows 1 Administrator Allowed to modify all settings 2 Device Manager Allowed to modify device related settings 3 Read Only User Only allowed to view settings without the permis sion to make changes You can manually specify whether users are allowed to log in from other LANs If you wish to block login attempts from external connections select Only in Th...

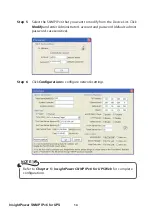
Page 17: ...ches of the SNMP IPv6 are set to the OFF posi tion Normal Mode to enable network communication Make sure the workstation and the SNMP IPv6 are on the same LAN Step 3 Insert the provided CD in the CD ROM drive From the root directory launch EzSetting Step 4 Click Discover to search all available SNMP devices on the LAN A list of devices will be shown NOTE 1 If you want to search SNMP devices in a d...

Page 18: ...nt to modify from the Device List Click Modify and enter Administrator s account and password default admin password case sensitive Step 6 Click Configuration to configure network settings NOTE Refer to Chapter 5 InsightPower SNMP IPv6 for UPS Web for complete configurations ...

Page 19: ...assword case sensitive The Main Menu will appear on the screen Please refer to 4 5 Configuring via Text Mode for more information NOTE 1 The SNMP IPv6 terminates idle connections after 60 seconds 2 Refer to Chapter 5 InsightPower SNMP IPv6 for UPS Web for complete configurations 4 4 Configuring through COM Port If a network connection is not available at your location you can still set up the SNMP...
Page 20: ...indows Vista and later ver sions If your operation system does not include the program a free alterna tive Telnet SSH client PuTTY can be downloaded from http www putty org Step 4 Enter a name choose an icon for the connection and click OK From the drop down menu Connect using select the COM port that is connected to the SNMP IPv6 Step 5 Click Configure and set up COM port parameters as follows ...

Page 21: ... sensitive Once you are logged in the Main Menu appears on the screen Please refer to 4 5 Configuring via Text Mode for more information 4 5 Configuring via Text Mode You can configure the SNMP IPv6 via text mode by using Telnet SSH clients such as HyperTerminal and PuTTY In this section you can find descriptions and default set tings Main Menu Web Card Version 01 00 00 MAC Address 00 30 ab 25 e9 ...

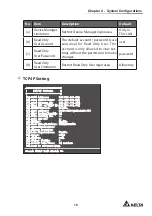
Page 22: ...o Item Description Default 1 RADIUS Auth Specify whether RADIUS login is al lowed Disable 2 Server The RADIUS server name 3 Secret The RADIUS secret 4 Port The RADIUS port number 1812 5 Administrator Account The default account password for the Administrator case sensitive admin 6 Administrator Password password 7 Administrator Limitation Restrict Administrator login area Only in This LAN 8 Device...

Page 23: ...Limitation Restrict Read Only User login area Allow Any TCP IP Setting 1 IPv4 Address 192 168 001 100 2 IPv4 Subnet Mask 255 255 255 000 3 IPv4 Gateway IP 192 168 001 254 4 IPv4 DNS or WINS IP 192 168 001 001 5 DHCPv4 Client Enable 6 IPv6 Address fe80 230 abff fe25 900 7 IPv6 Prefix Length 64 8 IPv6 Gateway IP 9 IPv6 DNS IP a DHCPv6 Enable b Host Name NetBIOS INSIGHTPOWER c System Contactor d Syst...

Page 24: ... IPv6 gateway s IP address 9 IPv6 DNS IP IPv6 Domain Name Server s IP address a DHCPv6 Enable Disable DHCPv6 protocol Enable b Host Name NetBIOS The Host Name for the SNMP IPv6 INSIGHTPOWER c System Contact The System Contact information d System Location The System Location information e Auto Negotiation Enable disable automatic transfer rate 10 100Mbps negotiation Enable f Speed If the Auto Nego...

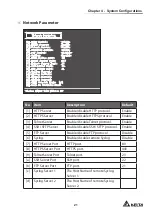
Page 25: ...net Server Port 23 a SSH Server Port 22 b FTP Server Port 21 c Syslog Server1 d Syslog Server2 e Syslog Server3 f Syslog Server4 g SNMP Get Set Port 161 0 Back To Previous Menu Please Enter Your Choice Network Parameter No Item Description Default 1 HTTP Server Enable disable HTTP protocol Enable 2 HTTPS Server Enable disable HTTPS protocol Enable 3 Telnet Server Enable disable Telnet protocol Ena...

Page 26: ...eed to start up a time server service on your workstation please refer to Chapter 7 Troubleshooting Q1 1 Time Selection SNTP 2 Time Zone 0 hr 3 1st Time Server POOL NTP ORG 4 2nd Time Server 5 Manual Date 01 01 2000 MM DD YYYY 6 Manual Time 00 00 00 hh mm ss 0 Back To Previous Menu Please Enter Your Choice Time Server No Item Description Default 1 Time Selection SNTP or manual SNTP 2 Time Zone Adj...

Page 27: ...nfigurations Soft Restart Reset the SNMP IPv6 This will not affect the operation of the UPS Default Reset Reset to manufacture default Exit Without Saving Exit and ignore changes Save and Exit Preserve your changes and exit ...

Page 28: ...InsightPower or https 192 168 1 100 Step 3 When connection is established the login page appears Enter your ac count and password default admin password http 192 168 1 100 NOTE 1 If you have previously changed the SNMP IPv6 s Host Name or IP address please connect with new settings 2 If the login page is accessible but you are unable to log in with correct account and password additional network c...

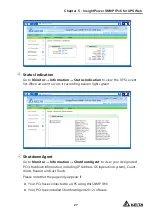
Page 29: ...nd Environment these three items 5 1 1 Information This includes the information of UPS Properties Battery Parameters In Out Param eters Identification Status Indication and ShutdownAgent Please note that since different UPSs provide different information the UPS that you have may not display the same web page UPS Properties Go to Monitor Information UPS Properties to see a status overview of the ...

Page 30: ... Measurement Battery Replacement Date http 192 168 1 100 In Out Parameters Go to Monitor Information In Out Parameters to view the information of Input Measurement Bypass Measurement Output Measurement and Outlet Bank http 192 168 1 100 Identification Go to Monitor Information Identification to view the information of Identification and UPS Rating ...

Page 31: ...s according beacon lights green http 192 168 1 100 ShutdownAgent Go to Monitor Information ShutdownAgent to view your designated PCs shutdown information including IP Address OS operation system Count down Reason and Last Touch Please note that the page only appears if z z Your PCs have connected to a UPS using this SNMP IPv6 z z Your PCs have installed ShutdownAgent 2012 software ...

Page 32: ...rom Event Level s pull down menu http 192 168 1 100 5 1 2 History Event Log Go to Monitor History Event Log Page 1 2 3 4 to see events that occur The existing ones are overwritten when the maximum number of entries 1 000 is reached You can also download the entire event log archive event_ log xls recorded during an assigned period of time on your computer http 192 168 1 100 ...

Page 33: ...s saved in the UPS and replies to the user through network Please note that this op tion only appears when the UPS supports this function and the event logs saved in the UPS may be different from the event logs saved in the SNMP IPv6 Data Log Go to Monitor History Data Log to see all saved device data You can also download the data archive data_log xls recorded during an assigned pe riod of time o...

Page 34: ... an event data entry is recorded 5 1 3 Environment Only when an EnviroProbe is used can the Environment page show up Please note that the SNMP IPv6 s DIP switch 1 should be set to the ON position and DIP switch 2 should be set to the OFF position when you use an EnviroProbe The Environment page includes Information and Configuration these two items You can monitor and set up your EnviroProbe via t...

Page 35: ...see your EnviroProbe s Sen sor Information Input Contacts and Contact Setting http 192 168 1 100 Configuration Go to Monitor Environment Configuration to configure your EnviroP obe s Warning Threshold Alarm Threshold Title and Type Please see the table below for detailed information http 192 168 1 100 ...

Page 36: ...n about OpenSSL toolkit and licenses http 192 168 1 100 5 2 Device 5 2 1 Management Since different UPSs have different functions your UPS may not support the same configurations or control items stated below Configure Go to Device Management Configure to configure the UPS The con figuration values are saved in the UPS or in the SNMP IPv6 and these values change UPS operation The configuration ite...

Page 37: ...he UPS to enable the UPS s voltage sensitivity function z z Transfer Voltage After you click Submit to confirm your transfer voltage setup the SNMP IPv6 will send the command to the UPS to enable the relevant functions z z Low Battery This configuration saves the setup values in the SNMP IPv6 and compares with the values received from the UPS If the received battery level is lower than the assigne...

Page 38: ...y in the UPS z z Bypass Transfer Frequency After you set a tolerance of bypass transfer frequency and confirm your set up the SNMP IPv6 will send the command to the UPS If the UPS transfers to bypass mode and the bypass frequency is out of the tolerance output will be turned off and critical loads will be protected z z Bypass Transfer Voltage After you set a tolerance of bypass transfer voltage an...

Page 39: ...nfirm your setup the SNMP IPv6 will send the command to the UPS to shut down or and restart the UPS If you want to shutdown the UPS please check the UPS Shutdown Delay box and key in delay time If you want to restart the UPS please check the UPS Restart Delay box and key in delay time If you want to shutdown and restart the UPS please check both of the box es and key in according delay time z z Sm...

Page 40: ...t all of the connected software and verify whether they work properly or not Please note that the simulation won t influence UPS operation the UPS remains in its original operation mode and won t transfer to battery mode Weekly Schedule Go to Device Management Weekly Schedule to arrange a weekly sched ule for the UPS You can select No Action Shutdown Restart 10 Second Test and set up what day and ...

Page 41: ...Web http 192 168 1 100 Event Level Go to Device Management Event Level to set up a level for an event If you want to receive an event notification please refer to 5 3 2 Notification SNMP Trap and 5 3 2 Notification Mail Server http 192 168 1 100 ...

Page 42: ...stration page includes User Manager TCP IP Web Console FTP Time Server Syslog Batch Configuration and Upgrade these nine selections User Manager The SNMP IPv6 supports RADIUS Check the Use RADIUS box key in required information including Server Secret and Port default 1812 and click Submit to enable RADIUS You can define service types for Administrator Device Man ager and Read Only User If RADIUS ...

Page 43: ... dotted format 3 Subnet Mask The Subnet Mask for your network 4 Gateway IP The IP address for network gateway in dotted format 5 DNS IP The IP address Domain Name Server in dotted format 6 Search Domain If the Host Name you provided cannot be found the system appends the search domain to your Host Name z z TCP IP Settings for IPv6 1 DHCP Client Enable Disable DHCP If enabled DHCP server automati c...

Page 44: ...cation System location information z z Link 1 Auto Negotiation Enable Disable automatic transfer rate 10 100M bps negotiation 2 Speed If the Auto Negotiation is disabled you can specify the transfer rate 3 Duplex If the Auto Negotiation is disabled you can specify the duplex mode Web This allows Administrator to enable disable HTTP HTTPS communication pro tocols http 192 168 1 100 z z Web 1 HTTP E...

Page 45: ...be used to encrypt and secure the integrity of transmitting data 2 Certificate File This allows you to replace your own SSL certificate file The SNMP IPv6 supports PEM format which is generated by OpenSSL Click Choose File to upload a certificate file NOTE For more information about generating a private SSL certificate file please refer to Chapter 7 Troubleshooting Q12 or visit http www openssl or...

Page 46: ...rate DSA RSA and Authentication Public keys for SSH please refer to Chapter 7 Troubleshooting Q13 You can use this page or SFTP protocol to upload key files For detailed information please refer to Chapter 7 Troubleshooting Q14 FTP This allows Administrator to enable disable FTP communication protocol http 192 168 1 100 z z FTP Enable disable FTP connection z z FTP Port Assign an FTP port number d...

Page 47: ...light Saving Check to enable daylight saving time During this period the SNMP IPv6 adjusts time forward one hour z z Manual If a time server is not accessible you can still manually set time and date Please note that every time you restart the SNMP IPv6 s network module time and date is reinstated to previous assigned settings Syslog Syslog is used to store the event log on remote Syslog servers T...

Page 48: ...ting configura tion files from the SNMP IPv6 that you have successfully configured and import the configuration files on other devices http 192 168 1 100 z z System Configuration The System Configuration includes settings saved in the Device and System tabs To download a configuration file simply click Download To upload a configuration file click Choose File select the file you wish to up load an...

Page 49: ...SNMP Configuration includes settings saved in the Notification tab To download a configuration file simply click Download To upload a con figuration file click Choose File select the file you wish to upload and click Upload NOTE If you need to modify the command lines please do not delete the un modified ones They should be left intact to assure the integrity of the configuration file Upgrade The ...

Page 50: ...esses that are allowed to access their community strings and access levels The maximum number of IP entries is 256 NOTE If IP address 0 0 0 0 is enlisted the NMS IP access restriction is ignored The SNMP IPv6 checks the community string to identify the access level and permission according to your setting SNMPv3 USM SNMPv3 offers features such as the encryption of packets and authentication to imp...

Page 51: ...nment To enable SNMP Trap you must add Target IP addresses to the Target IP list Specify the Community String Trap Type MIB SNMPv3 User Name Trap port Event Level SNMP Port for ShutdownAgent and click Add If you wish to update or delete a Target IP address specify the IP address in the Target IP list and click Update or Delete http 192 168 1 100 ...

Page 52: ...o event notifications are sent to the target address z z Information All event notifications are sent to the target address z z Warning Both Warning and Alarm event notifications are sent to the target address z z Alarm Only Alarm event notifications are sent to the target address z z ShutdownAgent All event notifications are sent to the target ad dress and you can go to Monitor Information Shutdo...

Page 53: ...me or IP If a Host Name is entered a DNS IP should be added in TCP IP Please see 5 3 1 Administration TCP IP z z Account The mail server login account z z Password The mail server login password z z Receiver The recipients E mail addresses z z Event Level Select the Event Level that when triggered an E mail notification is sent to the corresponding recipient 1 Information All event notifications a...

Page 54: ... On LAN Wake On LAN function can start up clients PCs from network with MAC address and you can set up at maximum 256 MAC addresses The configuration can wake up clients PCs after power restores or the SNMP IPv6 starts up http 192 168 1 100 ...

Page 55: ...sly perform a firmware up grade on your SNMP devices via LAN Please refer to the following instructions Step 1 The subnet mask allows you to define the device discovery range in the specified subnets Make sure the SNMP device you wish to upgrade is in the subnet that is specified If it is not please modify the subnet and sub net mask ...

Page 56: ...52 InsightPower SNMP IPv6 for UPS Step 2 Click Discover A list of SNMP devices is shown Step 3 Select a device from the Device List click Modify and enter Administra tor account and password ...

Page 57: ...to select a valid firmware binary file Verify the firmware version shown under File Information and then click Upgrade Now to continue Step 5 The upgrade process should take about 20 seconds Step 6 When the upgrade is completed the following dialog box appears It takes about 1 minute for the device to reboot ...

Page 58: ...D set ting on the SNMP IPv6 and the UPS is consistent C ping 172 16 186 230 Pinging 172 16 186 230 with 32 bytes of data Reply from 172 16 186 230 bytes 32 time 2ms TTL 64 Reply from 172 16 186 230 bytes 32 time 2ms TTL 64 Reply from 172 16 186 230 bytes 32 time 2ms TTL 64 Reply from 172 16 186 230 bytes 32 time 4ms TTL 64 Ping statistics for 172 16 186 230 Packets Sent 4 Received 4 Lost 0 0 loss ...

Page 59: ... prompt mode After that you can now connect to the SNMP IPv6 by its Host Name Please also ensure that the Host Name assigned to the SNMP IPv6 does not ex ceed 16 bytes Q5 How to check my workstation s IP address For Windows please enter ipconfig all in DOS prompt mode For UNIX please enter ifconfig in shell You should be able to check your IP and MAC Physical Address now Physical Address 00 23 4D ...

Page 60: ...ersists use a network cable to cross link your SNMP IPv6 and the workstation Ping the SNMP IPv6 s default or static IP address ac cording to your configurations If a ping response is successfully received indicating that the SNMP IPv6 is working properly check your network equipment If not contact your local dealer or service personnel for assis tance Q7 Unable to perform an SNMP Get command Refer...

Page 61: ...mation regarding IPv6 compatibility please visit IETF http tools ietf org html or IPv6 Ready Logo Program http www ipv6ready org Q12 How to generate a private SSL certificate file in PEM format for HTTPs connection To ensure connection security between the SNMP IPv6 and your worksta tion you can create your own SSL certificate file Please download and install OpenSSL Toolkit from http www openssl ...

Page 62: ...Select SSH 2 RSA from the Parameters area and click Key Generate key pair to generate a RSA key 4 Click Conversions Export OpenSSH Key and assign a filename to the RSA key Please ignore it when prompted to provide key passphrase 5 Select SSH 2 DSA from the Parameters clickt Key Generate key pair to generate a DSA key 6 Click Conversions Export OpenSSH Key and assign a filename to the DSA key Pleas...

Page 63: ...s firmware upgrade package binary Appears on specific devices only Upload files to their respective directories Make sure the filenames do not contain non English characters to avoid read error Overwrite existing files if prompted by your SFTP client Q15 How to test SNMPv3 in Linux Before you can access the SNMP OID Object Identifier via SNMPv3 protocol the SNMPv3 USM table must be organized Pleas...

Page 64: ...ord which is assigned from SNMPv3 USM table n The Context Name which is assigned from SNMPv3 USM table t Timeout in seconds ip The IP address of the SNMP IPv6 oid The next available SNMP OID for example 1 3 6 1 2 1 1 1 0 Please refer to the RFC1213 MIB ...

Page 65: ...ion RJ 45 jack connector 10 100M Physical Size W x D 130 mm x 60 mm Weight 75 g Environmental Operating Temperature 0 60 Storage Temperature 40 125 Operating Humidity 0 90 Non condensing NOTE Refer to the rating label for the safety rating All specifications are subject to change without prior notice Appendix A Specifications ...

Page 66: ... irresistible force i e war fire natural disaster etc and this warranty also expressly excludes all incidental and consequen tial damages Maintenance service for a fee is provided for any damage out of the warranty period If any maintenance is required please directly contact the supplier or Seller WARNING The individual user should take care to determine prior to use whether the environment and t...

Page 67: ......

Page 68: ......

Reviews: