background image

10

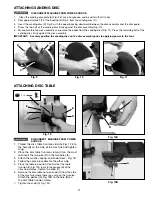
ATTACHING MACHINE TO STAND

DISCONNECT MACHINE FROM POWER
SOURCE.

1.

Pull the belt (A) Fig. 8 down through the smaller
rectangular hole (B) in the top shelf of the stand.

2.

Fasten the machine to the top shelf with four 5/16" x
1/2" bolts and lockwashers (C) Fig. 8 (three of which
are shown) and four #10-32 self-tapping screws and
washers (D). (The motor was removed for easier
viewing here.)

10

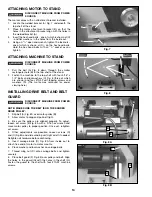
ATTACHING MOTOR TO STAND

DISCONNECT MACHINE FROM POWER
SOURCE.

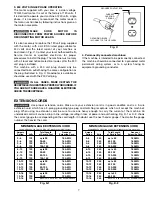
The motor comes with an attachment bracket installed.
1.

Locate the welded bracket (A) Fig. 7 underneath the
top shelf of the stand.

2.

Place the motor attachment bracket (B), so that the
holes in the attachment bracket align with the holes in
the welded bracket (A).

3.

Insert the hex head bolts - one of which is shown at (C)
- and flat washers, in the holes from the inside out.

4.

Using an 

11

/

16

" open end wrench, tighten the locknuts -

one of which is shown at (D) - on the hex head bolts.
Hold the hex head bolts with an 

11

/

16

" socket as you

tighten.

Fig. 8

A

B

C

D

INSTALLING DRIVE BELT AND BELT
GUARD

DISCONNECT MACHINE FROM POWER
SOURCE.

NOTE: MAKE SURE THE BELT IS ON THE SANDER
DRIVE PULLEY.

1.

Slip belt (A) Fig. 8A, over motor pulley (B).

2.

Allow motor to drop and pull belt tight.

3.

Be sure the pulleys are aligned properly. To adjust,

loosen set screw (E) Fig. 8A with a 3/16 hex wrench and
move motor pulley to proper position. Once set, retighten
set screw.

4.

Other adjustments are possible. Loosen screws (D)

and (C) Fig 8A and slide sanding unit right or left if needed.
Retighten all hardware before continuing.

5.

Insert carriage bolts (C) Fig. 8A from inside out to

attach free end of motor to motor mounts.

6.

Place washer and lockwasher on carriage bolts.

7.

Thread wing nut (D) onto carriage bolts and tighten

securely.

8.

Place belt guard (F) Fig. 8B over pulley and belt. Align

the holes in the guard (G) with the holes in the shelf (H).
Fasten the guard to the shelf with four #10-32 machine
screws.

A

B

C

D

D

Fig. 7

Fig. 8A

Fig. 8B

E

B

A

C

D

F

H

G

Summary of Contents for (Model 31-300)

Page 1: ...005 Delta Machinery To learn more about DELTA MACHINERY visit our website at www deltamachinery com For Parts Service Warranty or other Assistance please call 1 800 223 7278 In Canada call 1 800 463 3...

Page 2: ...stal Mail Technical Service Manager Delta Machinery 4825 Highway 45 North Jackson TN 38305 IN CANADA 505 SOUTHGATE DRIVE GUELPH ONTARIO N1H 6M7 Information regarding the safe and proper operation of t...

Page 3: ...EMS The symbols below are used to help you recognize this information SAFETY GUIDELINES DEFINITIONS SOME DUST CREATED BY POWER SANDING SAWING GRINDING DRILLING AND OTHER CONSTRUCTION ACTIVITIES contai...

Page 4: ...the machine and or injury may result 13 USE RECOMMENDED ACCESSORIES The use of accessories and attachments not recommended by Delta may cause damage to the machine or injury to the user 14 USE THE PR...

Page 5: ...lip could cause a hand to move into the abrasive disc or belt 12 MAINTAIN A MAXIMUM CLEARANCE OF 1 16 be tween the table and the abrasive disc The workpiece could be drawn into the space between the a...

Page 6: ...with a metal screw NOTE In Canada the use of a temporary adapter is not permitted by the Canadian Electric Code IN ALL CASES MAKE CERTAIN THE RECEPTACLE IN QUESTION IS PROPERLY GROUNDED IF YOU ARE NO...

Page 7: ...NSION CORDS Use proper extension cords Make sure your extension cord is in good condition and is a 3 wire extension cord which has a 3 prong grounding type plug and matching receptacle which will acce...

Page 8: ...Table 5 Motor 6 Knob 2 7 Clamp 2 8 7 16 Washer 2 9 Spring 2 10 Stud 2 11 Handle 1 12 3 8 Washer 1 13 Tension Spring 1 14 3 8 Hex Nut 1 15 3 8 Lock Nut 1 16 Stud 1 1 2 3 4 5 Fig 2 Fig 3 19 NOTICE THE...

Page 9: ...Head Bolt 2 36 Pointer and 10 32 Round Head Screw 37 Sanding Center 21 22 23 24 25 26 29 30 31 32 33 34 35 28 27 37 ASSEMBLY ASSEMBLY TOOLS REQUIRED Phillips Head Screwdriver not supplied 11 16 3 4 an...

Page 10: ...h is shown at D on the hex head bolts Hold the hex head bolts with an 11 16 socket as you tighten Fig 8 A B C D INSTALLING DRIVE BELT AND BELT GUARD DISCONNECT MACHINE FROM POWER SOURCE NOTE MAKE SURE...

Page 11: ...Fig 13B to the hole B on the disc table trunnion clamp 7 Tighten the knob C Fig 13A Fig 12 A B C D D E E Fig 13A A B C ATTACHING DISC TABLE DISCONNECT MACHINE FROM POWER SOURCE 1 Clean the sanding dis...

Page 12: ...down position Fig 16 Fig 17 A A 12 DISCONNECT MACHINE FROM POWER SOURCE 1 Insert the trunnion key A Fig 14 into the slot on the side of the sanding arm B 2 Thread the stud C into the hole D on the sid...

Page 13: ...ing to one side or the other very gently turn the tracking knob E Fig 20 clockwise to move the belt to the right or counterclockwise to move the belt to the left 5 A final adjustment can be made with...

Page 14: ...ig 24 on the table against the belt See if the table is 90 degrees to the belt 3 To adjust loosen the table tilting lock handle A Fig 23 Turn the adjusting screw F in or out until table is 90 degrees...

Page 15: ...1 use the table E or the accessory backstop to support the work Fig 27 Fig 31 Fig 30 1 Position the table A Figs 27 and 28 90 degrees to the belt Place a square B in the miter gauge slot with the blad...

Page 16: ...degrees to the disc 3 To adjust loosen the lock handle A Fig 32 and tighten or loosen the screw F Fig 32 until the table is 90 degrees to the disc 4 The stop F Fig 32 ensures that the table can rapid...

Page 17: ...Fig 39 REPLACING SANDING DISC See ATTACHING SANDING DISC section in this manual DISCONNECT MACHINE FROM POWER SOURCE DISCONNECT MACHINE FROM POWER SOURCE POWER TAKE OFF SHAFT 1 A power take off shaft...

Page 18: ...LT B TO AVOID TRAPPING THE WORKPIECE OR YOUR FINGERS BETWEEN THE TABLE AND THE SANDING BELT Fig 46 SANDING INSIDE CURVES You can sand inside curves on the top sanding drum Fig 46 if you loosen the kno...

Page 19: ...ATION SIDE OF THE SANDING DISC COULD CAUSE THE WORKPIECE TO FLY UP WHICH COULD BE HAZARDOUS THE EDGE OF THE TABLE C FIG 48 MUST BE POSITIONED A MAXIMUM OF 1 16 AWAY FROM THE SANDING DISC B TO AVOID TR...

Page 20: ...r All plastic parts should be cleaned with a soft damp cloth NEVER use solvents to clean plastic parts They could possibly dissolve or otherwise damage the material Wear ANSI Z87 1 safety glasses whil...

Page 21: ...ter or authorized service station with proof of purchase of the product within two years and provides Delta with reasonable opportunity to verify the alleged defect by inspection For all refurbished D...

Page 22: ...22 NOTES...

Page 23: ...23 NOTES...

Page 24: ...F brica Porter Cable Delta m s cercano ARIZONA Phoenix 85013 2906 4501 N 7th Ave Phone 602 279 6414 Fax 602 279 5470 CALIFORNIA Ontario 91761 Los Angeles 3949A East Guasti Road Phone 909 390 5555 Fax...

Reviews: