background image

88741    Rev. D

Clean and Care

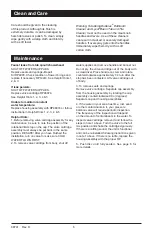
Care should be given to the cleaning

of this product. Although its finish is

extremely durable, it can be damaged by

harsh abrasives or polish. To clean, simply

wipe gently with a damp cloth and blot dry

with a soft towel.

Warning: 

Scrubbing Bubbles

®

 Bathroom

Cleaner and Lysol

®

Basin Tub and Tile

Cleaner

 must not be used on the clear knob

handles and levers. Use of these cleaners

can result in cracked or severely damaged

handles. If overspray gets onto the handles,

immediately wipe them dry with a soft

cotton cloth. 

Maintenance

Faucet leaks from tub spout/showerhead:

SHUT OFF WATER SUPPLIES.

Replace seats and springs–Repair

Kit RP4993. Check condition of lower O-rings and

replace if necessary RP14414. See Helpful Hints 1,

2, & 3.

If leak persists:

SHUT OFF WATER SUPPLIES.

Replace valve cartridge RP46074.

See Helpful Hints 1, 2, 3, 4 & 5

Unable to maintain constant

water temperature:

Replace housing assembly with RP46074 or follow

instructions in Helpful Hints 1, 2, 3, 4 & 5.

Helpful Hints:

1. Before removing valve cartridge assembly for any

maintenance, be sure to note the position of the

rotational limit stop on the cap. The valve cartridge

assembly must always be put back in the same

position. BE SAFE! After you have finished the

installation, turn on valve to make sure COLD

WATER FLOWS FIRST.
2. To remove valve cartridge from body, shut off

water supplies and remove handle and bonnet nut. 

Do not pry the valve cartridge out of the body with 

a screwdriver. Place handle on stem and rotate

counterclockwise approximately 1/4 turn after the

stop has been contacted. Lift valve cartridge out

of body.
3. To remove seats and springs.

Remove valve cartridge. Separate cap assembly

from the housing assembly by rotating the cap

assembly counterclockwise 90 o (degrees).

Separate cap and housing assemblies.
4. If the water in your area has lime, rust, sand

or other contaminants in it, your pressure

balance valve will require periodic inspection.

The frequency of the inspection will depend

on the amount of contaminants in the water. To

inspect valve cartridge remove it and follow the

steps in note 1 above. Turn the valve to the full

mix position and shake the cartridge vigorously.

If there is a rattling sound, the unit is functional

and can be reinstalled following instructions given

in note 1 above. If there is no rattle, replace the

housing assembly with the proper RP.
5. Push disc until fully seated. See page 6 for 

more details

6

Summary of Contents for Modern Monitor MultiChoice T14040

Page 1: ...w to properly make these adjustments please refer to page 6 and if still uncertain call us at 1 800 345 DELTA After installation and adjustment you must affix your name company name and the date you a...

Page 2: ...NY SHALL NOT BE LIABLE FOR ANY SPECIAL INCIDENTAL OR CONSEQUENTIAL DAMAGES INCLUDING LABOR CHARGES FOR BREACH OF ANY EXPRESS OR IMPLIED WARRANTY ON THE FAUCET Some states provinces do not allow the ex...

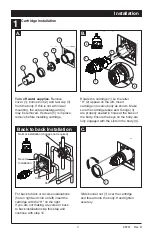
Page 3: ...cartridge tubes and O rings 3 are properly seated in holes at the base of the body Ensure the keys on the body are fully engaged with the slots in the body 4 Back to back Installation C For back to b...

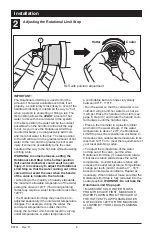
Page 4: ...The Rotational Limit Stop may need to be re adjusted seasonally if the inlet water temperature changes For example during the winter the cold water temperature is colder than it is during the summer w...

Page 5: ...e cartridge body and O ring Using an Allen wrench to secure the set screw 1 install the handle 2 onto the stem Insert plug button 3 if your model has one into set screw hole Secure the escutcheon 1 to...

Page 6: ...t stop on the cap The valve cartridge assembly must always be put back in the same position BE SAFE After you have finished the installation turn on valve to make sure COLD WATER FLOWS FIRST 2 To remo...

Page 7: ...mbios estacionales ADVERTENCIA No instale un aparato de corte o cierre en cualquiera de las tomas de esta v lvula Cuando este tipo de aparato cierra el flujo de agua puede hacer fallar la habilidad de...

Page 8: ...NDO LOS GASTOS DE MANO DE OBRA POR EL INCUMPLIMIENTO DE CUALQUIER GARANT A EXPRESA O IMPL CITA DE LA LLAVE DE AGUA Algunos estados provincias no permiten la exclusi n o limitaci n de da os especiales...

Page 9: ...s aros O 3 est n apropiadamente sentados en los agujeros en la base del cuerpo de la v lvula Aseg rese que la parte dentada en el cuerpo de la pieza encaje completamente en las muescas de ste 4 Instal...

Page 10: ...0 F El Tope que Limita la Rotaci n puede requerir el ajuste estacional si la temperatura del agua cambia Por ejemplo durante el invierno la temperatura del agua fr a es m s fr a que durante el verano...

Page 11: ...el cuerpo de la pieza y el aro O una llave Allen para fijar el tornillo de ajuste 1 Insertar el bot n obturador 3 si su modelo tiene uno en el agujero de tornillo de ajuste Fije la roseta con orificio...

Page 12: ...erle cualquier servicio f jese en la posici n del tope del l mite rotacional ubicado en la tapa Siempre se debe reponer el ensamble de cartucho de v lvula en el mismo posici n TENGA CUIDADO despu s de...

Page 13: ...son du changement de saison MISE EN GARDE N installez pas de dispositif d arr t sur une sortie quelconque de ce robinet En interrompant l coulement de l eau ce dispositif peut emp cher le robinet d qu...

Page 14: ...e au Canada et au Mexique DELTA FAUCET COMPANY SE D GAGE DE TOUTE RESPONSABILIT L GARD DES DOMMAGES PARTICULIERS CONS CUTIFS OU INDIRECTS Y COMPRIS LES FRAIS DE MAIN D OEUVRE QUI POURRAIENT R SULTER D...

Page 15: ...surez vous que les tubes et les joints toriques 3 de la cartouche sont bien cal s la base du corps Assurez vous que les ergots sur le corps sont parfaitement engag s dans les rainures du corps 4 Insta...

Page 16: ...rieure cette valeur La but e anti chaudage peut devoir tre r gl e chaque saison si la temp rature de l eau d alimentation change Par exemple la temp rature de l eau froide est plus basse en hiver qu...

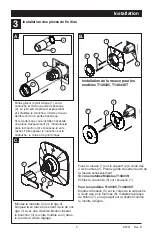
Page 17: ...filez le couvercle 5 sur l cusson 1 Pour les mod les T140335 T140440T Montez la fixation 5 sur le corps de la cartouche l aide des 2 vis fournies 6 Installez la plaque de finition 7 en la pla ant sur...

Page 18: ...urs tre repos e dans la m me position NE PAS PRENDRE DE RISQUES INUTILEMENT Une fois l installation termin e ouvrir le robinet pour s assurer que L EAU FROIDE S COULE EN PREMIER 2 Pour d poser la cart...

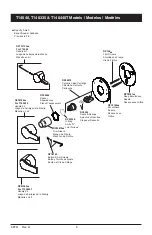
Page 19: ...ro de accesorio Anneau d coratif RP196 Trim Screws Atornillos de Franja Vis de Finition RP23336 O Ring Anillo O Joint Torique RP29569 Spacer Separadores Pi ce D espacement RP50879 Trim Sleeve Manga de...

Page 20: ...de la Manija Manette en kit RP78182 Button Set Screws Bot n y Tornillo de Ajuste Bouton et Vis de Calage RP78181 Deep Escutcheon Roseta Rosace avec Orifice RP78180 Escutcheon Roseta Rosace avec Orific...

Page 21: ...88741 Rev D Delta Faucet Company Product Service 55 E 111th Street Indianapolis IN 46280...

Reviews: