•
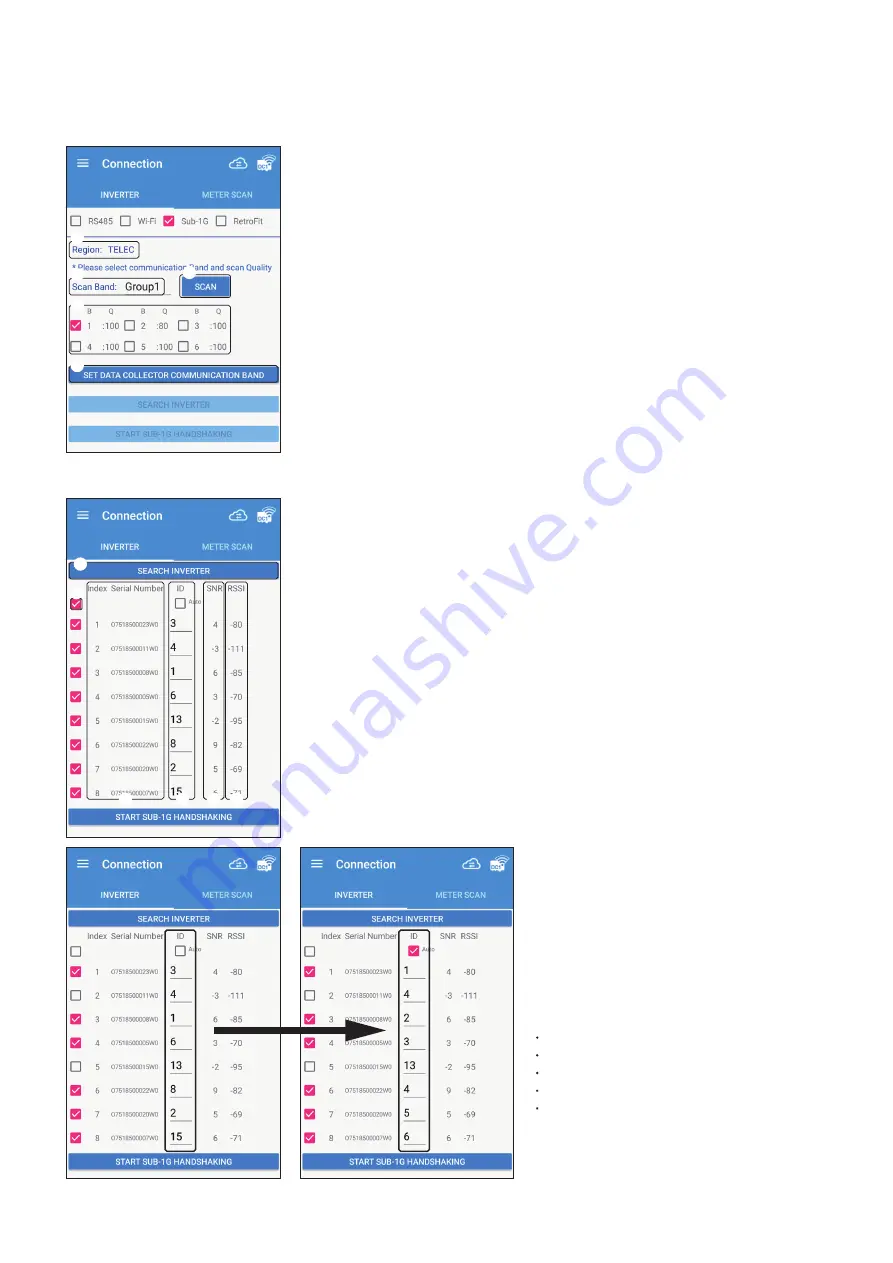
SUB_1G Connection page
1. Band Selection
Region
The device area currently set. For example, TELEC indicates the Japanese region.
Scan Band
Each Band represents a different frequency combination. It will put 6 bands into one group
to search efficienctly, if the group can not find the appropriate frequency band, try to scan
other groups. For example, there are 120 Bands in TELEC, "Group 1" displays "Band 1
to Band 6", "Group 2" displays "Band 7 to Band 12", and so on.
SCAN
After selecting group, click SCAN. It will show communication quality scores of the six
bands in the group.
Scan Quality
The top score is 100 points, the higher the score, the better the communication quality.
During the scanning process, if it finds other signal interference, the score will be deducted.
When the score is lower than 80, users will not be able to select the Band.
SET DATA COLLECTOR BAND
After selecting band, click SET DATA COLLECTOR BAND to set up.
SEARCH INVERTER
Press this button, Data Collector will list the nearby Inverter that has not been set.
Index & Serial Number
The serial number of the Inverters.
ID
Showing the original ID of Inverter. Users can change the number by drop-down menu.
SNR
One of the parameters to check communication quality, usually a positive value.
Indicating how much times the signal is stronger than the noise. The larger the value,
the stronger the signal, the better the connection quality. When the SNR is less than 0,
it is not recommended to choose.
RSSI
One of the parameters to check communication quality, usually a negtive value.
Indicating the value of RF signal. The larger the value, the stronger the signal, the
better the connection quality. For example, the signal of -60 is better than -80. When
the RSSI is less than -105, it is not recommended to choose.
Select All
Select the top checkbox will alto select all checkboxes.
The ID of the inverters you selected will rearrange
after selecting “Auto”. For example, the original ID
sequence 3, 4, 1, 6, 13, 8, 2, 15 changed to 1, 4, 2,
3, 13, 4, 5, 6. De-select “Auto”will change back to
the original ID.
❶
①
②
③
④
⑤
①
②
③
④
⑤
⑥
❷
❷
❹
❹
❺
❺
❸
❸
2. Search Inverter
❶
❻
3. SUB-1G HANDSHAKING
Click “START SUB-1G HANDSHAKING” will do
the following steps, please wait for a moment.
Set Inverter ID
Collect Inverter Information
Sync time with Inverter
Set Communication Band
Set monitor on
When Handshaking complete, means all settings
are done and starts to monitor inverters.
27


