12
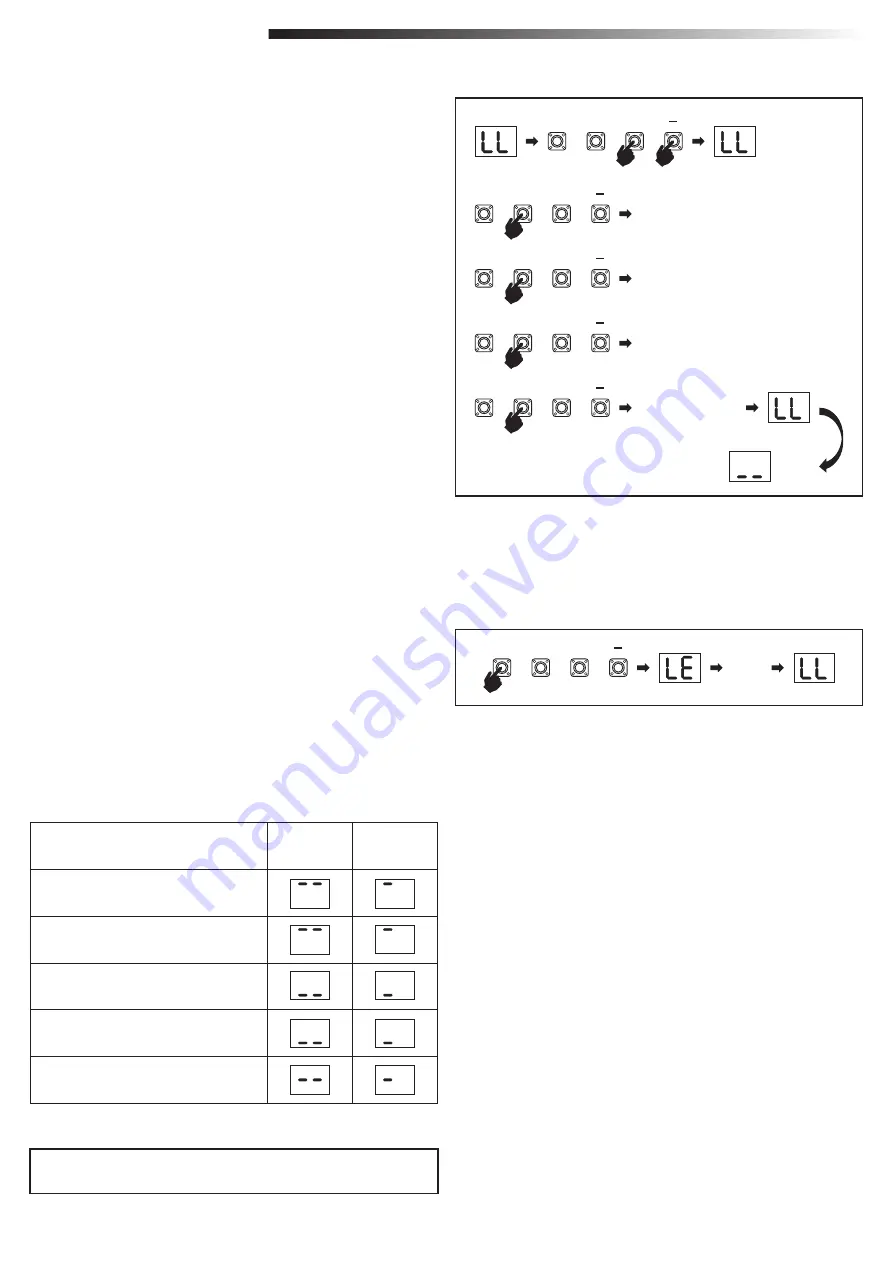
Advanced Learning Mode (manual setting of Soft Stop position)
1. Press and hold “
+
and
–
“ buttons for 2 seconds.
2. Automatic learning starts.
LL
will flash on the display during complete process.
3. Wing 2 moves in
CLOSE
direction until hard stop is reached, and stops.
4. Wing 1 moves in
CLOSE
direction until hard stop is reached, and stops for 2
seconds.
5. Wing 1 starts in
OPEN
direction at default speed.
6.
To define start of the Soft Stop for Wing 1 in
OPEN
direction press “
P
” button
at required start point. Wing 1 will continue opening until hard stop is reached,
and stops.
7. Wing 2 moves in
OPEN
direction at default speed.
8.
To define start of the Soft Stop for Wing 2 in
OPEN
direction press “
P
” button
at required start point. Wing 2 will continue opening until hard stop is reached,
stops for 2 seconds and then moves in
CLOSE
direction at default speed.
9.
To define start of the Soft Stop for Wing 2 in
CLOSE
direction press “
P
” button
at required start point. Wing 2 will continue closing until hard stop is reached,
and stops.
10. Wing 1 moves in
CLOSE
direction at default speed.
11.
To define start of the Soft Stop for Wing 1 in
CLOSE
direction press “
P
” button
at required start point. Wing 1 will continue closing until hard stop is reached,
and stops.
12.
Advanced Learning phase is finished.
LL
will appear on display and board will
return in stand-by mode after 3 seconds.
NOTE
: In single motor application, “Wing 2” actions are not used.
Following settings are programmed during Advanced Learning mode:
1. Travel length from
FULL CLOSED
to
FULL OPEN
position.
2. Opening and closing force for each motor.
3. Starting positions of the Soft Stops.
4. Wing delay in opening and closing position is 2 seconds. Shall you need to
change the delay please go to Advanced Settings: Delay Motor 2 (d0) and
Delay Motor 1 (dC).
NOTE
: To stop Learning phase press “
S
” button. The Learning process will be
interrupted, “
LE
” will flash on LED display. After 5 seconds “
LL
” will appear on
display indicating readiness to start Learning phase again.
If Learning process was not completed, it needs to be re-done.
ATTENTION:
Learning phase must be completed to enable operation.
P
+
S
2 sec.
P
+
S
Soft Stop OPEN
Wing 1
P
+
S
Soft Stop OPEN
Wing 2
P
+
S
Soft Stop CLOSE
Wing 2
III
III
P
+
S
Soft Stop CLOSE
Wing 1
3 sec.
P
+
S
III
III
5 sec.
7.5 Stand-by Mode
After the control board is powered on and programming is finished, the LED display
lights completely for 2 seconds and goes into the stand-by mode. During Stand-by
mode the LED display shows current gate status.
Herewith the Basic Settings are completed. You can leave Programming
and operate your gate or proceed with Advanced Settings.
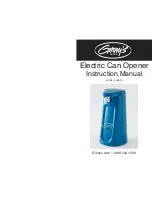
Two motors
(default)
One motor
Motor is opening, upper section of the display
flashes.
III
III
Motor stops at the opening position, upper
section of the display is on.
Motor is closing, lower section of the display
flashes.
III
III
Motor stops at the closed position, lower
section of the display is on.
Motor stops in the middle, middle of the
display is on.
7. PROGRAMMING


