background image

Installation 5

0020219190_00 Installation and maintenance instructions

13

Check whether the volume of the installed expansion

vessel is sufficient for the heating system.

Conditions

: The volume of the installed expansion vessel is insufficient

Install an additional expansion vessel, connected as

close to the product as possible, in the heating return.

Conditions

: External expansion vessel installed

Install a non-return valve in the product outlet (heating

flow) or decommission the internal expansion vessel in

order to prevent the warm start function from being in-

creasingly activated due to backflow.

Install a tundish with siphon for the condensate discharge

and the exhaust pipe on the expansion relief valve. Lay

as short a drain line as possible, at a downward gradient

away from the tundish.

Insulate bare pipes exposed to environmental influences

to protect them from frost using suitable insulating mater-

ial.

5.2

Installing the gas connection and heating

flow/return

2

3

1

1.

Install the gas line on the gas connection

(2)

without

tension.

2.

Purge the gas line before start-up.

3.

Install the heating flow

(3)

and the heating return

(1)

in

accordance with the relevant standards.

4.

Check all connections for leaks.

5.3

Installing the hot and cold water connection

1

2

Install the cold water connection

(2)

and hot water con-

nection

(1)

in accordance with the relevant standards.

5.4

Filling the siphon and connecting the

condensate discharge pipe

Danger!

Risk of death from escaping flue gases!

The siphon's condensate drain pipework

must not be connected to waste-water piping

because, otherwise, the internal condensate

siphon may be drained fully and flue gas may

escape.

Do not connect the condensate drain

pipework tightly to the waste-water pip-

ing.

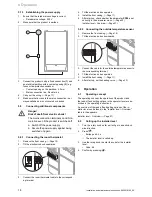
1

A

C

B

D

50 ml

Only use pipes which have been manufactured from

acid-resistant material (e.g. plastic) for the condensate

drain pipework.

Leave an installation space of at least 240 mm beneath

the condensate siphon.

Loosen the lower section of the siphon

(1)

from the con-

densate siphon.

Fill the lower section of the siphon with 50 ml water.

Secure the condensate discharge pipe to the lower sec-

tion of the siphon.

Re-fit the lower section of the siphon onto the condens-

ate siphon.

Suspend the condensate discharge pipe above the prein-

stalled tundish.

5.5

Connecting the discharge pipe to the

expansion relief valve on the product

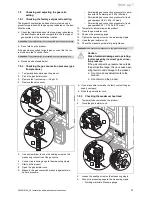
1.

Install the supplied discharge pipe for the expansion

relief valve so that it does not interfere with the removal

and fitting of the siphon trap.

1

2.

Install the discharge pipe

(1)

as shown.

Summary of Contents for Nitron Condense

Page 1: ...Installation and main tenance instructions Nitron Condense Nitron Condense 24 H TR Nitron Condense 28 H TR TR...

Page 2: ...g on the product 19 7 3 Checking and treating the heating water filling and supplementary water 19 7 4 Preventing low water pressure 20 7 5 Filling and purging the heating installation 20 7 6 Filling...

Page 3: ...rvicing instructions for the product and any other system compon ents installing and fitting the product in accord ance with the product and system approval compliance with all inspection and main ten...

Page 4: ...re that the product is supplied with sufficient combustion air 1 3 7 Risk of death due to explosive and flammable materials Do not use or store explosive or flammable materials e g petrol paper paint...

Page 5: ...ir flue gas installation 1 4 1 Risk of death from escaping flue gas Ensure that all openings in the air flue pipe that are within the building and can be opened are always closed for start up and duri...

Page 6: ...eter 60 100 mm 80 80 mm 80 125 mm An incorrect installation location leads to con densate leaking from the cover of the inspec tion opening and may lead to corrosion dam age Install the inspection elb...

Page 7: ...ensor 5 Recuperator 6 Overheating thermostat 7 Heating pump 8 Hydraulic block 9 Electronics box 10 Pressure compensation tube 11 Safety cut out SCO 12 Ignition electrode 13 Monitoring electrode 14 Bur...

Page 8: ...e Q Heat input range D Nominal hot water draw off rate Heating mode Hot water generation Bar code with serial number The 7th to 16th digits of the serial number form the article number 3 4 Symbols on...

Page 9: ...ue gas guiding Dimensions Nitron Condense 24 H TR Nitron Condense 28 H TR A 405 mm 430 mm B 39 mm 41 5 mm C 64 mm 76 5 mm D 202 5 mm 215 mm 4 4 Minimum clearances B B A C Minimum clearance A 200 mm B...

Page 10: ...t sufficient Ensure that wall mounting apparatus on site has a suf ficient load bearing capacity Use individual stands or primary walling for example Do not wall mount the product if you cannot provid...

Page 11: ...8 2 Installing the front casing 2x B A C Install the front casing as shown in the illustration 4 9 Removing installing the side section 4 9 1 Removing the side section 1 Remove the front casing Page...

Page 12: ...ting water and corrosion of the heat generation circuit and the boiler If using non diffusion tight plastic pipes in the heating installation separate the system by installing an external heat ex chan...

Page 13: ...heck all connections for leaks 5 3 Installing the hot and cold water connection 1 2 Install the cold water connection 2 and hot water con nection 1 in accordance with the relevant standards 5 4 Fillin...

Page 14: ...the inside 5 2 Install the air flue pipe as described in the separate installation instructions for the air flue pipe 5 6 3 Air flue gas installation 5 6 3 1 Complying with the minimum clearances for...

Page 15: ...0 mm in diameter Length of the air flue gas installation dia 80 80 mm Page 36 5 6 3 4 Horizontal air flue gas system Applicability C12 type flue pipe L For each additional 90 elbow or two 45 elbows th...

Page 16: ...4 W mK e g glass wool The attachments for the fresh air supply and flue gas extraction must not be installed on opposite walls of the building For each additional 90 elbow or two 45 elbows that is req...

Page 17: ...n in the illustration 5 7 1 2 Closing the electronics box A A B 1 Close the electronics box as shown in the illustration 2 Install the front casing Page 11 5 7 2 Carrying out the wiring Caution Risk o...

Page 18: ...e correspond ing terminal 4 Tilt the electronics box upwards 5 Install the front casing Page 11 6 After start up check whether the parameter PP06 is set correctly in the parameter menu Page 22 Install...

Page 19: ...heating water in the following cases If the entire filling and supplementary water quantity dur ing the operating life of the system exceeds three times the nominal volume of the heating installation...

Page 20: ...as been completely filled with heating water 10 Fill with heating water until the required filling pressure is reached 11 Close the valve on the filling device 12 Turn the cap on the automatic air ven...

Page 21: ...the product 8 Open the gas isolator cock 9 Measure the gas connection pressure against atmo spheric pressure Permissible gas connection pressure for opera tion with G20 natural gas 2 kPa 20 mbar Perm...

Page 22: ...coil 13 Secure the valve cover 14 Open the gas isolator cock 15 Check the measuring nipple for gas tightness 16 Install the front casing Page 11 17 Start up the product 7 10 Checking function and leak...

Page 23: ...ining feed head of the pump 1 0 2 0 3 0 0 A B 1 2 3 4 5 6 7 1 3 2 A Flow rate Q m h B Remaining feed head m 8 3 Setting the pump output 1 Temporarily decommission the product Page 26 2 Remove the fron...

Page 24: ...ipe 2 2 Remove the cable connection from the ignition and monitoring electrode 3 3 Pull out the burner 1 towards the front and out 4 Remove the screws for the ignition and monitoring elec trode 3 from...

Page 25: ...ps 2 on the flow pipe and the return pipe 3 3 Remove the upper flow pipe and return pipe 3 4 Loosen the overheating thermostat 1 from the heat exchanger by pressing the clamp 5 Pull the heat exchanger...

Page 26: ...sel 4 Fill and purge the heating installation Page 20 11 6 Completing inspection and maintenance work Check the gas connection pressure gas flow pressure Page 21 12 Decommissioning 12 1 Temporarily de...

Page 27: ...s 00 PP11 Ignition capacity selection 00 04 00 Automatic ignition 01 0 3 x Lmax 02 0 4 x Lmax 03 0 5 x Lmax 04 0 6 x Lmax 00 PP12 Offset value Eco mode 00 01 00 0 C 01 5 C 01 PP13 hot water handling...

Page 28: ...ut maintenance work X X 5 Disconnect the product from the power mains Check that the electrical plug connections and other connections are seated correctly and correct their position if necessary X X...

Page 29: ...nected incorrectly or not connected Gas valve stepper motor not connected multiple plug on the PCB not plugged in correctly interruption in cable harness gas valve stepper motor defective electronics...

Page 30: ...icient The water level is too high Check the water level reducer The gas pressure is insufficient Check the cable connections to the gas inlet and to the modulation coil Scale in the primary or second...

Page 31: ...heat loss The expansion relief valve is leaking The system pressure is over 0 03 MPa 3 bar Reduce the system pressure Reduced air in the expansion vessel or a tear in the diaphragm Check the expansio...

Page 32: ...39 39 26 27 29 28 30 35 36 37 36 35 37 31 32 32 33 34 34 31 43 33 24V 230V X18 X19 dd xx yy zz xx yy zz cc bb aa 18 17 16 19 17 16 18 6 1 11 12 13 14 15 16 7 9 17 18 20 21 22 24 19 10 8 ee ff 23 3 4...

Page 33: ...m 80 125 mm G20 natural gas flow pressure 2 kPa 20 mbar 2 kPa 20 mbar G30 liquid gas flow pressure 2 8 3 0 kPa 28 0 30 0 mbar 2 8 3 0 kPa 28 0 30 0 mbar G31 liquid gas flow pressure 3 7 kPa 37 0 mbar...

Page 34: ...12 l min 12 l min Water pressure 0 025 0 8 MPa 0 250 8 0 bar 0 025 0 8 MPa 0 250 8 0 bar Hot water output temperature range 35 64 35 64 Flue gas temperature in hot water handling mode 67 68 Technical...

Page 35: ...mm E Below eaves 200 mm F Below balconies or car port roofs 200 mm G From vertical wastewater pipes or down pipes 150 mm H From external or internal corners 200 mm I Above floors roofs or balconies 30...

Page 36: ...diameter B22 type flue pipe B22P air flue pipe C12 type flue pipe C32 type flue pipe C42 type flue pipe Nitron Condense 24 H TR 20 m 20 m 20 m Nitron Condense 28 H TR 20 m 20 m 20 m Diameter of the fl...

Page 37: ...ber cover 10 Removing the combustion chamber cover 11 Removing the front casing 10 Removing the side section 11 Replacing the burner 24 Replacing the expansion vessel 24 Replacing the heat exchanger 2...

Page 38: ...219190_00 G 2 Length of the air flue gas installation dia 60 100 mm Diameter of the flue pipe Dia 60 100 L B22 type flue pipe B22P air flue pipe C12 type flue pipe C32 type flue pipe C42 type flue pip...

Page 39: ...ue gas route 4 5 Flue pipe equipment connection piece 14 Front casing closed 4 Frost 5 G Grease 5 H Handing over to the operator 23 Heat load maximum 21 Heat load minimum 22 Hot water connection 13 I...

Page 40: ...ns 0020219190_00 Supply of combustion air 4 6 Switching off 26 Switching off the product 26 Switching on the product 19 T Tool 5 Transport 5 Treating the heating water 19 U Unpacking the product 8 Use...

Page 41: ......

Page 42: ......

Page 43: ......

Page 44: ...uyuk Bilecik www demirdokum com tr supplier Demir D k m Genel M d rl k Bah elievler Mah Bosna Bulvar No 148 34688 engelk y STANBUL Tel 02 16 516 20 00 Faks 02 16 516 20 01 24 saat M teri leti im Merke...

Reviews: