background image

3. Maintenance and Troubleshooting 

C-150-200D                                                       V16 

Page 12 

Service instructions 

 
Detach  the  high  pressure  hose,  dump  back  hose,  inlet  hose,  safety  valve,  and  parts  on  the 
pump head before serving the pump. 
 
(Please refer to Pump assembly (Page 17) unless otherwise stated.) 
 

Servicing the valves: 


1.


Remove the valve cap (Pos: 2). 

2.


Inspect the valve cap O-Ring (Pos: 1) for any damage, replace if necessary. 

3.


Use the needle nose pliers to remove the valve (Pos: 3). 

4.


Use  a  small  probe  to  move  the  poppet  up  and  down  to  assure  that  the  valve  is 
functioning properly and that no debris is stuck in the valve (Pos: 3). 

5.


To  reassemble  the  valves  proceed  the  other  way  round  and  tighten  the  cover  screws 
with a torque wrench. (Referring to torque specification) 


Servicing the Packings/Seals:


1.


Remove the bolts (Pos: 38) on the head (Pos: 36) of the pump. 

2.


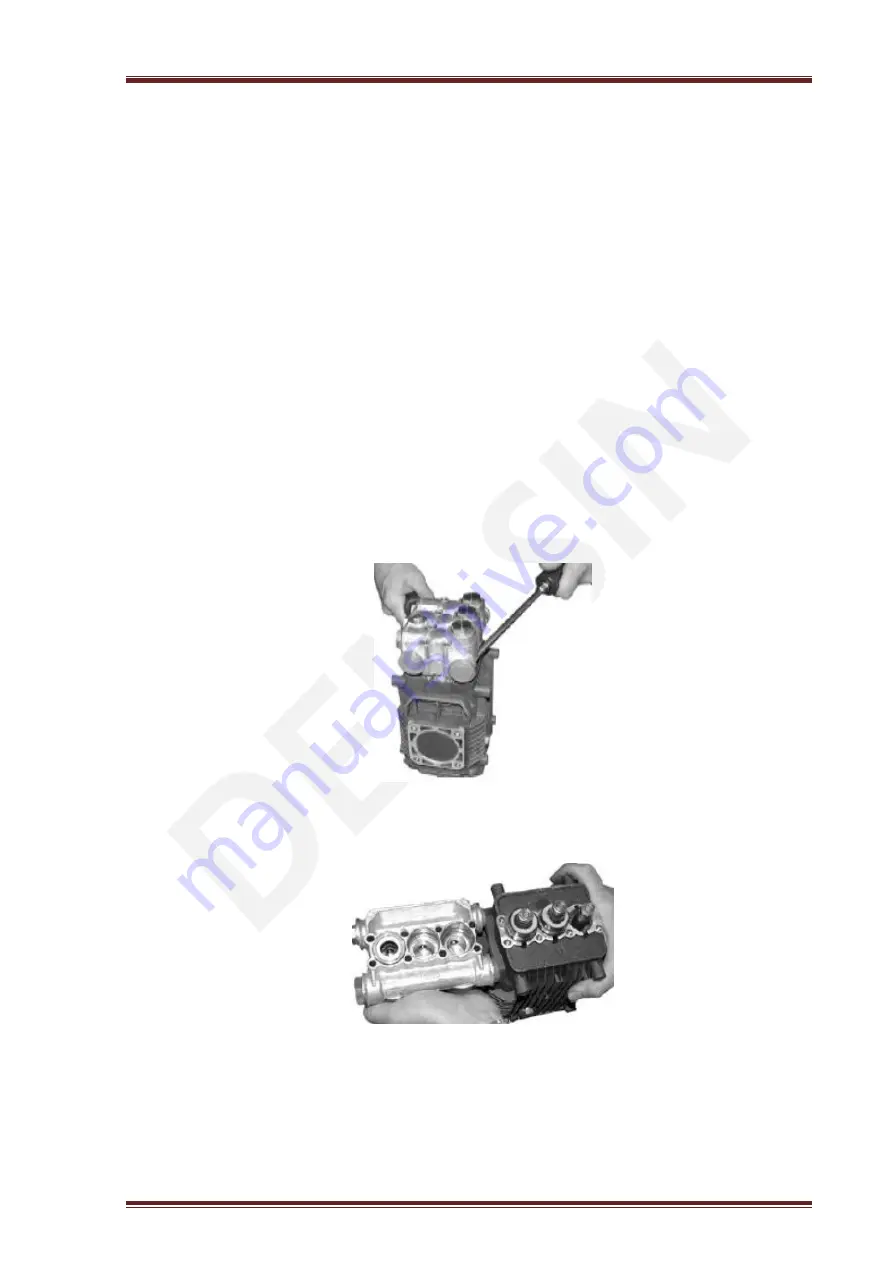
Place the screwdrivers between the head (Pos: 36) and crankcase (Pos: 9) of the pump, 
lifting one up and the other down. The head should start to lift off of the plungers (Pos: 
23). 


3.


When you remove the head, some of the water seals have stayed on the plungers (Pos: 
23) and some in the head (Pos: 36). To remove the seals from the plungers (Pos: 23), 
simple turn the assemblies and pull off.  


Summary of Contents for C-150D

Page 1: ...www densin com USER GUIDE SPARE PARTS MANUAL C 150 200D DIESEL POWERED HEAVY DUTY COLD WATER HIGH PRESSURE CLEANER ...

Page 2: ... you objects and persons near by Safety The following symbols are used in this manual to indicate procedures that if not followed may results in personal injuries or damage to equipment Version 16 March 2015 Revision History Date Revision Rev No June 2013 Amend error to Gearbox part number 13 Aug 2014 Added C 200D Unloader 14 Oct 2014 Manual Updating Repair Kit Updating 15 Mar 2015 Updating of Man...

Page 3: ...box assembly 18 Gear box assembly spare parts list 18 Pump assembly 19 Pump assembly spare parts list 20 Pump spare parts kit 21 Un loader valve assembly C 150D 22 Unloader valve assembly spare parts list 22 Repair kit Unloader valve C 150D 24 Un loader valve assembly C 200D 25 Un loader valve assembly C 200D spare parts list 25 Repair kit Unloader valve 27 Safety valve assembly C 200D 27 Safety v...

Page 4: ...s long life and high durability Specifications Model Motor Motor Speed Working Pressure Flow Capacity Power Supply Dimensions LxWxH Weight Hp kW rpm psi Bar gpm l min mm kg C 150D 6 0 4 4 3600 2175 150 4 0 15 2 Diesel 850x600x900 60 C 200D 10 7 5 3600 2900 200 4 9 18 5 Diesel 850x600x900 95 Applications These heavy duty High Pressure Cleaners are capable of removing any kind of dirt Algae off conc...

Page 5: ...ront of the Spray gun trigger while sliding in the male swivel coupling part pos 13 page 22 of the spray lance Prepare the water supply for the High Pressure Cleaner by attaching a hose to the supplied low pressure inlet male coupling Connect the other end of the water supply hose to a potable water tap Open the tap Notice Connection to the public mains water supply according to regulations Before...

Page 6: ...t be worn while using the equipment to protect the operator Do not try to clean clothes or footwear with the machine 6 Precautions must be made to keep bystanders away from the working range 7 Do NOT spray clean on yourself others or live animals The high pressure beams are capable of making severe injuries 8 Do NOT spray at electrical equipment OR the machine itself 9 While repairing or servicing...

Page 7: ...Do not operate the machine if important parts are damaged i e safety devices high pressure hoses spray handle 7 The user is obliged to observe all national working environment and working safety regulations concerning operation of high pressure washers 8 It is not allowed to connect this machine directly to a potable water supply 9 If the machine is to be connected to potable water supply it is st...

Page 8: ...ent may be suffering from a water jet injury Evaluation and management should parallel that of a gunshot injury The external manifestations of the injury cannot be used to predict the extent of internal damage Initial management should include stabilization and a thorough neurovascular examination X rays can be used to access subcutaneous air and foreign bodies distant from the site of injury Inju...

Page 9: ...hear proof gloves must be worn by the operator at all times A glove combination of a cloth inner lining and a water tight outer layer is preferred Foot protection Safety footwear with steel toecaps minimum 0 5mm 0 02 thick must be worn The toecap must cover at least 30 of the footwear length Basic safety footwear must also be equipped with metatarsal guards to protect the instep Safety boots are a...

Page 10: ...til the red point of the oil control glass has been reached Approx 3 4 liter of oil type Omala 220 is to be used Please refer to the separate engine manual for engine maintenance Check oil level in pump gearbox and engine regularly Notice Do not dispose of used oil in drain Refueling Before refueling allow the engine to cool down Do not spill fuel Cleaning Use a damp cloth to wipe the cabinet and ...

Page 11: ...nozzle and remove the extraneous matter Replace if damaged The high pressure cleaner does not reach the proper working pressure when the spray gun handle is activated The high pressure nozzle is clogged or there is dirt in the by pass valve The pump sucks air Turn off the High Pressure Cleaner Clean the nozzle Inspect the low pressure supply or while the spray gun trigger is activated turn the mac...

Page 12: ...or The High Pressure Cleaner does not suck chemicals The chemical container is empty The High Pressure Cleaner has not been set to low pressure on the double barrel lance cock The low pressure nozzle is clogged or partly clogged The non return valve of the chemical injector is stuck Ensure the chemical container contains sufficient fluid for proper suction Set the spray lance to low pressure by tu...

Page 13: ...to assure that the valve is functioning properly and that no debris is stuck in the valve Pos 3 5 To reassemble the valves proceed the other way round and tighten the cover screws with a torque wrench Referring to torque specification Servicing the Packings Seals 1 Remove the bolts Pos 38 on the head Pos 36 of the pump 2 Place the screwdrivers between the head Pos 36 and crankcase Pos 9 of the pum...

Page 14: ...ck 9 To reassemble the packing and seals proceed the other way round and tighten the cover screws with a torque wrench Referring to torque specification Servicing the Plungers Pos 23 Recommend to replace Piston kits Support Rings kits and Water Seals kits whenever servicing the plungers 1 Remove the plunger retainer nut Pos 25 2 Insert the gasket scraper between the copper washer Pos 24 and plunge...

Page 15: ...to align the plungers as shown 2 Place the head evenly onto the plungers and push it until it makes contact with the drive end of the pump 3 Torque the head bolts Pos 38 as shown in the tightening sequence diagram Torque Specification Descriptions Head Pos 38 Piston Nut Pos 25 Valve Cap Pos 2 In lbs 133 106 442 Kg m N m 15 12 50 ...

Page 16: ...049 Retractable hose reel 700550208 Accessories C150D C200D Double Barrel Lance 700551473 700551474 Single Barrel Lance 700550449 700550450 Short Double Barrel Lance 700551502 700550490 Single Barrel Lance with Rotating Nozzle 700550171 700551287 Double Barrel Contractor Lance with side Regulator Handle 700550192 700550193 Single Barrel Lance with Multi speed Nozzle 700550566 700551289 Industrial ...

Page 17: ...4 Spare Part List C 150 200D V16 Page 16 Chassis assembly ...

Page 18: ...ke C 200D 8 700510030 4 Screw 9 700520234 1 Stud for battery C 200D 10 700520235 1 Holder for battery C 200D 11 700530140 1 Battery cable C 200D 12 700530141 1 Battery C 200D 13 700530140 1 Battery cable C 200D 14 700510007 2 Lock nut C 200D 15 700520091 1 Battery bracket C 200D 16 700510010 4 Finger screw 17 700510005 4 Washer 18 700510004 4 Lock nut 19 700510052 2 Rubber mount 20 700510050 4 Fin...

Page 19: ...14 1 Bearing 5 1 Gear wheel engine side 6 1 Screw 7 1 Flange for pump 8 700540316 4 Dowty seal M8 9 4 Screw 10 1 Gasket 11 1 Gearwheel pump side 12 700505214 1 Snap ring Ø80 13 700505253 7 Washer 14 7 Screw 15 700505256 1 Plug 3 8 16 1 Aluminum washer 17 700022830 1 Gearbox housing 18 1 Oil seal 19 1 Gasket 1 19 700560064 1 Gearbox complete 1 2 3 4 5 6 7 8 9 10 11 12 13 14 15 16 17 18 19 ...

Page 20: ...4 Spare Part List C 150 200D V16 Page 19 Pump assembly ...

Page 21: ...20 700560033 3 Guiding piston 21 700560034 3 O ring 22 700560035 3 Spacer disc 23 Kit B 3 Piston Ø18 24 700560038 3 Piston washer 25 700560039 3 Nut M8 27 700560040 2 O ring 28 700560041 3 G plug 3 8 29 700560042 1 Washer 30 Kit C 3 Oil Seal 31 Kit D 3 Rear piston guide Ø18 32 3 O ring 33 3 Gasket Ø18 34 700560049 1 G plug 1 2 35 700560050 1 Washer 36 700560051 1 Head 37 700560052 8 Washer 38 7005...

Page 22: ...560004 Pump Valves Kit 1 SET 3 6 Complete valve 4 6 O ring Kit B 700560008 Pistons Ø18 1 SET 23 3 Piston Ø18 Kit C 700560011 Oil seals 1 SET 10 1 Cap 16 1 O ring 30 3 Oil Seal 47 1 Seal Kit D 700560139 Water seals Ø18 1 SET 32 3 O ring 33 3 Gasket Ø18 8 3 Piston guide Ø18 6 3 Support ring Ø18 7 3 Gasket Ø18 31 3 Rear piston guide Ø18 ...

Page 23: ...4 Spare Part List C 150 200D V16 Page 22 Un loader valve assembly C 150D 1 4 5 2 3 6 7 8 9 10 11 12 13 14 15 16 17 18 19 20 21 22 23 24 26 27 28 28 25 29 30 32 32 31 33 34 34 35 36 37 38 ...

Page 24: ...g Bypass 23 700540993 1 O Ring 1 23 700540989 1 Unloader Valve Complete 24 700540034 1 Quick Coupling Female Inlet 25 700540033 1 Strainer 26 700540738 1 Water Inlet 27 700540736 1 Banjo Bolt 1 2 High flow 28 700540056 2 Dowty Seal 1 2 29 700540737 1 Holder For Un Loader Valve 30 700540193 1 Pressure Gauge 31 700540734 1 Banjo Bolt 3 8 32 700550004 2 Dowty Seal 3 8 33 700540025 1 Elbow 34 70051013...

Page 25: ...Unloader valve C 150D Part no Kit description Pos Qty Description Kit E 700540991 Unloader Valve Seal Kit 2 1 Seat 3 1 Shutter Unloader 5 1 O Ring 6 1 Anti Extrusion Ring 7 1 O Ring 8 1 O Ring 10 1 O Ring 11 1 Anti Extrusion Ring 17 1 O Ring 20 1 O Ring ...

Page 26: ...4 Spare Part List C 150 200D V16 Page 25 Un loader valve assembly C 200D Safety Valve Inlet ...

Page 27: ...Shutter Spring 20 Kit E 1 O Ring 21 700540992 1 Retention Coupling 22 1 VR Coupling Bypass 23 700540993 1 O Ring 1 23 700540989 1 Unloader Valve Complete 24 700540034 1 Quick Coupling Female Inlet 25 700540033 1 Strainer 26 700540738 1 Water Inlet 27 700540736 1 Banjo Bolt 1 2 High flow 28 700540056 2 Dowty Seal 1 2 29 700540737 1 Holder For Un Loader Valve 30 700540193 1 Pressure Gauge 31 7005407...

Page 28: ...8 1 O Ring 10 1 O Ring 11 1 Anti Extrusion Ring 17 1 O Ring 20 1 O Ring Safety valve assembly C 200D Safety valve assembly spare parts list C 200D Pos Part no Qty Description 1 700540119 1 Body Safety Valve 3 8 2 700540115 1 Rubber Ball 3 700540121 1 Piston 4 700540120 1 O Ring 5 700540122 1 Spring 6 700540123 1 Washer 7 700540124 1 Fitting 8 700540125 1 Adjusting Screw 9 700510008 1 Nut 1 9 70054...

Page 29: ...Holder 5 700550782 1 Nozzle Low Pressure 6 700550781 1 Bushing Low Pressure Nozzle Holder 1 8 7 700550012 1 Lance Pipe Top 8 700550572 1 Lance Pipe Bottom 9 700550011 1 Needle Valve Complete 10 700550575 1 Knob For Needle Valve 11 700550574 1 O Ring For Needle Valve 12 700550591 1 Lance Pipe For Double Barrel Lance 13 700550259 1 Nipple Quick Coupling Male 14 700550522 1 Lance Guard L R Complete W...

Page 30: ...ti Extrusion Ring 3 1 O Ring 4 1 Washer 5 1 Pin Press Sphere 6 1 Seat 7 1 Sphere 5 16 8 1 Spring S S 9 Kit F 1 O Ring 10 1 Plug 11 1 Pipe 12 1 Coupling G1 4F Outlet SW Top 13 Kit G 1 Bushing 14 1 O Ring 15 1 Anti Extrusion Ring 16 1 Spacer 17 1 Rotating Joint Pin 18 1 Nut with Step 19 1 Nipple 20 700551521 1 Coupling G3 8F Inlet SW Top 21 1 Lever 30 ...

Page 31: ...oupling Female Complete 1 30 700551511 1 Trigger Gun Complete Trigger Gun Repair Kits Part no Kit description Pos Qty Individual components Part no Kit F 700551517 Seat Gasket Repair Kit 2 1 Anti Extrusion Ring 3 1 O Ring 4 1 Washer 5 1 Pin Press Sphere 6 1 Seat 7 1 Sphere 5 16 9 1 O Ring Kit G 700551520 Swivel Repair Kit 13 1 Bushing 14 1 O Ring 15 1 Anti Extrusion Ring 16 1 Spacer 17 1 Rotating ...

Page 32: ... For Machine Valve Complete x1 Pistons Kit x1 Oil Seal x1 Water Seal x1 C 150D 700560004 700560008 700560011 700560009 C 200D 700560004 700560008 700560011 700560009 For Machine Trigger Rep Kit Valve x1 Trigger Rep Kit Release Gun x1 O ring Quick Coupling x4 O ring Quick Coupling x2 C 150D 101119486 101119482 700540035 700550002 C 200D 101119486 101119482 700540035 700550002 For Machine Inlet Stra...

Page 33: ...e year from the date of invoice of the equipment This warranty does not cover normal wear and tear consumable items or part failures caused by i accident ii abuse or iii failure to maintain the DEN SIN system containing the affected parts in accordance with DEN SIN technical specification All labour is the responsibility and the expense of the Buyer The liability of Seller under this warranty is l...

Page 34: ...arts Request Form Company Name Delivery Address Country Postal Code Contact Name Contact Number Fax Number Mobile Number Email S N Part Number Description QTY Machine Model or Serial Number 1 2 3 4 5 6 7 8 9 10 11 12 13 14 15 16 17 18 19 20 Special Instructions ...

Page 35: ...This maintenance logbook will assist you to keep track on the servicing of your equipment Please record after service your machine Purchase date of the machine S N Service Description Date Remarks 1 2 3 4 5 6 7 8 9 10 11 12 13 14 15 16 17 18 19 20 21 22 23 24 25 26 27 28 ...

Reviews: