background image

Multi

MAXX

 HD

Technical Description

PR-2007-0350-GB • Subject to modifications • R2-04/2016

15

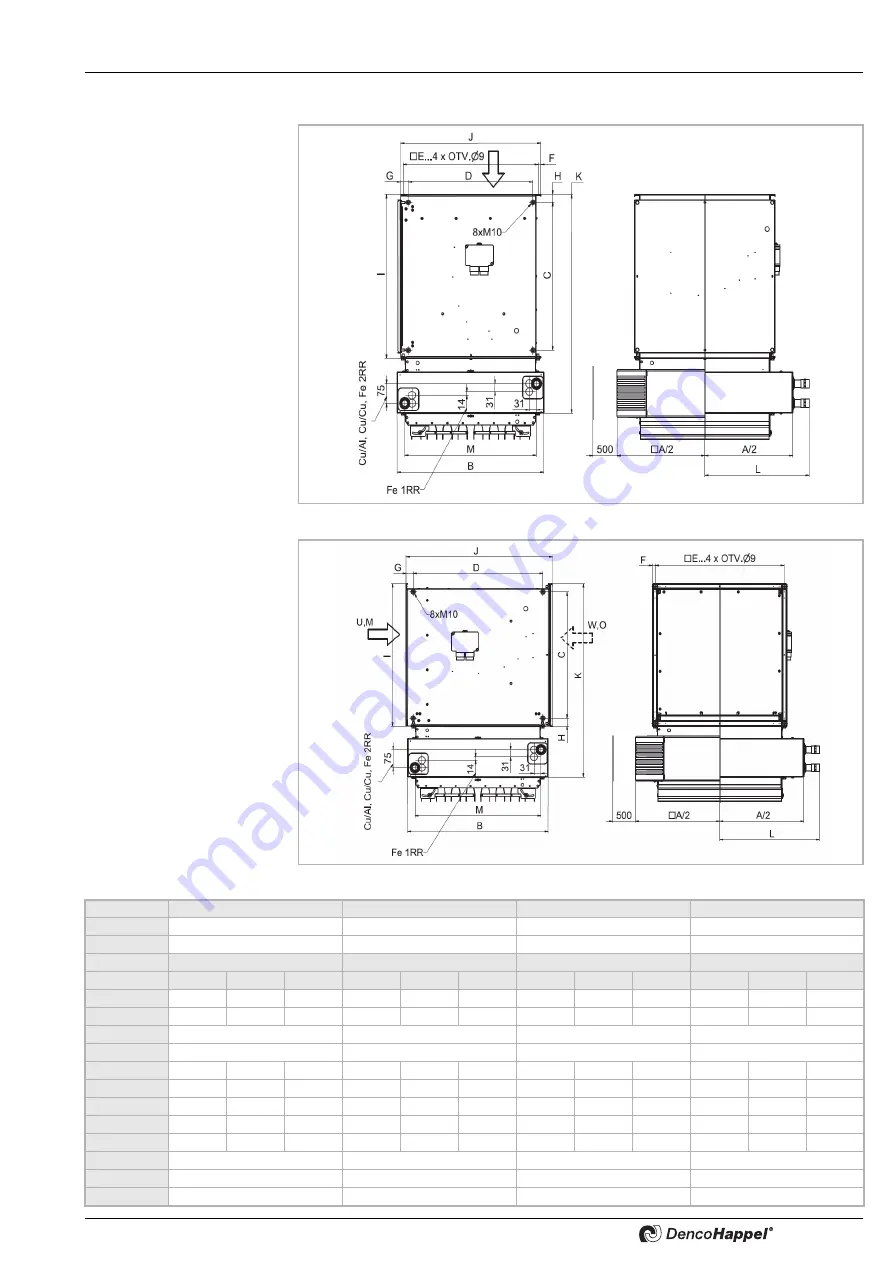
5.2.2 Ceiling installation
Unit designation
Y, R

Fig. 5-6

Unit designation
U, M, W, O

Fig. 5-7

Size

1

2

3

4

A

642

738

866

1026

B

532

628

756

916

Model

Model

Model

Model

Y, R

U, M, W, O V, N, X, P

Y, R

U, M, W, O V, N, X, P

Y, R

U, M, W, O V, N, X, P

Y, R

U, M, W, O V, N, X, P

C

473

427

427

569

523

523

697

651

651

857

811

811

D

427

473

473

523

569

569

651

697

697

811

857

857

E

470

566

694

854

F

12

12

12

12

G

32

31

32

31

32

31

32

31

H

31

32

34

31

32

34

31

32

34

31

32

34

I

535

493

493

631

589

589

759

717

717

919

877

877

J

493

547

494

589

643

590

717

771

718

877

931

878

K

745

703

703

841

799

799

969

927

927

1129

1087

1087

(Cu/Al, Cu/Cu)

399

447

511

591

(Fe)

361

409

473

553

457

553

681

841

Summary of Contents for MultiMAXX HD

Page 1: ...OPERATION MANUAL Decentral Systems Industry MultiMAXX HD Powerful Heating for Mixed Air Application ...

Page 2: ...MultiMAXX HD 2 PR 2007 0350 GB Subject to modifications R2 04 2016 1 DencoHappel product range ...

Page 3: ... wall 32 Weather protection grille 34 Roof bushing for slanted roof 35 Air intake hood roof 36 Bag filter module 37 Mat filter module 49 Roof bushing with flat roof plinth 51 Frame for wall connection Ohne Auslass Motor speeds C 3х400 V 3 speed diagonal distributor S 3x400 V 3 speed diagonal distributor upper speed range only size 3 Electric equipment K Terminal box S Fan switch R DencoHappel MATR...

Page 4: ...Storage 19 Delivery 19 Transport 19 Storage 19 Installation 20 Load bearing capacity of the installation site 20 Ceiling installation 20 Wall installation 21 Installing the unit 23 Installing unit casing 23 Medium Connections 26 Electrical Connections 28 Connection diagrams 28 Terminal box or electrical switch box 29 Connecting switch unit MC 300 or regulator by others 30 Overview of the DencoHapp...

Page 5: ...ubject to modifications R2 04 2016 5 3 Technical Description and Scope of Supply Fig 3 1 Unit componets 1 Air discharge louvres 2 Heat exchanger 3 Fan module with inlet nozzle and terminal box 4 Fan with contact protection grille 5 Unit casing with plastic corners 1 2 3 4 5 ...

Page 6: ...Technical Description and Scope of Supply MultiMAXX HD 6 PR 2007 0350 GB Subject to modifications R2 04 2016 Unit in industrial casing Unit in design decorative casing Fig 3 2 Fig 3 3 ...

Page 7: ...tion manual 4 1 Availability of the operation manual The accompanying operation manual includes important information about the safe and correct operation of the unit MultiMAXX HD This manual must always be available at the site where unit is in operation Every per son working with or around the unit must read and apply the information contained in the manual paying particular attention to the saf...

Page 8: ...ntion of personal injuries due to cutting on thin metal fins HIGH PRESSURE HAZARD Here you can find special information as well as rules and restrictions for the prevention of personal injuries due to high pressure DANGER OF OVERHEAD LOADS This symbol indicates a hazardous location with a risk of personal injury including death and material damage DANGER OF INFLAMMABLE MATERIALS Here you can find ...

Page 9: ...ery and principles of engineering particularly DIN VDE 0100 DIN VDE 0105 4 7 Safety regulations and codes When carrying out installation work commissioning maintenance and repair of the MultiMAXX HD units all requirements of safety regulations and codes as well as gene rally established technical practices shall be considered 4 8 Modifications and changes You must not change add to or modify the M...

Page 10: ...alification Every person authorised to work on or around the MultiMAXX HD must have read this entire operation manual and understood it completely particularly the chapter on safety It is too late to do this during work All work must only be carried out by specialists with sufficient knowledge based on pro fessional training and experience in the following Regulations concerning health and safety ...

Page 11: ...he air discharge opening can accommodate up to 13 different types of discharge louvres The diagonal fan is located in a fan casing on the rear side of the heating unit The protection grille prevents possible contact with the fan The unit rear side can be supplied with an attachment for mounting air intake accessories The fixing possibilities for suspending the unit using the ceiling or wall suspen...

Page 12: ...B 532 628 756 916 Model Model Model Model Y R U M W O V N X P Y R U M W O V N X P Y R U M W O V N X P Y R U M W O V N X P C 473 427 427 569 523 523 697 651 651 857 811 811 D 427 473 473 523 569 569 651 697 697 811 857 857 E 470 566 694 854 F 12 12 12 12 G 32 31 32 31 32 31 32 31 H 31 32 34 31 32 34 31 32 34 31 32 34 I 535 493 493 631 589 589 759 717 717 919 877 877 J 493 547 494 589 643 590 717 77...

Page 13: ... Y R U M W O V N X P Y R U M W O V N X P C 473 427 427 569 523 523 697 651 651 857 811 811 D 427 473 473 523 569 569 651 697 697 811 857 857 E 470 566 694 854 F 12 12 12 12 G 32 31 32 31 32 31 32 31 H 31 32 34 31 32 34 31 32 34 31 32 34 I 535 493 493 631 589 589 759 717 717 919 877 877 J 493 547 494 589 643 590 717 771 718 877 931 878 K 745 703 703 841 799 799 969 927 927 1129 1087 1087 L Cu Al Cu...

Page 14: ...l Model Model Y R V N X P U M W O Y R V N X P U M W O Y R V N X P U M W O Y R V N X P U M W O C 473 427 427 569 523 523 697 651 651 857 811 811 D 427 473 473 523 569 569 651 697 697 811 857 857 E 470 566 694 854 F 12 12 12 12 G 32 31 32 31 32 31 32 31 H 31 32 34 31 32 34 31 32 34 31 32 34 I 535 493 493 631 589 589 759 717 717 919 877 877 J 493 547 494 589 643 590 717 771 718 877 931 878 K 745 703 ...

Page 15: ... R U M W O V N X P Y R U M W O V N X P Y R U M W O V N X P C 473 427 427 569 523 523 697 651 651 857 811 811 D 427 473 473 523 569 569 651 697 697 811 857 857 E 470 566 694 854 F 12 12 12 12 G 32 31 32 31 32 31 32 31 H 31 32 34 31 32 34 31 32 34 31 32 34 I 535 493 493 631 589 589 759 717 717 919 877 877 J 493 547 494 589 643 590 717 771 718 877 931 878 K 745 703 703 841 799 799 969 927 927 1129 10...

Page 16: ... O V N X P Y R U M W O V N X P C 473 427 427 569 523 523 697 651 651 857 811 811 D 427 473 473 523 569 569 651 697 697 811 857 857 E 470 566 694 854 F 12 12 12 12 G 32 31 32 31 32 31 32 31 H 31 32 34 31 32 34 31 32 34 31 32 34 I 535 493 493 631 589 589 759 717 717 919 877 877 J 493 547 494 589 643 590 717 771 718 877 931 878 K 745 703 703 841 799 799 969 927 927 1129 1087 1087 L Cu Al Cu Cu 399 44...

Page 17: ...W O Y R V N X P U M W O Y R V N X P U M W O Y R V N X P U M W O C 473 427 427 569 523 523 697 651 651 857 811 811 D 427 473 473 523 569 569 651 697 697 811 857 857 E 470 566 694 854 F 12 12 12 12 G 32 31 32 31 32 31 32 31 H 31 32 34 31 32 34 31 32 34 31 32 34 I 535 493 493 631 589 589 759 717 717 919 877 877 J 493 547 494 589 643 590 717 771 718 877 931 878 K 745 703 703 841 799 799 969 927 927 11...

Page 18: ...ops Heat exchanger Size 4 Wall units require valve regulation if the inlet temperature reaches 130 C with ceiling unit from 100 C The valve shuts off the medium supply if the fan stops Size Unit weight with heat exchanger Water content of heat exchanger Cu Al Cu Cu Fe Zn Fe Zn 6mm Fe Fe steel Cu Al and Fe Zn Fe Zn circular pipe Cu Cu kg kg kg kg kg kg kg kg A C S T R A C S T R HD11 51 52 76 66 70 ...

Page 19: ...ccordance with the requirements EN 60 721 3 1 Permitted storage conditions permitted air condition for units which have not yet been installed Air temperature 25 C to 40 C Air humidity up to 85 relative humidity with no condensation NOTE Missing parts or damage in transit can only be claimed with the transport insurance if the damage has been confirmed by the carrier NOTE We recommend that you tra...

Page 20: ... a structural engineer or archi tect has to be received For fixing the unit there are two sets of 4 M10 nuts on the fan module see figure 5 1 and 5 10 The fixing material is enclosed with suspensions The suspension height of the unit is given in the table The data in the chart are approximate and apply to the discharge temperuture if the latter exceeds room temperature by 15 20 K Fig 7 1 Unit inst...

Page 21: ...low distance between units and minimum distance from the wall see below Direction of dischrged air flow It is necessary to set the discharge direction in such way as to prevent air draughts in the room The primary air flow must not be directed against walls beams cranes shelves columns or similar obstacles Recommended distances between wall mounted units see Fig 7 3 The distances between units dep...

Page 22: ...g table The data in the chart are approximate and apply to the discharge temperuture if the latter exceeds room temperature by 15 20 K Size 1 2 3 4 Distance to wall A not less mm 300 300 400 400 Unit model Air throw m Unit model Air throw m Outlet Outlet Outlet Outlet Bas wall SAL wall Bas wall SAL wall HD11 9 6 12 3 HD31 11 4 15 4 HD12 7 5 9 7 HD32 9 2 12 4 HD13 6 2 8 1 HD33 8 10 7 HD14 5 7 7 2 H...

Page 23: ...ig 7 4 Installing unit casing NOTE It is necessary to install the units in a safe reliable and visually acceptable way For these reasons it is recommended to use manufacturer s suspensions DAMAGE TO THE UNIT The unit must be installed in a stain free vibration free and twist free way NOTE It is necessary to fit the units level to the ceiling to allow access for air venting and bleeding the heat ex...

Page 24: ...Installation MultiMAXX HD 24 PR 2007 0350 GB Subject to modifications R2 04 2016 Fig 7 5 Fig 7 6 ...

Page 25: ...t exchanger left connection external thread 3 stage diagonal fan integrated controls and design casing 2 Bag filter F7 3 Mixed air damper type 3 4 Flexible connection 5 Mounting kit for ceiling suspension 6 Roof bushing 7 Air intake hood 1 LPWW register with Cu Cu heat exchanger left connection external thread 3 stage diagonal fan 2 Modular suspension 3 Bag filter F7 with differential pressure swi...

Page 26: ...ropriately marked the marking shall be considered Fig 8 1 Connecting heat exchanger to hydraulic circuit The supply and return piping should be run in such a way as to prevent mechanical stress and without placing a strain on the heat exchanger with sufficient clearance around the unit to allow for maintenance and repair operations DAMAGE TO THE UNIT When connecting the piping counterhold the conn...

Page 27: ...tiMAXX HD unit heaters must only be car ried out by qualified electricians in observance of this operation manual and the current regulations VDE regulations including safety regulations Accident prevention regulations Installation instructions DANGER FROM ELECTRICAL CURRENT The connection diagrams do not contain any protective measures During con nection the standards and regulations currently in...

Page 28: ...eet electrical switch box Plastic terminal box The terminal box contains a terminal strip and depending on the model may also contain additional electrical parts Sheet steel electric switch box The steel sheet electrical switch box contains control power electronics MATRIX 2001 3001 2002 3002 4002 2003 3003 4003 4004 Fig 9 1 Terminal box electrical switch box Plastic terminal box Steel sheet elect...

Page 29: ... to inside of cover or enclosed separately attached to inside of cover or enclosed separately NOTE ON SWITCH UNITS The connection diagrams are supplied with the relevant switch units or interme diate terminal box For connection use the following control cables control cables depending on unit type and necessary requirements thermal contact connection using 0 5 mm control cable with shielding made ...

Page 30: ...ed operation mode 1 stage switch MC301 MC331 connection cable 3 РЕ 4 wires screened line TC connecting wires 1 stage mode stage III 1 stage mode stage II 1 stage mode stage I Changing phases enables to swap rotation direction 2W 1U 1V 1W 3W 3U 2V 2U 3V TK TK M 3 2W 1U 1V 1W 3W 3U 2V 2U 3V TK TK TK TK L1 L2 L3 PE 2W 1U 1V 1W 3W 3U 2V 2U 3V TK TK TK TK L1 L2 L3 PE 2W 1U 1V 1W 3W 3U 2V 2U 3V TK TK TK...

Page 31: ...n be connected to the supplied controls system 9 4 1 Controller types MATRIX 2001 and MATRIX 3001 Fig 9 3 Controller types MATRIX 2001 and MATRIX 3001 N N STP 32 31 38 37 36 35 34 33 N STV STV STV STV STV STV N 30 STP N L 110 111 112 102 103 104 105 L STP STP STP 07 06 73 72 42 41 48 47 46 45 44 43 40 1 2 MATRIX 2001 3001 9 Power supply Control panel connection Connection of other units with MATRI...

Page 32: ... N L1 L2 L3 U1 V1 W1 U2 V2 W2 L1 N N N 32 31 73 72 71 70 07 06 15 14 13 12 11 10 38 37 36 35 34 33 99 98 97 96 95 Power supply Secondary air louvre connection to MATRIX 3000 Control panel connection Connection of other units with MATRIX 200x External room sensor MATRIX 2002 3002 4002 4002 IO 9 MATRIX 2002 3002 4002 4002 IO 9 Power supply Secondary air louvre Control panel connection Connection of ...

Page 33: ... 121 120 N L1 N L1 L2 L3 U1 V1 W1 U2 V2 W2 L1 N N N 83 82 Power supply Secondary air louvre Actuator of mixed air damper Control panel connection Connection of other units with MATRIX 300x 400x Inlet temperature sensor External room sensor Outdoor sensor Supply air sensor Status and error messaging External control input External exhaust fan MATRIX 2002 3002 4002 4002 IO 9 MATRIX 2002 3002 4002 40...

Page 34: ... N L1 L2 L3 3U 3V 3W L1 N N N 1W 2U 2V 2W 1V 1U 32 31 73 72 71 70 07 06 15 14 13 12 11 10 38 37 36 35 34 33 99 98 97 96 95 Power supply Secondary air louvre connection to MATRIX 3000 Control panel connection Connection of other units with MATRIX 200x External room sensor MATRIX 2003 3003 4003 4003 IO 9 MATRIX 2003 3003 4003 4003 IO 9 Power supply Secondary air louvre Control panel connection Conne...

Page 35: ... L N N N N 113 114 100 150 151 100 152 153 69 68 67 66 65 64 63 62 Power supply Secondary air louvre Actuator of mixed air damper Control panel connection Connection of other units with MATRIX 300x 400x Inlet temperature sensor External room sensor Outdoor sensor Supply air sensor Status and error messaging External control input External exhaust fan MATRIX 2003 3003 4003 4003 IO 9 MATRIX 2003 300...

Page 36: ...TP STP STV STV STV STV STV STV L L N 1 2 ON L L 500 501 502 503 504 505 506 83 82 79 78 L N N N N 113 114 100 150 151 100 152 153 69 68 67 66 65 64 63 62 Power supply Secondary air louvre Actuator of mixed air damper Control panel connection Connection of other units with MATRIX 300x 400x Inlet temperature sensor External room sensor Outdoor sensor Supply air sensor Status and error messaging Exte...

Page 37: ...ere the sensor is fitted is crucial for the temperature in the room to be regulated precisely Therefore the sensor must see Fig 9 9 not be fitted next to doors windows hatches etc as intense movement of air can cause incorrect measurements not be fitted on hot or cold walls e g chimney outside wall as wall temperature can cause incorrect measurements not be fitted behind curtains and net curtains ...

Page 38: ...by others max B 10 A Pos 2 Connection to 1st unit L1 N on fan switch Pos 3 Connection to 2nd unit L1 N on fan switch Pos 4 To further units Connect the mains voltage in accordance with the wiring diagram Fig 9 10 Connecting mains voltage for controller unit PE PE PE 1 2 3 4 PE N L1 N L1 PE L1 N NOTE Slave units can be supplied by the master unit see Fig 9 10 Pos 3 and Pos 4 Consider the total powe...

Page 39: ... 2nd unit L1 L2 L3 on fan switch Pos 4 To further units Connect the mains voltage in accordance with the wiring diagram Fig 9 11 Connecting mains voltage for controller unit PE PE 1 2 3 4 PE L3 L2 L1 N L1 L2 L3 N N PE PE L3 L2 L1 N N NOTE Use the following control cables for connection Short cable lengths and or location not prone to interference multi core control cable 0 5 mm2 shielded with alum...

Page 40: ... 13 34 33 32 37 36 35 38 40 46 45 44 43 42 41 48 47 Bedienger t MATRIX OP21 Ger t mit MATRIX 2000 Control panel MATRIX OP21 Unit with MATRIX 200x MATRIX 200x 300x 400x 400x IO 9 Connecting first unit further units without valves All further units must be equipped with MATRIX 200x Connect the control cables in accordance with the wiring diagram Control cable see bottom note on page 40 Fig 9 13 Conn...

Page 41: ...MATRIX 2000 31 30 34 33 32 37 36 35 38 31 30 First unit with MATRIX 300x Further units Next unit with MATRIX 200x MATRIX 200x 300x 400x 400x IO 9 Connecting control panel network participant When connecting control panel MATRIX OP21 to MATRIX Net network 2 core bus line should be used Connect the control cables in accordance with the wiring diagram The following cable is recommended for the bus li...

Page 42: ... air treatment unit Control panel MATRIX OP30 OP51 Unit with MATRIX 300x 400x Connecting first unit further units On units with the same control electronics MATRIX 300х 400х a 2 wire cable should be used Connect the bus line in accordance with the wiring diagram Each unit can be equipped with MATRIX 400х or MATRIX 300х The following cable is recommended for the bus line Manufacturer HELUKABEL Type...

Page 43: ...page 40 Connect the inlet sensor according to the wiring diagram The connection is carried out using the controller PCB MATRIX 300х 400х Fig 9 19 Connecting inlet sensor alternative MATRIX 200x 300x 400x 400x IO 9 9 9 9 1 Connection cable see note on page 40 Connect the room sensor according to the wiring diagram The connection can be performed on MATRIX 200х using control panel ОР21 terminals 12 ...

Page 44: ...am Operation Closed contact on terminal 120 121 Fault Closed contact on terminal 124 125 Fig 9 22 Connecting operation and fault messaging Luftbehandlungsgerät mit MATRIX 3000 4000 124 123 122 121 120 125 NO NC C NO NC C Unit with MATRIX 300x 400x Error Operation MATRIX 200x 300x 400x 400x IO 9 9 9 Functional input can be assigned with different functions depending on the supplied control equipmen...

Page 45: ...eating request max 230 V 4 A ohmic 2 A inductive Cooling request max 230 V 4 A ohmic 2 A inductive If no jumpers are set at 100 230 and 100 232 outputs 230 231 and 232 233 can be used as voltage free outputs max 2 A Carry out the connection according to the wiring diagram Fig 9 24 Connecting functional inputs and functional outputs 152 153 100 150 151 100 62 63 64 65 66 67 68 69 Air treatment unit...

Page 46: ...ng diagram The connecting terminals are located on the IO module Fig 9 27 Connecting valves on units with electrical secondary air damper Luftbehandlungsger t mit MATRIX 4000 113 114 N M Air treatment unit with MATRIX 400x MATRIX 200x 300x 400x 400x IO 9 9 9 9 NOTE For connecting valve actuators to the valve module MATRIX V refer to the rele vant operation manual on Global Modules MATRIX 200x 300x...

Page 47: ...it MATRIX 4000 03 133 134 02 01 N M Air treatment unit with MATRIX 400x MATRIX 200x 300x 400x 400x IO 9 9 Connecting external exhaust air fan is carried out in fresh air mode After jumper is set on terminals 130 and 131 terminal 132 is supplied with control voltage 230 V which can be used for exhaust fan switch by others on site Maximum relay contact load 230 V 4 A ohmic 2 A inductive Internal fus...

Page 48: ...odule and a controller unit In this case the LON module transmits the group setpoints and actual values With units incorporating MATRIX 3000 and MATRIX 4000 a group can also be formed by replacing the control panel by a global module such as MATRIX LON Group structure with the MATRIX 2000 system A group can be formed with the MATRIX 2000 system as illustrated in Fig 9 31 Fig 9 31 Group structure w...

Page 49: ...rd of the MATRIX 3000 controller refer to the unit s oper ation manual The data of the MATRIX LON module are assigned as part of the LON configuration The MATRIX V module is assigned to this group via the group address switch refer to the Commissioning and Testing Chapter in the operation manual for DencoHappel MATRIX global modules Units 2 to 16 can be freely assigned The control panel must be co...

Page 50: ... the group address switch on the control panel refer to the Commissioning and Testing Chapter in the operation manual for DencoHappel MATRIX control panels on the printed circuit board of the MATRIX 3000 4000 controller refer to the unit s operation manual The data of the MATRIX LON module are assigned as part of the LON configuration The MATRIX V MATRIX RF and MATRIX EM modules are assigned to th...

Page 51: ... on page 53 two digital input modules MATRIX DI two analogue input modules MATRIX AI two digital output modules MATRIX DO a central timer MATRIX CLOCK a return air management MATRIX EM up to 16 LON modules MATRIX LON Any assignment of the unit groups and the global modules in the network is possible The following is decisive for the assignment of the units control panels and global modules to a gr...

Page 52: ...ective boards enabling safe termination refer to Chapter Connecting MATRIX Net 9 7 4 Line structure The illustration shows the setup of the MATRIX Net with line structure As an example two groups each consisting of a control panel and a global module are networked In addition power supply of the control panel via the controller terminals 95 99 is shown Fig 9 35 Set up of MATRIX Net in line structu...

Page 53: ...h amounts to 25 m Fig 9 36 Set up of MATRIX Net in a line structure with stub line As it is not allowed to connect three wires together a joining terminal must be provided To do so the intermediate terminals STV mounted on the board if not already occupied or terminals fitted on site by others can be used 1 2 3 X NOTE The data transfer cable must be run as demonstrated in Fig 9 36 in such a way th...

Page 54: ...X Net on one side in the unit using shielding clips to ensure the best possible electrical contact Connect the shielding with the shielding clip to a large earth surface area In systems with a large network extent or if large scale EMC impairment is likely the shielding should be applied on both sides Before this operation make sure that no potential differentials occur RECOMMENDATION We recommend...

Page 55: ...inst being switched back on at an appropriate point of the on site power supply DANGER OF SCALDING Before performing any work on fan coil units Seal off the heating medium inlet before performing work on the valves or the inlet or outlet pipes and secure this sealing from being opened unintentionally Do not commence work before the heating medium has cooled down DANGER FROM ROTATING UNIT PARTS Rot...

Page 56: ...ing is completed to avoid air bubbles in the heat exchanger Check that the piping and connections and sealed 10 1 3 After commissioning Close the terminal box 10 2 Air venting To ensure that the exchanger is filled with heating cooling medium it has to be air vented Open all shut off and control valves Use an air venting key to open an air vent screw by others Close the vent screw s again if only ...

Page 57: ... terminating resistors at the beginning and end of the line Turn the DIP switch on both users e g control panels unit PCBs or modules to ON The line beginning and line end correspond to the start and end of the bus cable The terminating resistors should also be switched on for stand alone units MATRIX 200x 300x 400x 400x IO 9 Fig 10 1 Setting terminating resistors DIP switch Function 1 2 OFF OFF T...

Page 58: ...inning and line end correspond to the start and end of the bus cable The terminating resistors should also be switched back on for stand alone units MATRIX 200x 300x 400x 400x IO 9 9 9 Fig 10 2 Setting terminating resistors DIP switch Function 1 2 OFF OFF Terminating resistor switched off ON ON Terminating resistor switched on default setting Control Unit printed circuit board Module Module Module...

Page 59: ...n the control panel set the addresses 0 15 Each group is given its own address The labels A to F correspond to the addresses 10 to 15 MATRIX 200x 300x 400x 400x IO 9 NOTE Assigning duplicate addresses on the control panel causes malfunctions The default setting for the group address switch is 0 and it may need to be changed Fig 10 3 Setting the address on the control panel 1 Control panel group 0 ...

Page 60: ...en its own address The labels A to F correspond to the addresses 10 to 15 MATRIX 2001 3001 9 NOTE Assigning duplicate addresses on the control panels causes malfunctions The default setting for the group address switch is 0 and it may need to be changed if necessary Fig 10 4 Setting the address on the control panel 1 Control panel unit s MultiMAXX Group 0 address 0 2 Control panel unit s MultiMAXX...

Page 61: ...l mode This regulates the supply air temperature with the corresponding control parameters for the supply air temperature to this limit value With the room temperature and cascade control types this temporary supply air regu lation remains active until the main control setpoint i e particular room temperature is reached The unit then switches back to the main control type Minimum heating temperatu...

Page 62: ...e prevented or minimized by means of the minimum limitation Disadvantage The supply air temperature can fall below the minimum limitation temperature value Factory setting and input limit values of the influence coefficient Default value 1 0 Minimum input value 0 4 Maximum input value 4 0 Maximum heating temperature If this function is activated and a temperature sensor is installed in the supply ...

Page 63: ... electrical control box is open Direct interventions in the electrical switch box are not permitted Before completeting work on the air treatment unit ensure that the electrical switch box is properly closed Fig 10 5 Switching the unit on using the control panel 1 Control panel MATRIX OP44I 2 Control panel MATRIX OP50I 1 2 NOTE The setting of the speed selection switch only OP5X OP21X OP3XX OP44X ...

Page 64: ...ard signal the operating status of the unit DANGER OF ELECTRICAL CURRENT Before correcting an error in the data connection power the entire system down Ensure that the unit is secured against being switched back on at an appropriate point of the on site power supply MATRIX 200x 300x 400x 400x IO 9 9 MATRIX 200x 300x 400x 400x IO 9 9 9 LED LED status Operating status Action remedy Yellow On Supply ...

Page 65: ...ion input The input can be assigned with the following functions as required Unit OFF Bridge the input terminals Turn the unit on and adjust the setpoint as required until the fan is running Open the jumper 9 The fan must switch off the valves close unit remains in frost protection monitoring mode Gate contact Bridge the input terminals 9 The unit switches in the configured fan speed Open the jump...

Page 66: ...input terminals 9 The unit switches into normal mode Procedure for activating operation programme Free operation mode or economy mode Switch the unit on Set the jumper on the input terminals 9 The unit switches into free operation mode or economy mode Procedure for activating operation programme Unit off Switch the unit on Set the jumper on the input terminals 9 The unit switches off attention no ...

Page 67: ...ode the highest fan speed is blocked The fan speeds are controlled according to the deviation between actual and setpoint values Both the size and the time of the existing deviation affect the control behaviour The number of the available fan speeds depends on the unit type Parameter Speed number 0 3 speed stage fan Speed number 0 5 speed stage fan only MATRIX 4000 Fast ventilation only mixed air ...

Page 68: ... damper s position is regulated on the basis of the currently required heating in the room or supply air operation mode and the outside temperature external potential In favourable temperature conditions the regulation is achieved only by controlling the mixed air damper passive mode Economy mode control This function is similar to temperature regulation in certain temperature conditions and with ...

Page 69: ...e room temperature setpoint depending on the external temperature Example of use Starting from outside temperature of 26 C this setting requires to increase the room temperature setpoint by 0 5 C with 1 C increase of outside temperature The setpoint should not be increased any further if outside air temperature reaches 32 C Thus 26 C as the start temperature and 32 C as the end temperature should ...

Page 70: ...mal position is calculated and set on the basis of the fan speed and excessive temperature This function can be adjusted to local conditions using calibration Manual Functional possibilities with controls The input values for controls are fan speed and excessive temperature supply air temperature room temperature For excessive temperature note the following With low excessive temperature the suppl...

Page 71: ...installed If the calibration is performed via control panels it can only be done in groups In this case all units should have the same installation height In groups comprising ceiling mounted and wall mounted units a separate calibration is necessary for each of the two types The MATRIX PC servicing tool enables independent calibration of each unit in a group irrespectively of whether it is a mixe...

Page 72: ...all power supply connections ensure they cannot be switched on again unintentionally and verify that they have been disconnected Earth and short circuit them and cover or otherwise isolate any neighbouring live parts Failure to do so may lead to serious injury or death DANGER OF ROTATING UNIT PARTS The rotating fan wheel poses a risk of injury Before performing any work on the unit ensure that it ...

Page 73: ...ular inspections and troubleshooting Annually It is recommended to inspect the unit every year before the beginning of the heating season Maintenance shall be carried out by a refrigeration engineer after the unit has been isolated Part of the inspection shall focus on function testing of the fan and heat exchanger Remove possible dirt and sediments from the heat exchanger Make sure that the impel...

Page 74: ...ply fuse and connection Fan is not running Fan isolator is switched on Signal LED STOP error lights up Motor protection tripped Check motor temperature Let motor cool down and switch again If problem persists investigate reason for overheating Unit not heating Insufficient heating medium flow Air in heat exchanger Inlet temperature too low Check piping and pump repair fault Air vent heat exchanger...

Page 75: ...e sorted and separated according to their respective properties ENVIRONMENTAL DAMAGE Only appropriately trained staff may dismantle and dispose of the unit ELECTRICAL HAZARD When carrying out any decommissioning and dismantling work on the unit isolate all power supply connections ensure they cannot be switched on again unintentionally and verify that they have been disconnected Earth and short ci...

Page 76: ... DencoHappel is a global company with expertise in air treatment air conditioning and air filtration Our nearest sales and service teams will be glad to discuss ideas and develop creative and effective solutions with you ...

Reviews: