15
ENGLISH
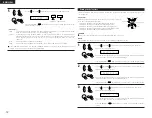
Press the
(down) button to switch the DIGITAL input (COAX) setting.
10
Setting the Digital In assignment
Input the type of components connected to the digital input terminals.
1
Use the
(left) and
(right) buttons to assign the input function connected to
the COAXIAL input (COAXIAL) terminal.
NOTE:
• TUNER, V. AUX cannot be selected.
16 COAX CD
CD
AUX
DVD
TV
VCR
CDR
OFF
(Initial)
(left) button (right) button
• Select “OFF” if nothing is connected.
Press the ENTER or
(down) button to switch the optical input 1 (OPT1)
setting.
2
Use the
(left) and
(right) buttons to assign the input function connected to
the OPTICAL input 1 (OPTICAL 1) terminal.
17 OPT1 DVD
CD
AUX
DVD
TV
VCR
CDR
OFF
(Initial)
(left) button (right) button
• Select “OFF” if nothing is connected.
Press the ENTER or
(down) button to switch the optical input 2 (OPT2)
setting.
3
Use the
(left) and
(right) buttons to assign the input function connected to
the OPTICAL input 2 (OPTICAL 2) terminal.
18 OPT2 TV
CD
AUX
DVD
TV
VCR
CDR
OFF
(Initial)
(left) button (right) button
• Select “OFF” if nothing is connected.
Press the ENTER or
(down) button to switch the Auto Surround Mode setting.
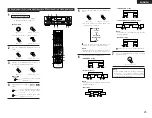
Setting the Auto Surround Mode
For the three kinds of input signals as shown below, the surround mode played the last is stored in the memory.
At next time it the same signal inputs, the memorized surround mode is automatically selected and the signal
is played.
Note that the surround mode setting is also stored separately for the different input function.
SIGNAL
Default Auto Surround Mode
q
Analog and PCM 2-channel signals
STEREO
w
2-channel signals of Dolby Digital, DTS or other multichannel format
Dolby PL
II
x Cinema
e
Multichannel signals of Dolby Digital, DTS or other multichannel format
Dolby or DTS Surround
1
Use the
(left) and
(right) buttons to select the Auto Surround mode.
19 AUTOSURR. ON
ON
OFF
(Initial)
(left) button (right) button
Press the ENTER or
(down) button to switch the Ext. In SW Level setting.
Setting the Ext. In SW Level
Set the method of playback of the analog input signal connected to the Ext. In terminal.
1
Use the
(left) and
(right) buttons to select the Ext. In Subwoofer channel
Level playback.
20 EXT.IN SW +15
+00
+05
+10
+15
(Initial)
(left) button (right) button
Press the ENTER or
(down) button if you want to start the settings over from
the beginning.
After setting up the system
Press the SYSTEM SETUP button to finish system set up.
1
This completes the system setup operations. Once the system is set up, there is no need to make the
settings again unless other components or speakers are connected to or the speaker layout is changed.
Summary of Contents for AVR-1705
Page 44: ...44 A B 6 16 ohms A B 12 16 ohms 6 16 ohms 1 2 3 LED DENON 4 ohms L R L R L R 80Hz A B...
Page 66: ...66 2 1 2 1 AUDIO 1 SHIFT 2 PRESET 16 3 1 2 1 2 17 1 2 A SPEAKER A B 3 1...
Page 79: ...79 A B 6 16 ohms A B 12 16 ohms 6 16 ohms 1 2 3 LED DENON 4 ohms L R L R L R 80Hz A B...
Page 101: ...101 2 1 2 1 AUDIO 1 SHIFT 2 PRESET 16 3 1 2 1 2 17 1 2 A SPEAKER A B 3 1...
Page 111: ...TOKYO JAPAN www denon com Printed in China 511 4177 002...


