background image

78

CVIIP4001CRLTF (MCU


: IC31)

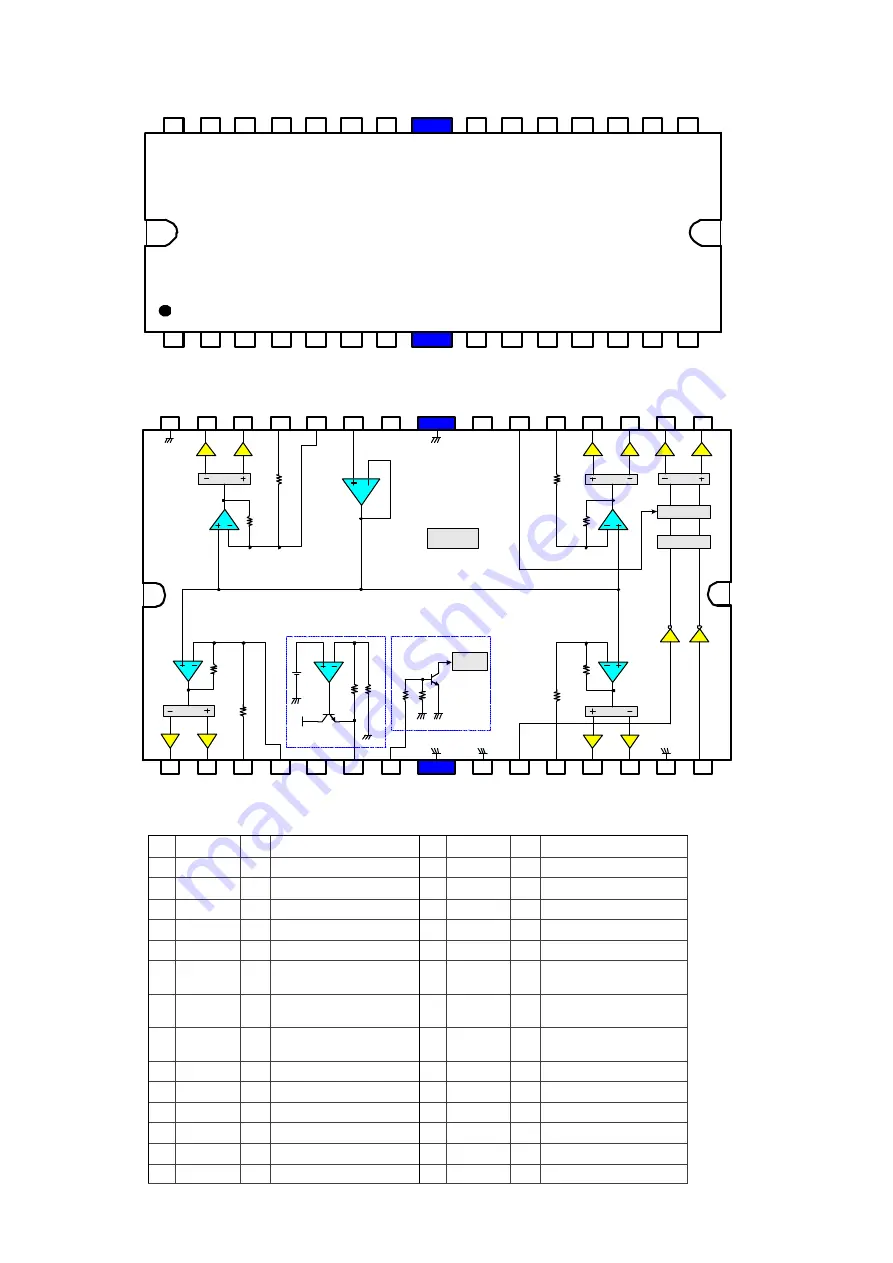
CVIIP4001CRLTF Block Diagram

CVIIP4001CRLTF Pin Discriptions

- 2 -

August. 2002 

(Rev.7)

WWW.INTERPIONSEMI.COM

 IP4001

5-CH MOTOR DRIVE IC 

8

9

10

11

12

13

14

2

3

4

5

6

7

1

21

20

19

18

17

16

15

27

26

25

24

23

22

28

DO1-

DO1+

IN1

IN1A

N/C

REO

MUTE

SGND FWD

IN2

DO2+ DO2- PGND1 REV

DO5+

DO5-

DO3-

DO3+

IN3

CTL

VCC1

VCC2

REF

IN4A

IN4

DO4-

PGND2

DO4+

(FIN)

(FIN)

 PIN DESCRIPTIONS

NO SYMBOL

I/O   DESCRIPTION

1

DO1-

O   CH1 OUTPUT (-)

2

DO1+

O   CH1 OUTPUT (+)

3

IN1

I

  CH1 INPUT 1

4

IN1A

I

  CH1 INPUT 2

5

N / C

-

 NO-CONNECTION

6

REO

O   REGULATOR 

  OUTPUT

7

MUTE

I

  MUTE 

  INPUT

8

SGND

-

  SIGNAL 

  GROUND

9

FWD

I

  CH5 INPUT 1

10

IN2

I

  CH2 INPUT

11

DO2+

O   CH2 OUTPUT (+)

12

DO2-

O   CH2 OUTPUT (-)

13

PGND1

-

POWER GROUND 1

14

REV

I

  CH5 INPUT 2

NO SYMBOL

I/O   DESCRIPTION

15

DO5+

O

  CH5 OUTPUT (+)

16

DO5-

O

  CH5 OUTPUT (-)

17

DO3-

O

  CH3 OUTPUT (-)

18

DO3+

O

  CH3 OUTPUT (+)

19

IN3

I

  CH3 INPUT 

20

CTL

I

CH5 MOTOR SPEED 

  CONTROL

21

VCC1

I

  SUPPLY VOLTAGE 1 

  (CH2,CH3,CH5)

22

VCC2

I

  SUPPLY VOLTAGE 2 

 (CH1,CH4,SIGNAL,REG)

23

REF

I

  CH BIAS INPUT

24

IN4A

I

  CH4 INPUT 1

25

IN4

I

  CH4 INPUT 2

26

DO4+

O

  CH4 OUTPUT (+)

27

DO4-

O

  CH4 OUTPUT (-)

28

PGND2

-

POWER GROUND 2

 PIN CONNECTIONS

IP4001

- 1 -

August. 2002 

(Rev.7)

WWW.INTERPIONSEMI.COM

 IP4001

5-CH MOTOR DRIVE IC 

  The  IP4001  is  a  monolithic  integrated  circuit,    and 

suitable  for  5-ch  motor  driver  which  drives  focus

actuator, tracking actuator, sled motor, spindle motor 

and Tray motor of CDP & V-CD system.

- 1ch(forward-reverse) control DC motor driver 

- 4ch BTL(Balanced Transformerless) driver

- Built-in TSD (Thermal shutdown) circuit

- Built-in 5V regulator with an internal NPN TR

- Built-in mute circuit

- Built-in Tray motor speed control circuit

- Wide operating supply voltage range: 6.5V~13.2V

   Device

Package

Operating Temp

IP4001

28SSOPH-375

-35

O

C ~ +85

O

C

IP4001TF

28SSOPH-375

-35

O

C ~ +85

O

C

 DESCRIPTIONS

 BLOCK DIAGRAM

 ORDER INFORMATION

 FEATURES

8

9

10

11

12

13

14

2

3

4

5

6

7

1

21

20

19

18

17

16

15

27

26

25

24

23

22

28

DO1-

DO1+

IN1

IN1A

N/C

REO

MUTE

SGND

FWD

IN2

DO2+ DO2-

PGND1 REV

DO5+

DO5-

DO3-

DO3+

IN3

CTL

VCC1

VCC2

REF

IN4A

IN4

DO4-

PGND2

TSD

10K

10K

D

D

Level Shift

10K

10K

D

D

Level Shift

IN2

10K

10K

D

D

Level Shift

D

D

SWITCH

Level Shift

MSC

10K

10K

D

D

Level Shift

BIAS

V

C

C

2

REGULATOR

3.

3K

3.

3K

2.5

V

20

K

20

K

PWR

TR

DO4+

(FIN)

(FIN)

MUTE

IN1

28SSOP H/S 

- 2 -

August. 2002 

(Rev.7)

WWW.INTERPIONSEMI.COM

 IP4001

5-CH MOTOR DRIVE IC 

8

9

10

11

12

13

14

2

3

4

5

6

7

1

21

20

19

18

17

16

15

27

26

25

24

23

22

28

DO1-

DO1+

IN1

IN1A

N/C

REO

MUTE

SGND FWD

IN2

DO2+ DO2- PGND1 REV

DO5+

DO5-

DO3-

DO3+

IN3

CTL

VCC1

VCC2

REF

IN4A

IN4

DO4-

PGND2

DO4+

(FIN)

(FIN)

 PIN DESCRIPTIONS

NO SYMBOL

I/O   DESCRIPTION

1

DO1-

O   CH1 OUTPUT (-)

2

DO1+

O   CH1 OUTPUT (+)

3

IN1

I

  CH1 INPUT 1

4

IN1A

I

  CH1 INPUT 2

5

N / C

-

 NO-CONNECTION

6

REO

O   REGULATOR 

  OUTPUT

7

MUTE

I

  MUTE 

  INPUT

8

SGND

-

  SIGNAL 

  GROUND

9

FWD

I

  CH5 INPUT 1

10

IN2

I

  CH2 INPUT

11

DO2+

O   CH2 OUTPUT (+)

12

DO2-

O   CH2 OUTPUT (-)

13

PGND1

-

POWER GROUND 1

14

REV

I

  CH5 INPUT 2

NO SYMBOL

I/O   DESCRIPTION

15

DO5+

O

  CH5 OUTPUT (+)

16

DO5-

O

  CH5 OUTPUT (-)

17

DO3-

O

  CH3 OUTPUT (-)

18

DO3+

O

  CH3 OUTPUT (+)

19

IN3

I

  CH3 INPUT 

20

CTL

I

CH5 MOTOR SPEED 

  CONTROL

21

VCC1

I

  SUPPLY VOLTAGE 1 

  (CH2,CH3,CH5)

22

VCC2

I

  SUPPLY VOLTAGE 2 

 (CH1,CH4,SIGNAL,REG)

23

REF

I

  CH BIAS INPUT

24

IN4A

I

  CH4 INPUT 1

25

IN4

I

  CH4 INPUT 2

26

DO4+

O

  CH4 OUTPUT (+)

27

DO4-

O

  CH4 OUTPUT (-)

28

PGND2

-

POWER GROUND 2

 PIN CONNECTIONS

IP4001

Summary of Contents for D-M38S

Page 1: ...RCD M38 3 3 RCD M38DAB 3 D M38S 3 STEREO CD RECEIVER Ver 3 Some illustrations using in this service manual are slightly different from the actual set Please use this service manual with referring to the operating instructions without fail For purposes of improvement specifications and design are subject to change without notice S0105 1V03DM DG1007 Please refer to the MODIFICATION NOTICE ...

Page 2: ...safety parts that are marked z on wiring diagrams and parts lists be sure to use the designated parts Be sure to mount parts and arrange the wires as they were originally For safety seasons some parts use tape tubes or other insulating materials and some parts are mounted away from the surface of printed circuit boards Care is also taken with the positions of the wores omsode amd clamps are used t...

Page 3: ... film RW winding RN Metal film RK Metal mixture P Pulse resistant type NL Low noise type NB Non burning type FR Fuse resistor F Lead wire forming 2B 1 8 W 2E 1 4 W 2H 1 2 W 3A 1 W 3D 2 W 3F 3 W 3H 5 W F 1 G 2 J 5 K 10 M 20 Ex RN Type 14K Shape and per formance 2E Power 182 Resist ance G Allowable error FR Others Resistance 1800ohm 1 8kohm 1 8 2 Indicates number of zeros after effective number 2 di...

Page 4: ...y regulations require that the set be restored to its original condition and that parts which are identical with those specified be used Veiligheidsbepalingen vereisen dat het apparaat in zijn oorspronkelijke toestand wordt terug gebracht en dat onderdelen identiek aan de gespecifieerde worden toegepast Bei jeder Reparatur sind die geltenden Sicherheitsvorschriften zu beachten Der Originalzustand ...

Page 5: ... stereo separation 35dB 1kHz n n CD section Playback frequency response 2Hz 20kHz Wow flutter Below measurable limits 0 001 Sampling frequency 44 1kHz RCD M38 SC M37 n n Clock Timer section Clock method Crystal oscillator Within 1 2 minutes per month Timer Everyday Once timer One each Sleep timer 90 minutes maximum n n General Power supply E2 EK model AC 230 V 50 Hz Power supply E3 model AC 120 V ...

Page 6: ...Service tools Measuring Disc CD TCD 784 CD R TCD R082W CD RW TCD W082W z Refer to MEASURING METHOD AND WAVEFORMS Service Jigs When you repair the printing board you can use the following JIG Extension cable kit Please order to Denon Official Service Distributor in your region if necessary 943309004570M DATA UPDATE KIT 1 Set Refer to 26 page Note All user settings will be lost and this factory sett...

Page 7: ...ODED VIEW P9 TOP CABINET REAR PANEL SUB ASSY Refer to DISASSEMBLY 6 REAR PANEL SUB ASSY and EXPLODED VIEW SUB TRANS UNIT Ref No of EXPLODED VIEW C6 INPUT P W B UNIT ASSY Ref No of EXPLODED VIEW C8 DAB MODULE for EK model Ref No of EXPLODED VIEW C9 TUNER MODULE Ref No of EXPLODED VIEW C12 FRONT PANEL SUB ASSY Refer to DISASSEMBLY 2 FRONT PANEL SUB ASSY and EXPLODED VIEW FRONT UNIT Ref No of EXPLODE...

Page 8: ...iption of the direction in which the photos were taken Photographs for which no direction is indicated were taken from above the product The photograph is RCD M38 EK model 1 DOOR 1 Take off the Chucking plate after removing screws The viewpoint of each photograph Photografy direction View from above Front side Direction of photograph B Direction of photograph D Direction of photograph C Direction ...

Page 9: ...9 2 Open the CD tray by turning the Drive gear clockwise 3 Detach the DOOR Drive gear CD tray DOOR Direction of photograph B ...

Page 10: ...the connector wire Proceeding TOP CABINET DOOR FRONT PANEL SUB ASSY View from bottom cut CN82 FFC cable Outside of CD macha foot Direction of photograph D Direction of photograph C CN83 FRONT PANEL SUB ASSY Direction of photograph B Please refer to EXPLODED VIEW for the disassembly method of each PCB included in FRONT PANEL ASSY ...

Page 11: ...up of CD MECHANISM ASS Y then disconnect the connector wires and FFC cable Proceeding TOP CABINET DOOR FRONT PANEL SUB ASSY CD MECHANISM ASS Y CD MECHANISM ASS Y CN26 CN25 Protective soldering place for laser diode Soldering place Direction of photograph B FFC cable ...

Page 12: ...p band then disconnect the connector wires and FFC cable Remove the screws Proceeding TOP CABINET DOOR FRONT PANEL SUB ASSY CD MECHANISM ASS Y MCB PCB UNIT ASSY View from bottom Direction of photograph B cut CN71 CN96 CN98 CN12 FFC cable Direction of photograph B ...

Page 13: ...r wires Proceeding TOP CABINET DOOR FRONT PANEL SUB ASSY CD MECHANISM ASS Y HEAT SINK SUB ASSY View from bottom Direction of photograph B cut CN72 CN95 HEAT SINK SUB ASSY Direction of photograph C HEAT SINK SUB ASSY CN73 CN97 Direction of photograph C Please refer to EXPLODED VIEW for the disassembly method of each PCB included in HEAT SINK SUB ASSY ...

Page 14: ...t the connector wires 3 Disconnect the connector wires and FFC cable then remove the screws 4 Remove the screws Proceeding TOP CABINET REAR PANEL SUB ASSY View from bottom CN96 CN98 Direction of photograph D CN93 CN72 CN12 FFC cable Direction of photograph A ...

Page 15: ...UB ASSY Proceeding TOP CABINET REAR PANEL SUB ASSY SPK UNIT Please refer to EXPLODED VIEW for the disassembly method of SPK UNIT Proceeding TOP CABINET REAR PANEL SUB ASSY SPK UNIT TRANS Please refer to EXPLODED VIEW for the disassembly method of TRANS Proceeding TOP CABINET REAR PANEL SUB ASSY SPK UNIT TRANS GUIDE UNIT Please refer to EXPLODED VIEW for the disassembly method of GUIDE UNIT ...

Page 16: ...e 1 Remove 2 top screws then detach the Chucking plate 2 Detaching the Chucking pulley and chucking yoke by removing the 3 hooks when abandoning CD MECHA ass y 2 CD tray When abandoning CD MECHA ass y please detach the CD tray 1 Detach the Sw pin on the CD tray 2 Open the CD tray by turning the Drive gear clockwise 3 Open the Stopper as shown in the fig then detach CD tray Chucking yoke Chucking p...

Page 17: ...nism prior to anchoring in the set should be protected against static electricity and dust The mechanism must be stored that damaging outside forces are not received When carrying the finished mechanism hold it by the chassis body For proper operation storage and operating environment should not contain corrosive gases For example H2S SO2 NO2 CI2 etc In addition storage environment should not have...

Page 18: ...f VFD is turning on and off every one second MUTING ON 3 Unplug AC cord to clear this mode 3 Cold start mode initialization 1 Plug AC cord into power outlet while pressing ON STANDBY and 8 button same time on Main Unit Initialize I N I T I A L I Z E Default source DISC TUNER band FM DAB Model DAB SDB OFF BASS 0 TREBLE 0 BALANCE CENTER DIMMER 100 VOLUME 8 TUNER Preset All 0 Set TUNER PRESET button ...

Page 19: ...the initially set position 10 mm towards the outside from the innermost position and stop in this status 4 2 Servo check Press the 5 button Execute the following steps Press 1 3 button continuously for over 1second to switch directly to SUB CODE readout in step t q LD ON with servo still stopped 1 3 0 1 L D O N 1 3 flashing w FOCUS ON disc rotation tracking off z If no disc loaded retry then stop ...

Page 20: ...rder 1 3 Tr X X X X 1 3 flashing T No XX XX Time 4 6 Adjustment value display 1 When DIRECT button is pressed the adjustment values are displayed in the following order q FOCUS BALANCE 1 3 X X X X F O C U S B A L A N C E 1 3 flashing XXXX Adjustment value w FOCUS GAIN 1 3 X X X X F O C U S G A I N 1 3 flashing XXXX Adjustment value e TRACKING BALANCE 1 3 X X X X T R A C K I N G B A R A N C E 1 3 f...

Page 21: ... after the laser turns on The current value is updated every 3 seconds The laser drive current undergoes A D conversion for calculation Decimal values are discarded 2 Press the 2 button 4 CD test mode 1 display reappears Stored data is not cleared initialazation of 3 Cold start mode 4 7 1 Overwriting the stored data 1 When the 1 3 button is pressed for over 5 seconds while the laser current is dis...

Page 22: ...tracks If disc has 21 or more tracks skip to final track after playback of first track has finished e After disc playback has finished move pickup to innermost position and open tray The heat run repetition no is incremented increased by 1 when the tray is opened r When loader open status detected close tray again re read TOC and start playback from the first track on the disc t Conduct q to r rep...

Page 23: ...manual search E3 00 TOC could not be read within specified time E3 01 PVD SVD analysis could not be completed within specified time E4 04 Search time out E4 05 Error in communications with CD decoder E5 00 Inner switch not on E6 00 Inner switch not off E9 00 Tray is not opened by the specified time E9 01 Other error Number of heat runs performed when error occurred 1 Press the 9 button while the e...

Page 24: ...ver 5 seconds while the acumulated laser on time is displayed the count value is reset C L E A R L A S E R O N T I M E 2 After resetting is completed the display in 6 Accumulated laser on time display mode 1 00000 hours on the top line reappears Count value is reset upon shipment from the factory and when the mechanism is replaced 7 Displaying the protection history mode 1 Plug AC cord into power ...

Page 25: ...e two mode of update regarding to the target of software as below 2 1 Update MAIN CPU s software to internal Flash ROM The target devise is internal flash ROM of CPU IC11 on COP12284 MCU PCB The updating of software takes about 1 minute Update data for MAIN CPU RCDM38_38 0427 01 bin Procedure of the MAIN CPU s Update 1 Prepare USB memory in which the Update program is written 2 Power On 3 Select U...

Page 26: ... female to female straight type DATA UPDATE KIT for M CR502 RCD M38 part no 943309004570M Update tool FlashProg exe other files and folders in Flash Programmer folder Update data for USB CPU RCD M38DAB_100430 00 USB s32 NOTE The yy is two digits of year The mm is month The dd is date The vv is release number LOCATION Procedure of the UDSB CPU s Update 1 Create the MODEL NAME folder into anywhere o...

Page 27: ...rogrammer folder 5 Double click FlashProg_b35 exe and launch the Flash Programmer NOTE When a Flash Programmer does not launch even if double clicked FlashProg_b35 exe please refer to 2 3 When a Flash Programmer did not launch 27 ...

Page 28: ... seconds later after the Flash Programmer launch Click OK NOTE Since Flash Programmer communicates with the unit automatically the above dialog box appears when it fails in communication 7 Click the Setup in the menu bar and select the Device 28 ...

Page 29: ... 8 Choose the TMP92FD28 in the Device and choose the 900 H1 in the Series And click Object File tab 9 Click Browse 29 ...

Page 30: ... 10 Choose the Motorola S Format s16 s24 s32 in Files of type Choose the RCD M38DAB_100430 00 USB s32 and click Open 11 Click Communication tab 30 ...

Page 31: ... 12 Choose the Serial port number in the COM Port Check the Data Rate Auto Input the 9 00 in the Clock And Click OK 13 Click the File in the menu bar and select the Exit 31 ...

Page 32: ...e unit from DATA UPDATE KIT Caution A connector pin has the connection direction Refer to the photograph 17 Connect the mains cord into the unit 18 Press the ON STANDBY button to turn on the unit 19 Double click FlashProg_b35 exe and launch the Flash Programmer again 20 The Flash Programmer communicates automatically When communication succeeds between a unit and a program a dialog box saying Eras...

Page 33: ... 21 Click OK 22 Click P Program to start update 23 Software is written into the microprocessor The writing of software takes about 30 seconds 33 ...

Page 34: ...lick the File in the menu bar and select the Exit 26 OPress the ON STANDBY button to turn off the unit 27 Disconnect the mains cord from the unit and then disconnect the connective wire of DATA UPDATE KIT from the unit 28 UPDATE completion 29 Please check the version in SERVICE MODE 1 Version Display Mode Refer to 18 page 34 ...

Page 35: ...2 3 When a Flash Programmer did not launch 1 Open the FlashProg ini in the Flash Programmer folder by text editor EX Notepad etc 2 Delete the text OpenFile C your PC setting s32 35 ...

Page 36: ... 3 Save the FlashProg ini 36 ...

Page 37: ... 4 Close the text editor 5 Probably you can launch the Flash Programmer Go to the Procedure of the UDSB CPU s Update step 5 37 ...

Page 38: ...om MCU_CD B D ST 3 9V CN96 1pin D204 cathode Check Soldering CN96 1pin SUB TRANS B D Check Soldering IC11 on MCU_CD B D Check Soldering X101 on MCU_CD B D Check Soldering CN96 on MCU_CD B D SUB TRANS B D Check Soldering FRONT B D BN82 7pin VKK FRONT B D BN82 8pin FL1 9pin FL2 FRONT B D WF81 1pin VFD_3 3V AMP B D CN95 8pin AC15V AMP B D CN82 7pin VKK MCU_CD B D WN81 1pin VFD_3 3V POWER B D Check Pa...

Page 39: ...eck controll signal for DAC INPUT B D IC15 6 7 8 pin AKCS AKCLK AKCON Check Power Supply Voltages for CD MCU_CD B D CN98 1pin 8VM CN98 5pin USB 9V IC51 1pin USB 5V Check Soldering MCU_CD B D CN98 1 3pin 8VM USB 9V POWER B D Check Parts IC71 Check Soldering IC51 on MCU_CD B D IC52 on MCU_CD B D Check Parts IC51 IC52 Check Soldering CN72 9pin SW 5V POWER B D Check Soldering IC11 58pin CD_DSP_RST on ...

Page 40: ...heck Soldering IC15 9 10 11 12pin on INPUT B D IC17 on INPUT B D Check Soldering IC11 on INPUT B D Check Soldering IC11 on MCU_CD B D WF11 6 7 8pin on INPUT B D V_DATA V_CLK_VCE WN11 on MCU_CD B D Check Soldering IC11 on INPUT B D IC12 on INPUT B D Check Soldering Q106 112 on INPUT B D WF11 10pin F_MU on INPUT B D IC11 Q103 on MCU_CD B D WN11 on MCU_CD B D Check Soldering CN72 6 8pin on INPUT B D ...

Page 41: ...ages for PREAMP POWER AMP INPUT B D 12V 12V AMP B D 22 8V 22 8V Check Analog Audio Data output from Prtable in FRONT B D Portable in output BN82 1 3pin POR_L POR_R Check Soldering CN72 1 5pin 12V 12V on INPUT B D CN97 5 6 8 9pin 22 8V 22 8V on AMP B D POWER B D SPEAKER B D Check Soldering JK82 on FRONT B D BN82 on FRONT B D Check Soldering CN98 9pin 12V on MCU_CD B D POWER B D Check Parts IC17 Che...

Page 42: ...ignal for DAB TUNER INPUT B D CN11 15 16pin DAB_DO DAB_DI Check Analogl Audio Data output from DAB TUNER INPUT B D DAB TUNER output CN11 29 30pin DAB_L DAB_R Check Soldering CN72 9pin SW 5V on INPUT B D POWER B D IC18 IC19 on INPUT B D Check Part IC18 IC19 on INPUT B D Check Soldering BN83 1pin USB 5V on FRONT B D CN83 on MCU_CD B D CN98 5pin on MCU_CD B D POWER B D Check Part IC71 on MCU_CD B D C...

Page 43: ...UT B D JK11 AUX1 in L R IC11 13 14pin AUX1_L AUX1_R Check Audio Data output from FUNCTION IC INPUT B D IC11 49 50pin LOUT ROUT Check Soldering JK13 on INPUT B D WF11 4 5pin IPOD_TX IPOD_RX on INPUT B D WN11 on MCU_CD B D IC11 on MCU_CD B D Check Soldering JK11 on INPUT B D IC11 on INPUT B D Check Soldering IC11 on INPUT B D NG NG NG OK OK OK ...

Page 44: ...r extending between the probe and test points When watching the HF waveform use the extending wire as short as possible When HF waveform is noisy or cannot discriminate the eye pattern replace the Traverse Unit after measuring the lop Point q Q7 is measured with the point shown below 1 MCU CD PCB TEST POINT NOTES A C B Component side A q t e w u r y i Q3 Q4 C Q3 Q4 Q0 Q1 Q2 o C B A q t e w u r y i...

Page 45: ... TP RFO Ⓑ CN26 4 MGND o Q2 e TP FEI Ⓒ CN83 5 DGND Q3 Q4 r R202 0Ω FOO Ⓓ WF12 9 DGND Q5 Q7 t TP TEI y R203 0Ω TRO u R243 0Ω FMO i R241 0Ω DMO o CN26 3 OPSW Q0 CN26 5 CLSW Q1 CN26 2 LOAD Q2 CN26 1 LOAD Q3 CN83 3 D Q4 CN83 2 D Q5 WF12 4 LRCK Q6 WF12 2 BICK Q7 WF12 3 SDTI Q5 Q7 Q6 D Foil side ...

Page 46: ... 1V div 1V div 500mV div 1V div 1V div 500mV div 1V div 1V div 1V div 500mV div 1V div 1V div 500mV div 1V div 1V div 1V div 500mV div 1V div qRFEQO qRFEQO 1 3 CD RW TCDW082W PLAY 1 2 CD R TCDR082W PLAY 2 1 CD TCD784 DETECTION 2 3 CD RW TCDW082W DETECTION 2 2 CD R TCDR082W DETECTION wRFO eFEI rFOO tTEI yTRO uFMO iDMO wRFO eFEI rFOO tTEI yTRO uFMO iDMO ...

Page 47: ...div 1V div 500mV div 1V div 1V div 500mV div 1V div 1V div 1V div 500mV div 1V div 3 3 CD RW TCDW082W READ 3 2 CD R TCDR082W READ 4 1 CD TCD784 FOCUS ADJUSTMENT 4 3 CD RW TCDW082W FOCUS ADJUSTMENT 4 2 CD R TCDR082W FOCUS ADJUSTMENT wRFO eFEI rFOO tTEI yTRO uFMO iDMO wRFO eFEI rFOO tTEI yTRO uFMO iDMO wRFO eFEI rFOO tTEI yTRO uFMO iDMO ...

Page 48: ...48 5 CD Playback Q5LRCK Q6BICK Q7SDTI Q3D Q4D STANDARD GND STANDARD GND STANDARD GND WF12 9 CN83 5 oOPSW Q0FCLSW Q2LOAD Q1LOAD OPEN CLOSE 4 6 USB playback 7 LOADER OPEN CLOSE ...

Page 49: ...6ohm AC PWR_ON FL_ON TRANS RCD M38DAB ONLY VENICE 7 0 EK T5CN5 512k E3 E2 JP TMP330FYFG 256k MAIN AMP 28 6dB STK4142 MUTE PRE AMP 3 3dB NJW1153FG1 INPUT SELECTOR OPTICAL OUT JP ONLY DATA CLOCK iPOD CONTROL AUX2 REC TUNER USB CD AK4385 LPF PORTABLE F AUX1_IN AUX2_IN AUX2_RECOUT AUDIO DAC VOL VOL CONTROL GAIN OUTPUT VOLUME INPUT SELECTOR IPHONE AUX1 DC DC MAIN DC 9V USB 5V DC 21V DC 14 5V AC 3 5V DC...

Page 50: ... DC 6 5V 0 07A S 3 3V Reg FL DISPLAY MCU 3 3V MCU USB PICK UP FL DRIVER Max 32mA 1091mA CD DSP STK4142 DC 21 0V 1 8A AC 3 4V 0 2A OPTICAL DC8 5V 1 0A SI8005 D 3 3V Reg 1 5V Reg USB DECODER 1 2V Reg DAB MODULE DAC SW 5V Reg SP HP RELAY AC RELAY DAB 3 3V Reg 8VM Reg CD MOTOR DRIVER 12V Reg TWOFOLD VOLTAGE 12V Reg 9V Reg DC 14 5V 0 45A NJW1153FG1 FUN VOL IC OP AMP TUNER MODULE 8V Reg 8V Reg CURRENT B...

Page 51: ...Y USB HP OUT Portable In LINE1 Dock IN LINE2 IN MUTE LINE2 OUT SUBWOOFER OUT SP OUT 20dB 30W 6ohm NJW1153 Max output 4Vrms 12dB 13 4V 22 5dB 10dB 8dB 0dB CD USB 1KHz 0dB PB 1 0V SDB 8dB 1 59Vrms 4dB 28 6dB HP OUT DAB 1KHz 0dB 0 6V TONE 10dB 0 63Vrms 4 0dB 1 0V 32ohm 10dB LINE IN 200mV 10dB 20dB FM 30 MOD 213mV 30dB 40dB S N 96dBtyp 50dB 60dB Output Noise Level 110dBv typ LAEVEL DIAGRAM ...

Page 52: ...WIRING DIAGRAM 52 ...

Page 53: ...フリー半田 半田付けには 鉛フリー半田 Sn Ag Cu を使用してください Lead free Solder When soldering use the Lead free Solder Sn Ag Cu MCU PCB COMPONENT SIDE INPUT PCB COMPONENT SIDE GUIDE PCB COMPONENT SIDE REGULATOR PCB COMPONENT SIDE 6 5 4 3 2 1 E D C B A 3 2 1 B A 8 7 6 5 4 3 2 1 D C B A ...

Page 54: ...ださい Lead free Solder When soldering use the Lead free Solder Sn Ag Cu 1 2 3 4 5 6 7 8 9 H G F E D C B A MCU PCB FOIL SIDE INPUT PCB FOIL SIDE REGULATOR PCB FOIL SIDE E D C B A 1 2 3 4 5 6 1 2 3 B A GUIDE PCB FOIL SIDE 1 2 3 4 5 6 7 8 D C B A ...

Page 55: ...older When soldering use the Lead free Solder Sn Ag Cu FRONT PCB COMPONENT SIDE SUB TRANS PCB COMPONENT SIDE SPK PCB COMPONENT SIDE AMP PCB COMPONENT SIDE 10 9 8 7 6 5 4 3 2 1 E D C B A 8 7 6 5 4 3 2 1 F E D C B A 6 5 4 3 2 1 E D C B A 6 5 4 3 2 1 D C B A ...

Page 56: ...ead free Solder When soldering use the Lead free Solder Sn Ag Cu FRONT PCB FOIL SIDE SUB TRANS PCB FOIL SIDE SPK PCB FOIL SIDE AMP PCB FOIL SIDE 1 2 3 4 5 6 7 8 9 10 E D C B A 1 2 3 4 5 6 7 8 F E D C B A 6 5 4 3 2 1 E D C B A 6 5 4 3 2 1 D C B A ...

Page 57: ...z X201 16 9344MHz C255 470 16V C253 470 16V C252 100 6 3V C243 47 6 3V C216 1000uF 6 3V C210 1000uF 6 3V C308 470 16V C512 47 6 3V C503 100 6 3V C403 10 16V C406 10 16V C125 100 6 3V R212 100 R405 0 1 2 BN12 L501 CLZ9Z014Z R512 0 R511 0 C531 0 1uF C532 0 1uF C508 100 6 3V C505 10 16V C504 0 1uF R206 OPEN C307 470 16V C312 0 1uF C313 0 1uF R185 100 R184 100 1 2 3 4 5 6 7 8 9 10 11 12 13 14 15 16 17...

Page 58: ...41 0 01uF C140 0 01uF D110 1SS355T D109 1SS355T C144 47 50V RFO C147 0 1uF C145 100 50V RFO C146 0 1uF C133 4700P C129 1 50V C109 10 50V C110 10 50V Q101 OPEN Q102 OPEN R115 OPEN R116 OPEN C124 10 50V C125 10 50V C136 OPEN C137 OPEN L102 10uH Q112 HVTKRC102S R175 100 9 8 7 6 5 4 3 2 1 CN72 R150 8 2K R151 8 2K R148 8 2K R149 8 2K R154 8 2K R152 8 2K V B OUTPUT B INPUT B INPUT V A INPUT A INPUT A OU...

Page 59: ...S133MT R743 100K Q709 C107M Q710 A102MT C714 0 01uF C706 0 22uF 100V R704 1W 4 7Ω R705 1W 4 7Ω C707 0 22uF 100V C722 5P D706 1SS133MT C738 0 1uF 100V C736 6800P C735 6800P C737 0 1uF 100V C744 0 01uF C745 0 01uF C739 0 01uF 100V C740 0 01uF 100V C741 0 1u 250V 1 3 4 2 D712 C743 4700 35V RO C742 4700 35V RO R754 10K 1 4W R753 10K 1 4W L701 L702 19 18 16 17 15 14 13 12 11 10 9 8 7 6 5 4 3 2 1 WF81 k...

Page 60: ...z z EXPLODED VIEW s Parts marked with this symbol have critical characteristics Use ONLY replacement parts recommended by the manufacturer WARNING 印の部分は安全を維持するために重要 な部品です 従って交換時は必ず指定の 部品を使用してください 60 ...

Page 61: ...1 M3 943402009790D FRONT PANEL BKE2 BKE2 CKM2A196ZC45 1 M3 943402009800D FRONT PANEL SPE2 SPE2 CKM2A196ZC62 1 M4 943411000460D POWER KNOB ASSY BK CGX1A353XA 1 M4 00D9430211100 POWER KNOB ASSY SP CGX1A353YA 1 M5 nsp FIP BRACKET CMD1A468 2 M6 943403009410D CABINET TOP BK CKC2A186S56 1 M6 943403009420D CABINET TOP SP CKC2A186S55 1 M7 nsp BOTTOM CHASSIS CUA3A286 9 M8 nsp HT BRACKET CMD1A672 9 M9 nsp H...

Page 62: ...d tray and use again when changing the tray 3 nsp Gear cover S 1 4 nsp Tray gear S 1 5 nsp Chucking plate 1 6 nsp Screw 2 6 x 7 PTPWH 4 7 nsp Chucking yoke 1 8 nsp Magnet 1 9 941302002350M MECHA DA11T3CN 1 10 nsp Chucking pulley 1 11 nsp Sub chassis Ass y 1 12 1 nsp Coil spring front 2 12 2 nsp Coil spring back 2 13 nsp Screw 2 6 x 10 P No slit type2 4 14 nsp Washer 2130 4 17 nsp Outsert main chas...

Page 63: ...60K 1 1 943531008940D BOX OUT CARTON E2 CPG1A860J 1 2 nsp LABEL YEAR E3 1 3 nsp LABEL SERIAL NO 1 4 nsp LABEL CAUTION CQB1A661Z 1 5 943535001060D BAG POLY SET CPP1A082Z 1 6 943533000150D PAD SNOW L CPS1A811 1 7 943533000160D PAD SNOW R CPS1A812 1 8 1 nsp BAG POLY MANUAL260X365 CPB1A190Z 1 8 2 943541009000D MANUAL INSTRUCTION E3 CQX1A1529Z 1 8 2 943541008980D MANUAL INSTRUCTION EK E2 CQX1A1528Y 1 8...

Page 64: ... CORD POWER EK CJA2E106ZV 1 z 9 943611000190S CORD POWER E2 CJA2B108ZV 1 10 nsp BAG POLY EK E2 CPB1A008Z 1 11 nsp LABEL CONTROL EK E2 CQB1A993Z 2 12 nsp COLOR LABEL GRAY SPEK SPE2 CPB1A008Z 2 13 nsp FCC LABEL E3 CQB1A634Z 1 14 943531009400D MASTER BOX OUT CARTON E3 CPG3A864X 1 15 nsp SPEAKER ASSY E3 SCM37BKE3 1 16 943533000250D PAD A E3 CPS1A819 1 17 943533000260D PAD B E3 CPS1A820 1 d ...

Page 65: ...UCTORS Only major semiconductors are shown general semiconductors etc are omitted to list The semiconductor which described a detailed drawing in a schematic diagram are omitted to list 1 IC s TMP92FD28FG MCU IC41 ...

Page 66: ...66 TMP92FD28FG Block Diagram ...

Page 67: ...Open 26 DVSS3A DVSS3A G 27 DVCC3A VDD3 3V P 28 P10 MODEL OPTION O PU PD L L H or L RCD M38 LOW RCD M38DAB HIGH 29 P11 MODEL OPTION O L L L RCD M38 LOW MC R503 HIGH 30 P12 N C O L Open 31 P13 CP RESET O H L L to Apple Chip WWI IC42 MFI341S2164 32 P14 N C O L Open 33 P15 N C O L Open 34 P16 N C O L Open 35 P17 N C O L Open 36 P40 N C O L Open 37 P41 N C O L Open 38 P42 N C O L Open 39 P43 N C O L Op...

Page 68: ... 80 D USB I O 81 AM0 VDD3 3V P 82 P77 USB DETECT I L USB Detect 83 DVSS3A GND G 84 PF0 TXD0 N C O L Open 85 PF1 RXD0 N C O L Open 86 PF2 D DOWN O PD L H USB D LINE RESET 87 PF3 TXD1 USB TX O L L H L to HOST MCU IC11 88 PF4 RXD1 USB RX I H L to HOST MCU IC11 89 PF5 N C O L 90 PN1 CP SDA I O PU L L H L to Apple Chip WWI IC42 MFI341S2164 91 PN2 CP CLK O PU L L H L to Apple Chip WWI IC42 MFI341S2164 9...

Page 69: ...69 TMPM330FYFG for E3 E2 JP model T5CN5 for EK model MCU IC11 ...

Page 70: ... power supply 6 INT4 REMOTE_IN_1 I remote in 7 PK2 HP_ON O L L H Headphone on off control SP Relay Control 8 PJ5 CD_CLOSE_M O L L H CD CLOSE MOTOR IP4001 14 Mute 9 PH4 CD_OPEN_M O L L H CD OPEN MOTOR IP4001 9 Mute 10 PH5 CD_CLOSE_SW I Pull up O CD CLOSE switch 11 PG7 CD_OPEN_SW I Pull up O CD OPEN switch 12 TEST2 TEST pin Set to OPEN 13 DVSS G GND pin 14 DVCC P Power supply pin 15 PG4 CD_LIMIT_SW ...

Page 71: ...DS_DATA I Pull down RDS data 49 INT1 RDS_CLK I Pull down RDS clock 50 PK0 CD_BUS2 I receive data from CD DSP Oasis 64 pin OUT 51 PK1 CD_BUS3 O L L send command to CD DSP Oasis 65 pin IN 52 PI4 CD_BUCK O L L communication clock with CD DSP 53 PI5 CD_CCE O L L communication chip enable with CD DSP 54 PB0 TDO SWV O Pull up for DEBUG 55 PA0 TMS SWDIO O Pull up for DEBUG 56 PA1 TCK SWCLK O Pull down fo...

Page 72: ... I Pull up O L Portable In 100 PD5 Model option I Pull up Model Option H TC94A92FG MCU IC16 TC94A92FG Pin Layout Top View Pio7 Pio6 Pio5 Pio4 Pio3 Pio2 Pio1 Pio0 VSS 2 VDD1 2 XVDD3 Xo Xi XVSS3 DVSS3L Lo DVDD3L DVDD3R Ro DVSS3R 60 59 58 57 56 55 54 53 52 51 50 49 48 47 46 45 44 43 42 41 VDD3 61 40 CDMoN3 BUS0 62 39 Pio14 CDMoN2 BUS1 63 38 Pio13 CDMoN1 BUS2 64 37 Pio12 CDMoN0 FGiN BUS3 65 36 Pio11 B...

Page 73: ...h C Pointer register Y Pointer register A3 X Pointer register Address Calc 2sets YRAM 4kw 24bit X Bus Y Bus 40bit XRAM 4kw 24bit ERAM 4kw 24bit CROM 4kw 11 44kw 24bit PRAM 1024w 40bit PROM 4kw 9 36kw 40bit General I O I F SRAM I F SRAM 512kbit 4kw 128bit MCU I F Pio0 7 Intrupt Cont IRQ Program Control Instruction Decoder round limit round limit TEi VREF 4KB SRAM Control Servo AVSS3 AVDD3 IP ATT VD...

Page 74: ...5uF 8 AGCi I 3AI F RF signal AGC amplifier input pin I 9 RFo O 3AI F RF signal generation amplifier output pin O 10 RVSS3 Grounding pin for 3 3 RF amplifier core and PLL circuit 11 FNI2 I 3AI F Main beam signal input pin To be connected to PIN diode C I 12 FNI1 I 3AI F Main beam signal input pin To be connected to PIN diode A I 13 FPI2 I 3AI F Main beam signal input pin To be connected to PIN diod...

Page 75: ... pin O Bulit in output R 3 3 kΩ 32 VDD1 3 I O 3I F Power supply pin for 1 5V Decoder DSP CD circuit 33 Pio8 I O 3I F Port 8 General Input Output Port I CMOS Port Schmitt input Refer to 1 2 Pin Assinment Table 34 Pio9 I O 3I F Port 9 General Input Output Port I CMOS Port Schmitt input Refer to 1 2 Pin Assinment Table 35 Pio10 I O 3I F Port 10 General Input Output Port I CMOS Port Schmitt input Refe...

Page 76: ...it 52 VSS 2 Grounding pin for 1 5V digital circuit 53 Pio0 I O 3I F Port 0 General Input Output Port I CMOS Port Schmitt input Refer to 1 2 Pin Assinment Table 54 Pio1 I O 3I F Port 1 General Input Output Port I CMOS Port Schmitt input Refer to 1 2 Pin Assinment Table 55 Pio2 I O 3I F Port 2 General Input Output Port I CMOS Port Schmitt input Refer to 1 2 Pin Assinment Table 56 Pio3 I O 3I F Port ...

Page 77: ... MS I 3I F Microprocessor I F mode selection pin H Parallel I F L Serial I F I Refer to 1 2 Pin Assinment Table 69 RST I 3I F Reset Input pin I Schmitt input 70 Test I 3I F Test pin L fixed I Connect to GND for normal operation 71 VDD1 1 Power Supply pin for 1 5V Digital circuit 72 VSS 1 Grounding pin for 1 5V Digital circuit 73 SRAMSTB I 3I F 1Mbit SRAM stand by pin SRAMSTB L I 74 VDDM1 Power Sup...

Page 78: ...internal NPN TR Built in mute circuit Built in Tray motor speed control circuit Wide operating supply voltage range 6 5V 13 2V Device Package Operating Temp IP4001 28SSOPH 375 35OC 85OC IP4001TF 28SSOPH 375 35OC 85OC BLOCK DIAGRAM ORDER INFORMATION FEATURES 8 9 10 11 12 13 14 2 3 4 5 6 7 1 21 20 19 18 17 16 15 27 26 25 24 23 22 28 DO1 DO1 IN1 IN1A N C REO MUTE SGND FWD IN2 DO2 DO2 PGND1 REV DO5 DO...

Page 79: ...input 6 55 V Power supply voltage input 24 R6IN Input selector Rch input 6 56 GND Ground 25 L7IN Input selector Lch input 7 57 V Power supply voltage input 26 R7IN Input selector Rch input 7 58 RECL1 Input selector Lch REC output 1 27 L8IN Input selector Lch input 8 59 RECR1 Input selector Rch REC output 1 28 R8IN Input selector Rch input 8 60 RECL2 Input selector Lch REC output 2 29 DATA Control ...

Page 80: ...er DC cut capacitor input terminal 14 R1IN Input selector Rch input 1 46 FIL3_L Lch Bass filter DC cut capacitor output terminal 15 L2IN Input selector Lch input 2 47 FIL2_L Lch Bass filter terminal 16 R2IN Input selector Rch input 2 48 FIL1_L Lch Treble filter terminal 17 L3IN Input selector Lch input 3 49 LOUT Lch output 18 R3IN Input selector Rch input 3 50 ROUT Rch output 19 L4IN Input selecto...

Page 81: ...81 AK4385 INPUT IC15 AK4385 Pin Discriptions AK4385 Block Diagram ...

Page 82: ...82 2 IC s 16ST103GINK MAIN FL81 PIN CONNECTION GRID ASSIGNMENT 1 43 Upper Lower ...

Page 83: ...83 ANODE CONNECTION ...

Page 84: ...84 ...

Page 85: ...6509S IC IPOD AUTHENTICATION CHIP FROM MARANTZ CVI236710076509S DM IC51 00D9430209701 IC KIA1117S F33 REGULATOR SOT 223 CVIKIA1117S33 IC52 90M HC900160R IC LM1117S15 REGULATOR SOT 223 CVIKIA1117S15 IC71 943239007340S IC DCDC CONVERTER 3 5A CVISI8005QTL D101 102 90M HD201800R DIODE 1SS355 HVD1SS355T D103 90M HD201820R DIODE RB160L 60TE25 HVDRB160L60TE25 D104 105 90M HD201800R DIODE 1SS355 HVD1SS355...

Page 86: ...700pF 50V CCUS1H472KC C205 nsp CHIP CAP 0 1uF 50V CCUS1H104KC C206 nsp CHIP CAP 0 015uF 50V CCUS1H153KC C207 nsp CHIP CAP 0 1uF 50V CCUS1H104KC C209 nsp CHIP CAP 0 1uF 50V CCUS1H104KC C210 nsp ELECT CAP HCEC0JRV102T C211 nsp CHIP CAP 0 033uF 50V CCUS1H333KC C212 nsp CHIP CAP 5600pF 50V CCUS1H562KC C213 nsp CHIP CAP 0 1uF 50V CCUS1H104KC C214 215 nsp CHIP CAP 470pF 50V CCUS1H471JA C216 nsp ELECT CA...

Page 87: ...6 nsp CHIP CAP 470pF 50V CCUS1H471JA C417 nsp CHIP CAP 0 1uF 50V CCUS1H104KC C418 nsp CHIP CAP 0 01uF 50V CCUS1H103KC C420 421 nsp CHIP CAP 0 1uF 50V CCUS1H104KC C422 nsp CHIP CAP 0 1uF 50V CCUS1H104KC C433 nsp CHIP CAP 0 1uF 50V CCUS1H104KC C438 nsp CHIP CAP 0 1uF 50V CCUS1H104KC C501 502 nsp CHIP CAP 0 1uF 50V CCUS1H104KC C503 nsp ELECT CAP 100UF 6 3V HCEC0JRV2101T C504 nsp CHIP CAP 0 1uF 50V CC...

Page 88: ...U000220R CHIP INDUCTOR 10UH 3225 PKG HLQ10E100KRZ L301 nsp CHIP FERRITE BEAD 220ohm 2012 CLZ9R006Z L401 nsp CHIP FERRITE BEAD 60ohm 4516 CLZ9Z014Z L501 nsp CHIP FERRITE BEAD 60ohm 4516 CLZ9Z014Z L701 nsp POWER COIL 22UH 3A CLQ13E220MRZ L702 nsp POWER COIL 47UH 3A CLQ13E470MRZ RN11 90M BW000410R CHIP RES 10K OHM 1608 X 4 CRJ104DJ103T WN11 nsp WAFER CARD CABLE SMD CJP15GA193ZY WN12 nsp WAFER CARD CA...

Page 89: ...HVTKTC2875B Q106 90M BA001600R CHIP TR KRA107S HVTKRA107S Q108 00D9430037903 CHIP TR KRC102S HVTKRC102S Q112 00D9430037903 CHIP TR KRC102S HVTKRC102S CAPACITORS GROUP C101 108 nsp CHIP CAP 180pF 50V CCUS1H181JA C109 110 nsp ELECT CAP 10uF 50V CCEA1HH100T C111 114 nsp CHIP CAP 0 1uF 50V CCUS1H104KC C115 118 nsp ELECT CAP 10uF 50V CCEA1HH100T C119 121 nsp CHIP CAP 0 1uF 50V CCUS1H104KC C122 125 nsp ...

Page 90: ...C C196 nsp ELECT CAP 330UF 10V EK CCEA1AH331T C197 nsp CHIP CAP 0 1uF 50V CCUS1H104KC C198 199 nsp CERAMIC CAP 1200PF 50V CCKT1H122KB C401 402 nsp ELECT CAP 10uF 50V CCEA1HH100T C403 406 nsp CHIP CAP 0 1uF 50V CCUS1H104KC C407 408 nsp ELECT CAP 4 7UF 50V CCEA1HKS4R7T C409 nsp CHIP CAP 0 01uF 50V CCUS1H103KC C410 nsp CHIP CAP 0 01uF 50V CCUS1H103KC C910 nsp CHIP CAP 0 1uF 50V CCUS1H104KC C913 919 n...

Page 91: ...00D9430209400 DIODE 1N4003SRT CVD1N4003SRT D915 00D9430041902 SCHOTTKY DIODE 1N5819 HVD1N5819T D916 917 00D9430110008 DIODE 1N4003ST CVD1N4003ST D918 919 00D9430041902 SCHOTTKY DIODE 1N5819 HVD1N5819T D920 90M HD201290R DIODE 1SS133MT HVD1SS133MT D921 nsp COPPER WIRE C3A206 D922 924 90M HD201290R DIODE 1SS133MT HVD1SS133MT D925 nsp DIODE ZENER HVDMTZJ12BT D928 934 90M HD201290R DIODE 1SS133MT HVD1...

Page 92: ...M CAP 0 22UF 100V CCME2A224JXT C708 709 943133001380S METALLIZED FILM CAP CCME2A473JXT C710 nsp ELECT CAP 470uF 10V CCEA1AH471T C711 712 nsp CERAMIC CAP 0 1UF 50V CCBS1H104ZFT C713 nsp ELECT CAP 47uF 25V CCEA1EH470T C714 715 nsp CERAMIC CAP 0 01UF 50V CCBS1H103ZFT C716 717 nsp ELECT CAP 4 7uF 50V CCEA1HH4R7T C718 719 nsp CERAMIC CAP 470PF 50V CCKT1H471KB C720 nsp ELECT CAP 47UF 50V CCEA1HRFO470T C...

Page 93: ...HIP CAP 0 1uF 50V CCUS1H104KC C835 nsp ELECT CAP 100UF 16V CCEA1CKS101T C836 nsp CHIP CAP 0 1uF 50V CCUS1H104KC C837 838 nsp CHIP CAP 0 01uF 50V CCUS1H103KC C839 840 nsp CHIP CAP 68pF 50V CCUS1H680JA C901 943133001380S METALLIZED FILM CAP CCME2A473JXT C902 903 nsp CERAMIC CAP 0 01UF 50V CCBS1H103ZFT C904 nsp ELECT CAP 2200UF 25V CCEA1EH222E C905 nsp ELECT CAP 1000uF 25V CCEA1EH102E C906 907 nsp CE...

Page 94: ...1ZY CN95 nsp WAFER CJP09GB03ZY CN97 nsp WAFER 11P 2 5MM PITCH YMW025 CJP11GB03ZY CN99 nsp WAFER CJP03GA01ZY F901 nsp FUSE HOLDER KJCFC5S z F901 00D9430170909 FUSE GLASS TUBE 125V 2A 20MM E3 KBA1C2000A4UY z F901 00D9430170909 FUSE GLASS TUBE 250V 1A 20MM E2 EK KBA2C1000TLEY F902 nsp COPPER WIRE C3A206 F903 nsp COPPER WIRE C3A206 FL81 943172007420D V F D 16ST103GINK CFL16ST103GINK GND1 nsp EARTH PAL...

Page 95: ...y New S801 809 00D9430209507 SW TACT CST1A023ZT z T902 943101000980D TRANS SUB RCD M37USA E3 CLT5I010ZU z T902 943101000960D TRANS SUB RCD M37EUR E2 EK CLT5I010ZE VR81 943667001330S ENCODER VR CSR2A033Z WF81 nsp CARD CABLE WAFER CJP19GA117ZY ...

Reviews: