background image

ENGLISH

6

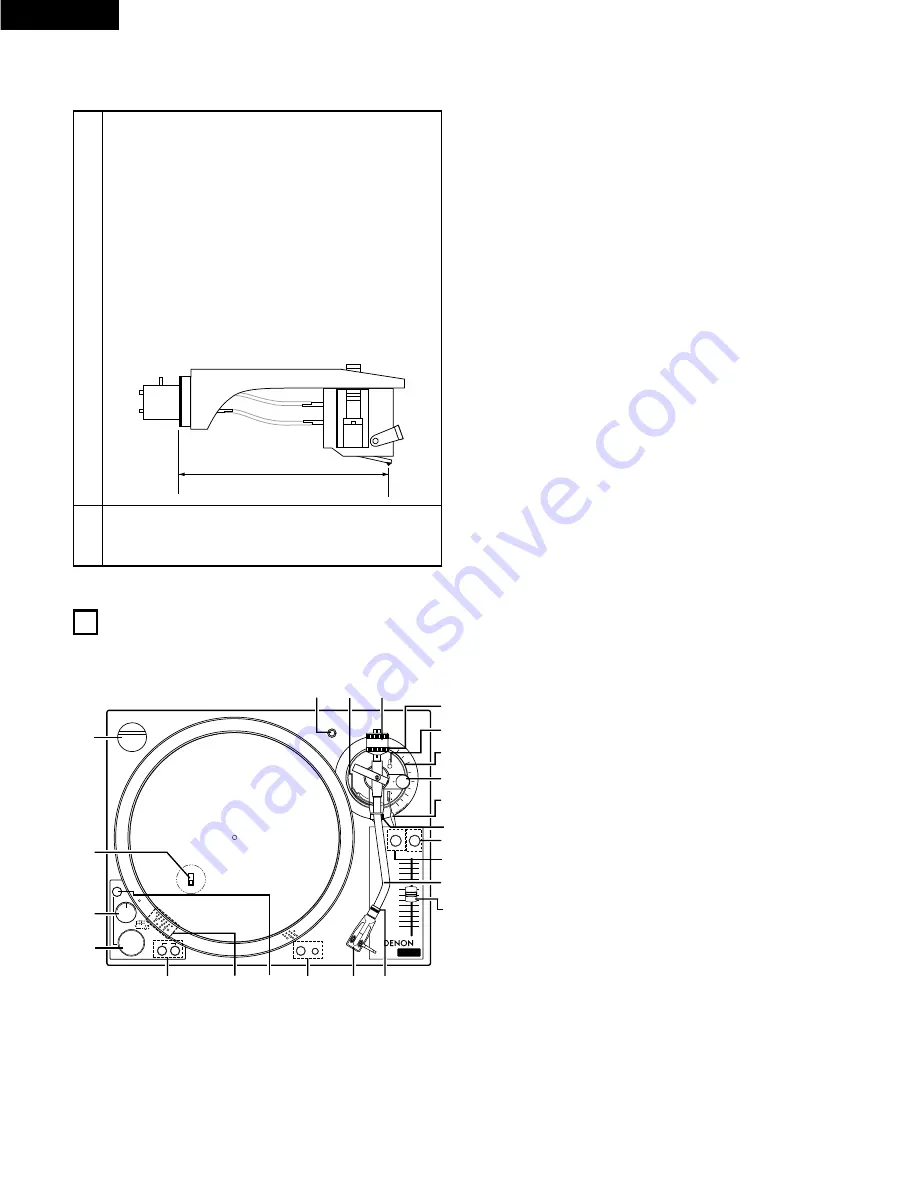
(3)  Mounting the cartridge

• The cartridge is not included.

1

Mount your cartridge on the head shell.

• The head shell’s lead wires are color-coded. Use

tweezers or the like to securely connect the lead wires

to the corresponding terminals on the cartridge,

referring to the indications on the cartridge or the

cartridge’s instructions.

Attach wires as follows:

White (L +) Left c
Blue (L –) Left channel –
Red (R +) Right c
Green (R –) Right channel –

• The proper overhang is achieved by mounting the

cartridge so that the stylus is positioned 53 mm from

the head shell mount edge (rubber washer), as shown

on the diagram below.

2

Insert the head shell on which the cartridge has been

mounted into the tone arm and fasten it in place

using the lock nut.

53 mm

q

Power dial (POWER)

ON  – Rotate right
OFF – Rotate left

w

Start/Stop button (START/STOP)

• Press this button to start and stop the platter rotation.

e

Platter revolution speed buttons

33 rpm – Press 33
45 rpm – Press 45
78 rpm – Press 33 and 45

r

Strobe dots

• Four rows of dots that indicate various stages in pitch adjust.

– 3.3 % – outer row

– 3.

0 % – large dots

+ 3.3 % – next row
+ 7.2 % – inner row

t

Brake switching button (BRAKE)

• The platter stops turning.
• When the BRAKE button’s LED is lit, rotation stops slowly (in

about 2 seconds).

• When the BRAKE button is flashing, internal electronic brake

is set free.

y

Target light

• Press the button to the right and a light will pop up directed

at the stylus position.

u

Headshell

Attach the cartridge here.
• When installing a cartridge, refer to the installation

instructions supplied by the manufacturer of that cartridge.
During installation, attach the stylus protector to guard the
stylus tip from damage.

i

Headshell locking nut

• Attach headshell by inserting into the front end of the tone

arm, then turn the locking nut clockwise with the head shell
firmly held horizontally.

o

Pitch slider

• Use this to change the speed of the platter when the PITCH

button is lit.  You can adjust the speed in a range of ±12 %.

!0

S-shaped tone arm

!1

Pitch button (PITCH)

ON  – Will allow use of the pitch adjust.
OFF – Will hold the revolution speed at exactly the specified

speed.

!2

Key adjust button (KEY-ADJUST)

NOTE: 

The  “KEY ADJUST” function effective only operate
while the “PITCH” button is lit on.

!3

Tone arm clamp and rest

• Use this rest the tone arm and clamp it in position during

transportation.

!4

Lifter lever

• Use this to lift and lower the tone arm.

!5

Anti-skating knob (ANTI-SKATING)

• When a record is playing, a force is generated drawing the

stylus towards the center of the record. Set this knob to the
same value as the stylus pressure to offset this force.

!6

Tone arm height adjust (HEIGHT ADJUST)

• This allows the tone arm to be properly align with the platter

surface.

!7

Height lock lever (LOCK)

• Prevents accidental adjustment of the height.

2

PART NAMES AND FUNCTIONS

DP-DJ151

Digital

Quartz

A

N

T

I-

S

KA

TING

7

6

5

4

32

10

ON

SLOW

BRAKE

OFF

POWER

START
/STOP

45

0

1

2

3

4

33

78

+12

0

-12

PITCH

KEY ADJUST

q
w

e

r t

o

y

u i

!1

!2

!3

!4

!5

!6

!7

!9

@0

@1

@2

@2

!0

!8

Top panel

Summary of Contents for DP-DJ151

Page 1: ...alden nl Fazantendreef 17 19 8251 JR Dronten T 0321 769022 E info pick upnaalden nl W www pickupnaalden com W www pickupnaald com Facebook www facebook com pickupnaalden Twitter twitter com Pickupnaalden Google plus google com 114738445546162436900 ...

Page 2: ...N61000 3 3 Following the provisions of 73 23 EEC 89 336 EEC and 93 68 EEC Directive ÜBEREINSTIMMUNGSERKLÄRUNG Wir erklären unter unserer Verantwortung daß dieses Produkt auf das sich diese Erklärung bezieht den folgenden Standards entspricht EN60065 EN55013 EN55020 EN61000 3 2 und EN61000 3 3 Entspricht den Verordnungen der Direktive 73 23 EEC 89 336 EEC und 93 68 EEC DECLARATION DE CONFORMITE Nou...

Page 3: ...e this unit c Move this unit away from others d Plug this unit respectively into a different AC outlet This is note in accordance with Section 15 838 of the FCC Rules FOR U S A CANADA MODEL ONLY CAUTION TO PREVENT ELECTRIC SHOCK MATCH WIDE BLADE OF PLUG TO WIDE SLOT FULLY INSERT POUR LES MODELES AMERICAINS ET CANADIENS UNIQUEMENT ATTENTION POUR ÉVITER LES CHOCS ÉLECTRIQUES INTERODUIRE LA LAME LA P...

Page 4: ...N 810 21 GROUND CLAMPS POWER SERVICE GROUNDING ELECTRODE SYSTEM NEC ART 250 PART H NEC NATIONAL ELECTRICAL CODE 12 Power Cord Protection Power supply cords should be routed so that they are not likely to be walked on or pinched by items placed upon or against them paying particular attention to cords at plugs convenience receptacles and the point where they exit from the appliance 14 Cleaning The ...

Page 5: ...he power cord when not using the set for long periods of time Wenn das Gerät eine längere Zeit nicht ver wendet werden soll trennen Sie das Netzka bel vom Netzstecker Débrancher le cordon d alimentation lorsque l appareil n est pas utilisé pendant de longues périodes Desconecte el cordón de energía cuando no utilice el equipo por mucho tiempo For sets with ventilation holes Do not obstruct the ven...

Page 6: ...n at the touch of a button 3 Key adjust When Key Adjust is on musical key tone can be kept constant even the platter speed is changed with the slider 4 3 stage braking speed You can select one of 3 record stop times 5 78 rpm compatible This set can play 33 45 and 78 rpm records 6 Digital out The music is output in the digital format and reproduced on an external digital processor or an MD recorder...

Page 7: ...ected at the stylus position u Headshell Attach the cartridge here When installing a cartridge refer to the installation instructions supplied by the manufacturer of that cartridge During installation attach the stylus protector to guard the stylus tip from damage i Headshell locking nut Attach headshell by inserting into the front end of the tone arm then turn the locking nut clockwise with the h...

Page 8: ...t so that the arm is virtually parallel to the record s surface r Move the lock lever in the direction of the arrow to lock the height 1 Set both the anti skating knob to 0 2 Move the tone arm Lift the tone arm from the arm rest and move it over the platter When moving the tone arm be careful that the stylus does not directly touch the platter or other parts For cartridges with detachable stylus c...

Page 9: ...t When the strobe is stopped the platter is turning at the displayed speed When the key adjust button is pressed during the pitch control mode the button lights on and musical key tone can be kept constant even the platter speed is changed with the slider Note that the key adjust function operates only when switch is set to LINE Digital processor or MD recorder 1 Analog connections 1 Connect the l...

Page 10: ...able Drive method Direct drive Turning speed 33 1 3 45 and 78 rpm Wow flutter 0 2 wrms or less S N ratio 50 dB or greater Platter Aluminum die cast 330 mm diameter Motor Brush less DC motor 2 Tone arm Arm type Static balance S shaped arm pipe Effective length 234 mm Overhang 15 mm Arm height adjustment range Approx 6 mm Stylus pressure adjustment range 0 to 4 0 g 1 scale 0 1 g Applicable cartridge...

Reviews: