background image

11

ENGLISH

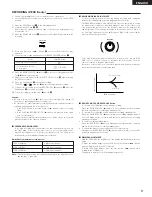
TAPE COUNTER AND MEMORY STOP

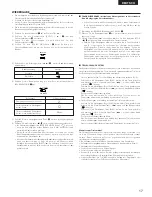
1) Operation of the Tape Counter

(1) Press the RESET button to reset the counter to “ 

‚‚‚‚

”.

(2) By using the PLAY, FF, or REW functions, the reading of the counter will

change to indicate index position.

During recording and playback operations, the counter is useful for
noting the location of existing programs or positions where recording is
to be started.

The reading of this counter does not correspond with that of any other
deck.

(3) Deck A and Deck B have the memory of their own counter.

2) MEMORY STOP Operation

(1) During recording or playback, the Memory Stop feature can be used to

locate a particular point on the tape. Press the COUNTER RESET button
at the desired point.

(2) Then Press the COUNTER MEMORY button, the MEMO indicator

lights.

(3) When the Fast Rewind ( 

6

) button is pressed during forward tape

travel ( 

), or the Fast Forward ( 

7

) button is pressed during

reverse tape travel ( 

), the tape is rapidly rewound (or advanced)

until the counter indication of “ 

‚‚‚‚

” is reached.

The Memory Stop feature will rewind or forward the tape to within –5

counts in the forward ( 

) direction (from “ 

‚‚‚‚

” to “

”)

and to 5 counts in the reverse ( 

) direction (from “ 

‚‚‚‚

to “ 

‚‚‚fi

”). After this, several seconds are required for corrective

operations.

The Memory Stop function operates independently in both directions
for deck A and deck B.

Caution:

If the memory stop operation is performed after repeated fast-forwarding or
rewinding, the tape may not stop at the proper position.

PLAY

PLAY

COUNTER

RESET

MEMORY

REC PAUSE

DIRECTION

DIRECTION

REC/REC MUTE

CD SYNCHRO

COUNTER

RESET

MEMORY

MEMO

MPX

HIGH

DUB

SYNC

MEMO

dB   

L

R

-40   -30   -20   -10   -5   -3 

-1 

0

+1

+3

+5 +10

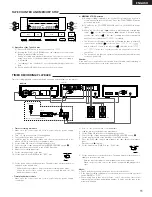
TIMER RECORDING/PLAYBACK

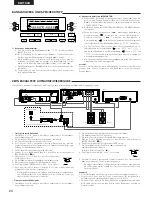
Timer recording/playback can be made using any audio timer available on the market.

LINE
OUT

LINE

IN

SYNCHRO

TAPE-1

L
R

L
R

PB REC

R

L

R

L

L

R

L

R

LINE

OUT  IN

L
R

R

L

TUNER

L

R

A

B

SP

R

L

OUT  PUT

R

L

AM

DRW-695

Amplifier

Tuner

Wall outlet

Timer

On timer recording/playback

Lch

Rch

Speaker System

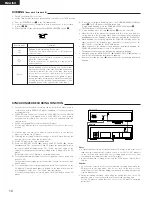
Timer recording procedure

1. Make sure the connections are correct, especially the power supply

connections.

2. Turn “on” the power switch of each appliance.
3. Tune the desired station on the tuner.
4. Load the tape for recording. (Make sure the erase prevention tab is not

broken off; if it is, cover the hole with plastic tape).

5. Set the Dolby NR switch to the appropriate position.
6. Select the type of tape transport with the REVERSE MODE switch 

u

.

7. Make sure the monitor switch to the SOURCE position.
8. Adjust the recording input level.
9. Set the starting position of the tape.
10. Set the timer switch (TIMER) to the “REC” side.

2. Turn “on” the power switch of each appliance.
3. Load the pre-recorded tape to be played back.
4. Set the Dolby NR switches to the appropriate positions.
5. Select the type of tape transport with the REVERSE MODE switch 

u

.

6. Set the monitor switch of the Amplifier to the TAPE position. 
7. Press the PLAY ( 

1

) button and playback the tape; adjust the playback

level.
Press the stop ( 

2

) button. 

8. Set the timer switch (TIMER) to the “PLAY” side.

TIMER

REC

OFF PLAY

11. Set the audio timer to the desired time. The audio timer will turn the power

supply on at the desired time.

* With the above procedures, timer controlled recording can be made. 

When the preset time comes, the power is supplied and the FM
broadcast can be recorded.

Timer playback procedure

1. Make sure the connections are correct, especially the power supply

connections.

9. Set the audio timer to the desired time. The audio timer will turn the power

supply on at the desired time.

* With the above procedures, timer playback can be accomplished. 

When the preset time comes, the power is supplied and playback will
start.

Notes:

• Please read the operating instructions for the timer before use.
• If the timer recording or playback is not desired, be sure to switch the timer

switch (TIMER) to “OFF”.

• When using timers that allow several “on/off” operations, timer start

functioning can continue an unlimited number of times until the tape in the
machine is finished.

TIMER

REC

OFF PLAY

Summary of Contents for DRW-695

Page 1: ...OR REC PAUSE DIRECTION DIRECTION DUBBING SPEED REC REC MUTE CD SYNCHRO DOLBY NR PHONES MIN MAX B OFF C TIMER REV MODE REC OFF PLAY RELAY COUNTER RESET MEMORY DOUBLE CASSETTE DECK DRW 695 INPUT LEVEL B...

Page 2: ...one si riferisce conforme alle seguenti normative EN60065 EN55013 EN55020 EN61000 3 2 e EN61000 3 3 In conformit con le condizioni delle direttive 73 23 EEC 89 336 EEC e 93 68 EEC DECLARACI N DE CONFO...

Page 3: ...ur laisser un espace d au moins 10 cm entre le haut l arri re les c t s de cet appareil et le mur ou un autre composant PRECAUZIONI PER L INSTALLAZIONE Per consentire una buona dispersione del calore...

Page 4: ...Laat geen insektenverdelgende middelen benzine of verfverdunner met dit apparaat in kontakt komen Se till att inte insektsmedel p spraybruk bensen och thinner kommer i kontakt med apparatens h lje N o...

Page 5: ...Play and Timer Recording 2 Optional Remote Controllable 2 Tape Lighting CONNECTION Leave your entire system including this cassette deck turned off until all connections between the deck and other com...

Page 6: ...voltage Please be sure to unplug the cord when you leave home for say a vacation 6 Tape Transport Buttons PLAY 2 6 7 4 REC REC MUTE Deck B only 3 REC PAUSE Deck B only 0 1 Play Button Stop Button Fas...

Page 7: ...2 Storage Precautions Do not store cassette tapes in a place where they will be subject to Extremely high temperature or excessive moisture Excessive dust Direct sunlight Magnetic fields near TV sets...

Page 8: ...les upon which playback stops When playback starts from deck B when switching to deck A the first deck A playback cycle will be counted as the second cycle The completion of 5 cycles will always be at...

Page 9: ...2 0 dB level on peaks 1 dB level on peaks TYPE IV Metal 3 dB level on peaks Note The optimum recording level differs depending on the program source and the type of tape used 2 RECORDING BIAS ADJUSTME...

Page 10: ...sed in combination with a DENON CD player equipped for the synchronized recording function SYNCHRO Jack Connection Connect the SYNCHRO Jack with a DENON CD player which is equipped with a SYNCHRO jack...

Page 11: ...et Timer On timer recording playback Lch Rch Speaker System Timer recording procedure 1 Make sure the connections are correct especially the power supply connections 2 Turn on the power switch of each...

Page 12: ...at offered by Metal tape 2 The dynamics in the treble range are improved significantly 3 Since no decoding is necessary during playback the improved sound can be enjoyed on any type of tape deck inclu...

Page 13: ...eble is emphasized Heads are dirty Tape is worn If the POWER switch is turned off either during recording or playback and the unit is stopped there may be cases when the cassette cannot be removed eve...

Page 14: ...ge ausgeschaltet bis alle Anschl sse zwischen dem Cassettendeck und den anderen Komponenten vorgenommen worden sind LINE OUT LINE IN L R SYNCHRO TAPE 1 PB REC R L R L L R L R LINE OUT IN Empf nger ode...

Page 15: ...andlauftasten PLAY 2 6 7 4 REC REC MUTE nur cassetten deck B 3 REC PAUSE nur cassetten deck B 0 1 Wiedergabetaste PLAY Stopptaste STOP Schnellr cklauftaste REW Schnellvorlauftaste FF Aufnahme Stummsch...

Page 16: ...uf an denen Sie folgendem ausgesetzt sind Extrem hoher Temperatur oder extremer Feuchtigkeit Au ergew hnlich viel Staub Direktem Sonnenlicht Magnetfeldern in der N he von Fernsehger ten oder Lautsprec...

Page 17: ...cks Wird die Folge Wiedergabe aktiviert so werden die in Cassettendeck A und B eingelegten Cassettenb nder f nfmal nacheinander wiedergegeben Danach stoppt dann die Wiedergabe Wenn die Wiedergabe vom...

Page 18: ...EINSTELLUNG DER AUFNAHME VORMAGNETISIERUNG Um beste Aufnahmeergebnisse erzielen zu k nnen ist die berwachung w hrend der Aufnahme und der Vergleich verschiedener Aufnahmen nach Ihrer eigenen Beurteilu...

Page 19: ...FNAHMEFUNKTION Mit einem f r die Synchronaufnahme Funktion ausger steten CD Spieler von DENON lassen sich gute Ergebnisse bei Synchronaufnahmen erzielen Synchron Buchsen SYNCHRO Anschlu Verbinden Sie...

Page 20: ...R L AM DRW 695 Verst rker Tuner Wandsteckdose Timer Stromversorgung ber den Timer Links Rechts Lautsprecher Timergeschaltete Aufnahme 1 berzeugen Sie sich da alle Anschl sse insbesondere der Netzkabe...

Page 21: ...eblich verbessert 3 Da w hrend der Wiedergabe keine Dekodierung erforderlich ist kann der verbesserte Klang von jedem beliebigen Cassettendeck aus genossen werden einschlie lich von tragbaren Spieler...

Page 22: ...ergew hnliche Ger usche auf Der Dolby NR Schalter wurde nicht richtig eingestellt Stellen Sie den Dolby NR Schalter auf die richtige Position Der Hochfrequenzbereich H hen ist verst rkt Die Tonk pfe...

Page 23: ...ammables par minuterie 2 T l commandable par la t l commande en option 2 Eclairage de la bande CONNEXION Laisser le syst me entier y compris la platine cassette teint jusqu ce que toutes tes connexion...

Page 24: ...ment de bande PLAY 2 6 7 4 REC REC MUTE Seulment platine B 3 REC PAUSE Seulment platine B 0 1 Touche de lecture PLAY Touche d arr t STOP Touche de rembobinage rapide REW Touche d avance rapide FF Touc...

Page 25: ...soumises une temp rature extr mement lev e ou un taux d humidit excessif une pr sence excessive de poussi re une lumi re solaire directe des champs magn tiques pr s de t l viseurs ou enceintes Pour li...

Page 26: ...e la platine en cours de lecture de bande La lecture relay e lit les deux platines A et B successivement pendant 5 cycles apr s quoi la lecture s arr te Lorsque la lecture commence partir de la platin...

Page 27: ...al diff re selon la source de programme et le type de bande utilis e 2 REGLAGE DE LA POLARISATION D ENREGISTREMENT Afin d obtenir de meilleurs r sultats d enregistrement il est essentiel de contr ler...

Page 28: ...DENON quip pour la fonction d enregistrement synchronis Connexion de prise de synchronisation SYNCHRO connecter la prise de synchronisation SYNCHRO un lecteur de CD DENON quip d une prise de synchroni...

Page 29: ...SYNCHRO TAPE 1 L R L R PB REC R L R L L R L R LINE OUT IN L R R L TUNER L R A B SP R L OUT PUT R L AM DRW 695 Amplificateur Tuner Prise murale Temporisateur Enregistrement reproduction avec temporisa...

Page 30: ...am lior e de mani re significative 3 Comme aucun d codage n est n cessaire pendant la lecture le son am lior peut tre cout sur n importe quel type de platine cassette y compris les lecteurs portables...

Page 31: ...by NR correctement La gamme haute fr quence sons aigus est accentu e Les t tes sont sales La bande est us e Si l interrupteur d alimentation est hors circuit pendant l enregistrement ou la lecture et...

Page 32: ...toringen niet denkbeeldig is Verwijder het netsnoer van het stoopkontakt door de stekker uit te trekken 2 Verwijder het achterdeksel niet Ter voorkoming van elektrische schok dient u het achterdeksel...

Page 33: ...ghi periodi di tempo ad esempio per le vacanze 6 Commandi di avanzamento del nastro PLAY 2 6 7 4 REC REC MUTE solo a DECK B 3 REC PAUSE solo a DECK B 0 1 Tasto di riproduzione Tasto d arresto Tasto di...

Page 34: ...ficatore Prima di collegare il la piastra a cassetta con vostro amplificatore raccomandabile rileggere il manuale di istruzioni per il vostro amplificatore Usare le prese bianche per il canale sinistr...

Page 35: ...a rel premete il tasto di arresto STOP 2 6 della piastra in fase di riproduzione La riproduzione a rel riprodurr i nastri inserite nelle piastre A e B continuamente per 5 cicli dopodich si arrester l...

Page 36: ...strazione sono indispensabili il montraggio durante la registrazione e il vostro proprio contfronto delle varie registrazioni DRW 695 dotato di un dispositivo di regolazione della polarizzazione in mo...

Page 37: ...to della funzione di registrazione sincronizzata Collegamento della presa di registrazione sincronizzata SYNCHRO Collegate la presa di registrazione sincronizzata SYNCHRO con un lettore CD della DENON...

Page 38: ...rtarsi che i collegementi siano corretti soprattutto quelli d alimentazione della corrente 2 Accendere tutti i componenti che si intende usare 3 Sintonizzare la stazione desiderata con il sintonizzato...

Page 39: ...zione s inseriscein off nel modo sia della registrazione che della riproduzione ed il dispositivo si trova allo stato di fermata accade che non si possa smontare le casetta quando si spinge il pulsant...

Page 40: ...ivado de la m sica sin molestar a los dem as o para el monitoreo de la grabaci n puede enchufarse el juego de auriculares La impedancia deber ser de 8 a 1200 ohmios 4 Sensor de control remoto REMOTE S...

Page 41: ...al amplificador Antes de conectar la bandeja al amplificador seria una buena pr ctica revisar el manual de instrucciones del amplificador Utilizar las fichas blancas para el canal izquierdo y las fic...

Page 42: ...eproducidas secuencialmente durante 5 ciclos desup s de lo cual la reproducci n finalizar Cuando la reproducci n comienza desde la platina B al cambiar hacia la platina A el primer ciclo de reproducci...

Page 43: ...factor m s importante para lograr grabaciones bien equilibradas 2 AJUSTE DE LA POLARIZABION DE GRABACION Para obtener los mejores resultados de grabaci n es esencial que se realice el monitoreo durant...

Page 44: ...aci n sincronizada Conexi n del conector de sincronizaci n SYNCHRO Conecte el conector de sincronizaci n SYNCHRO a un reproductor CD DENON que est equipado con un conector SYNCHRO y efect e luego una...

Page 45: ...Procedimiento de grabaci n con temporizador 1 Aseg rese de que todas las conexiones especialmente las de alimentaci n est n correctas 2 Posicione en ON el interruptor de alimentaci n de cada component...

Page 46: ...es sucios Cinta gastada En el caso que se desconecte la llave de encendido en el modo de grabaci n o modo de reproducci n y se parara la unidad pueden presentarse los casos en que el casete no pueda s...

Page 47: ...PHONES Voor prive genieten van uw favoriete muziek zonder anderen te storen of voor meeluisteren tijdens opnemen wordt de hoofdtelefoon op de aansluitingen aangesloten De impedantie dient tussen 8 en...

Page 48: ...r Het is nutting de gebruiksaanwijzing van uw versterker door te lezen alvorens het deck erop aan te sluiten Gebruik de witte stekkers voor het linker en de rode voor het rechterkanaal 2 Dubbing De me...

Page 49: ...neer de weergave begint vanaf deck B en er wordt overgeschakeld naar deck A wordt de eerste weergaveronde van deck A geteld als de tweede ronde De 5 rondes worden altijd afgerond met de achterkant van...

Page 50: ...ens het opnemen en met elkaar vergelijken van uw opnamen van wezenlijk belang De DRW 695 is uitgerust met een fijnafstemming voor de bias voor het vergemakklijken van het instellen van de juiste bias...

Page 51: ...NAME FUNKTIE Een handige synchrone opname kan worden uitgevoerd als zij wordt gebruikt in kombinatie met een CD speler van DENON die voor synchrone opname is uitgerust Aansluiting op de SYNCHRO aanslu...

Page 52: ...akt worden 2 Schakel de netschakelaar van iedere component in 3 Stem de tuner af op hit gewenste station 4 Plaats de cassette voor opnemen in het cassettedeck Zorg dat het wispreventienokje van de cas...

Page 53: ...Band is versleten Als de POWER schakelaar spanning wordt uitgeschakeld ofwel tijdens de opname ofwel tijdens de weergave en het toestel stopt kan het gebeuren dat de cassette niet kan worden uitgewor...

Page 54: ...ettfacket Om denna lucka inte r helt st ngd f rblir bandman verknapparna oaktiva 3 H rlursuttag PHONES En h rlur kan anslutas hit h r enskild lyssning eller f r medh ring vervakning under inselning Im...

Page 55: ...n f rst rkare Innan kassettbandspelard cket ansluts till f rst rkaren r det en good regel att f rst l sa igenom f rst rkarens bruksanvisning De vita pluggarna anv nds f r v nster L kanal och de r da f...

Page 56: ...kvenspelning g ller att b de d ck A och B spellar v xelvis 5 g nger varefter avspelningen avbryts N r avspelningen startar fr n d ck B och v xlar till d ck A r knas den f rsta g ngen d ck A spelar som...

Page 57: ...Se p toppniv matarna FL PEAK och justerna ing ngsniv erna me hj lp av ing ngsniv regl agerattama INPUT LEVEL 2 FINJUSTERING AV INSPELNINGSBIAS F r att erh alla b sta inspelningsresultat r din egen omd...

Page 58: ...utningar SYNCHRO Anslut synkronanslutningen SYNCHRO till en DENON CD spelare med synkronanslutning SYNCHRO med hj lp av anslutningskabeln som medf ljer kassettd cket Du kan d refter utnyttja funktione...

Page 59: ...med timer V nster kanal H ger kanal H gtalarsystem Inspelning med timer 1 Se till att alla anslutningar utf rts korrekt s rskillt anslutningen av str mf rs rjning 2 St ll alla enheters str mbrytare p...

Page 60: ...ndet utisitet Om du st nger av str mbrytaren under inspelning eller avspelning och d cket stoppar kan det intr ffa att det inte g r att ta ut kassetten fast n du trycker p EJECT 5 tangenten Reng r dem...

Page 61: ...ma grava o pode ser ligado um conjunto de auscultadores a esta tomada Utilize auscultadores com uma taxa de imped ncia de 8 a 1200 ohms 4 Sensor remoto REMOTE SENSOR Com o DRW 695 a unidade de control...

Page 62: ...gravador a um amplificador Antes de ligar o gravador ao seu amplificador por favor reveja o manual de instru es do seu amplificador Utilize as fichas brancas para o canal esquerdo e as fichas vermelha...

Page 63: ...uzir a fita A reprodu o por revezamento reproduzir os gravadores A e B em sucess o durante 5 ciclos a seguir aos quais cessa a reprodu o Quando come ar a reprodu o do gravador B quando comutar para o...

Page 64: ...quilibradas 2 AJUSTAMENTO DA POLARIZA O DA GRAVA O Para os melhores resultados de grava o inspec o durante a grava o e compara o de grava es diferentes utilizando a sua pr pria opini o s o essentiais...

Page 65: ...cronizada Ligue uma tomada sincro SYNCHRO tomada sincro SYNCHRO de um leitor de discos compactos DENON que esteja equipado com uma tomada sincro SYNCHRO fa a ent o uma grava o sincronizada Utilize o c...

Page 66: ...grava o por temporizador 1 Certifique se de que as liga es est o correctas especialmente as liga es da fonte de alimenta o 2 Lique o interruptor de alimenta o de cada aparelho 3 Sintonize a esta o de...

Page 67: ...a alta frequ ncia agudos real ado As cabe as est o sujas A fita est gasta Se o interruptor de corrente for desligado quer durante a grava o ou a reprodu o e a unidade for parada pode haver casos quand...

Page 68: ...68 MEMO...
Page 69: ...Printed in China 511 4088 007 16 11 YUSHIMA 3 CHOME BUNKYO KU TOKYO 113 0034 JAPAN Telephone 03 3837 5321...

Reviews: