background image

Getting started

4

Do not place the unit
on amplifiers or
equipment that may
become hot.

The heat can damage the unit.

PRECAUTIONS

Before using this unit please read these operating instructions care-
fully. Take special care to follow the warnings indicated on the unit
itself as well as the safety suggestions listed below.
Afterwards keep them handy for future reference.

Safety

1. Power Source—The unit should be connected to a power

supply only of the type described in the operating instructions or
as marked on the unit. If you are not sure of the type of power
supply to your home, consult your appliance dealer or local
power company.

2. Polarization—If the unit is equipped with a polarized AC power

plug (a plug having one blade wider than the other), that plug will
fit into the AC outlet only one way. This is a safety feature. If you
are unable to insert the plug fully into the outlet, try reversing the
plug. If the plug should still fail to fit, contact your electrician to
replace your obsolete outlet. Do not defeat the safety purpose of
the polarized plug.

3. Power Cord Protection—AC power supply cords should be

routed so that they are not likely to be walked on or pinched by
items placed upon or against them. Never take hold of the plug or
cord if your hand is wet, and always grasp the plug body when
connecting or disconnecting it.

4. Overloading—Do not overload wall outlets and extension cords

as this can result in a risk of fire or electric shock.

5. Nonuse Periods—When the unit is not being used, turn the pow-

er off. When left unused for a long time, the unit should be un-
plugged from the household AC outlet.

6. Attachments—Do not use attachments not recommended by

the unit manufacturer as they may cause hazards.

Installation

Environment

1. Water and Moisture—Do not use this unit near water—for ex-

ample, near a bathtub, washbowl, swimming pool, or the like.
Damp basements should also be avoided.

2. Condensation—Moisture may form on the lens in the following

conditions…

³

immediately after a heater has been turned on.

³

in a steamy or very humid room.

³

when the unit is suddenly moved from a cold environment to a
warm one.

If moisture forms inside this unit, it may not operate properly. To
correct this problem, turn on the power and wait about one hour
for the moisture to evaporate.

3. Heat—The unit should be situated away from heat sources such

as radiators and the like. It also should not be placed in tempera-
tures less than 5

e

C (41

e

F) or greater than 35

e

C (95

e

F).

Placement

1. Ventilation—The unit should be situated so that its location or

position does not interfere with its proper ventilation. Allow
10 cm (4

q

) clearance from the rear of the unit.

2. Foreign Material—Care should be taken so that objects do not

fall into and liquids are not spilled into the unit. Do not subject this
unit to excessive smoke, dust, mechanical vibration, or shock.

3. Carts and Stands—The unit should be used only with a cart or

stand that is recommended by the manufacturer.
The unit and cart combination should be moved
with care. Quick stops, excessive force, and un-
even surfaces may cause the unit and cart combi-
nation to overturn.

4. Mounting—Any mounting of the appliance should follow the

manufacturer’s instructions, and should use a mounting accesso-
ry recommended by the manufacturer.

Maintenance

Disconnect this unit from the AC outlet before cleaning.
Clean the cabinet, panel and controls with a soft cloth lightly moist-
ened with a mild detergent solution.
Do not use any type of abrasive pad, scouring powder or solvent
such as alcohol or benzine.

Service

1. Damage Requiring Service—The unit should be serviced by

qualified service personnel when:
(a) The AC power supply cord or the plug has been damaged; or
(b) Objects have fallen or liquid has been spilled into the unit; or
(c) The unit has been exposed to water; or
(d) The unit does not appear to operate normally or exhibits a

marked change in performance; or

(e) The unit has been dropped, or the enclosure damaged.

2. Servicing—The user should not attempt to service the unit be-

yond that described in the operating instructions. All other servic-
ing should be referred to an authorized service personnel.

3. Replacement parts—When parts need replacing, ensure the

servicer uses parts specified by the manufacturer or parts that
have the same characteristics as the original parts. Unauthorized
substitutes may result in fire, electric shock, or other hazards.

4. Safety check—After repairs or service, ask the servicer to per-

form safety checks to confirm that the unit is in proper working
condition.

Summary of Contents for DVD-800

Page 1: ...SEARCH 6 5 SKIP 9 PLAY 1 C ON STANDBY REMOTE CONTROL UNIT RC 550 1 2 3 4 5 6 7 8 9 0 10 6 9 5 1 PLAY MODE REPEAT MODE A B REPEAT V S S SET UP CLEAR SUBTITLE AUDIO ANGLE RETURN DISPLAY ENTER MENU SLOW...

Page 2: ...11 Starting play from a selected title or track 11 Skipping chapters or tracks 12 Frame by frame viewing 12 Fast forward and rewind SEARCH 12 Slow motion play 12 Advanced operations Changing soundtra...

Page 3: ...s voltage within the product s enclosure that may be of suffi cient magnitude to constitute a risk of electric shock to persons CAUTION CAUTION TO REDUCE THE RISK OF ELECTRIC SHOCK DO NOT REMOVE SCREW...

Page 4: ...t may not operate properly To correct this problem turn on the power and wait about one hour for the moisture to evaporate 3 Heat The unit should be situated away from heat sources such as radiators a...

Page 5: ...chapter Press the numbered buttons and press ENTER Repeat play You can use chapter repeat or title repeat Program play random play You cannot use program play or random play Display during play On Sc...

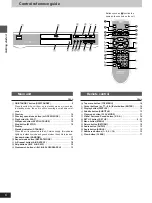
Page 6: ...t is still consuming a small amount of power 2 Disc tray 10 3 Disc tray open close button OPEN CLOSE 10 4 Play button 1 PLAY 10 5 Still pause button STILL PAUSE 10 6 Stop button STOP 10 7 Display 8 St...

Page 7: ...remote control Do not use rechargeable type batteries Do not mix old and new batteries use different types at the same time heat or expose to flame take apart or short circuit attempt to recharge alk...

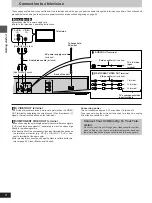
Page 8: ...e terminals outputs the color difference signals CB CR and luminance signal Y separately in order to achieve high fidelity in reproducing colors The description of the component video input terminals...

Page 9: ...ess SET UP to show the menus 3 Press 2 1 to select the Video tab 4 Press 3 4 to select TV Aspect and press ENTER 5 Press 3 4 to select the item and press ENTER 4 3 Pan Scan Factory preset Select if yo...

Page 10: ...levision broadcasts If you turn the volume up on the television or amplifier ensure you reduce the volume again before playing other sources so that a sudden increase in output does not occur Auto pow...

Page 11: ...PLAY while is flashing Pressing 1 PLAY while the message is displayed the beginning portions of each chapter up to the current one are played and full play resumes from the point where you stopped pl...

Page 12: ...e paused Press 2 or 1 The frame changes each time you press the buttons The frames change in succession if you press and hold the button Pressing also activates forward frame by frame C Fast forward a...

Page 13: ...number changes each time you press the button To clear display the subtitle languages 1 Press SUBTITLE 2 Press 1 PLAY 3 Press 3 4 to select ON or OFF C Angles During play Press ANGLE The number chang...

Page 14: ...recorded on it the effect is broadened and sound seems to come from virtual speakers on either side Press V S S Each time you press the button 1 Natural effect l l 2 Emphasized effect l OFF Cancel Fac...

Page 15: ...dicator lights up Refer to Icons for audio menu in Using On Screen Menu Icons page 20 for setting details Note CINEMA VOICE MODE will not work or will have less effect with some discs even if you sele...

Page 16: ...layback control Cancel menu play first 1 Press during play until PBC PLAY is cleared from the unit s display 2 Press the numbered buttons to select a track to start play 3 Press REPEAT MODE above To r...

Page 17: ...am play screen appears 2 Press the numbered buttons to select the track To select a 2 digit number Example To select track 23 press S10 then 2 and 3 To select a track using the cursor buttons Press EN...

Page 18: ...ted Press 3 4 to select the menu Each time you press the button Play menu A l l Video menu B l l Audio menu C l Display menu D 3 Press 2 1 to select the item 4 Press 3 4 to select the setting Items wi...

Page 19: ...le screen indicate the maxi mum speeds of the search Shuttle screen Content DVD Title number VCD CD Track number DVD Chapter number DVD Time select a position to start play by specifying a time VCD CD...

Page 20: ...oint To mark another position 2 1 ENTER To recall a marker 2 1 ENTER To erase a marker 2 1 CLEAR Icon AB OFF 1 2 3 Icons for display menu Icon Content DVD IPB display Displays the picture type I P B i...

Page 21: ...NU SET UP RETURN ENTER 1 2 3 4 RETURN Changing initial settings Remote control only Change the initial settings to suit your preferences and to suit the unit to the environment in which it is being us...

Page 22: ...through the COMPONENT VIDEO OUT terminals PCM Down Conversion DVD Digital output during play of DVDs recorded in 96 kHz linear PCM page 25 Dolby Digital DVD Digital output during play of DVDs recorde...

Page 23: ...Select if small text or fine patterns cannot be seen clearly when Automatic is selected Lighter when connected to a TV through the VIDEO OUT or S VIDEO OUT terminal Darker when connected to a TV throu...

Page 24: ...84 Punjabi 8065 Quechua 8185 Rhaeto Romance 8277 Telugu 8469 Thai 8472 Tibetan 6679 Tigrinya 8473 Tonga 8479 Turkish 8482 Turkmen 8475 Twi 8487 Ukrainian 8575 Urdu 8582 Uzbek 8590 Vietnamese 8673 Vola...

Page 25: ...ve made 1The connected equipment must be able to handle 96 kHz LPCM in order to take advantage of high quality audio found on these discs Dolby Digital Bitstream Factory preset When you have connected...

Page 26: ...nnect to an amplifier with built in decoder or a separate decoder amplifier combination 27 A PCM Down Conversion Select Yes Dolby Digital DTS Digital Surround Settings depend on your decoding equipmen...

Page 27: ...decoder or a decoder amplifier combination Back of the unit Optical digital audio cable Do not bend when connecting Speakers You can enjoy surround sound by connecting from three to six speakers Examp...

Page 28: ...us off page 14 The Dolby Pro Logic decoder will not function correctly if Virtual Surround Sound V S S or Bass Plus is on Place the subwoofer as close as possible to the front center Turn BASS PLUS on...

Page 29: ...hich do not contain more than one language In the case of some discs the alternative language cannot be selected with AUDIO or SUBTITLE Try selecting it from the disc s menu if one is available Subtit...

Page 30: ...dry cloth If the surfaces are extremely dirty use a soft cloth dampened with a soap and water solution or a weak detergent solution Never use alcohol paint thinner or benzine to clean this unit Before...

Page 31: ...ncy response DVD linear audio 4 Hz 22 kHz 48 kHz sampling 4 Hz 44 kHz 96 kHz sampling CD audio 4 Hz 20 kHz 2 S N ratio CD audio 115 dB 3 Dynamic range DVD linear audio 102 dB CD audio 98 dB 4 Total ha...

Page 32: ...ge 42 Avance rapide recul rapide Recherche 42 Lecture ralentie 42 Fonctions volu es Changement de langue des dialogues et des sous titres et s lection des angles 43 Pour agr menter le visionnement de...

Page 33: ...RVISIBLE ET INVISIBLE EN CAS D OUVERTURE EXPOSITION DANGEREUSE AU FAISCEAU ATTENTION SYNLIG OG USYNLIG LASERSTR LING VED BNING UNDG UDS TTELSE FOR STR LING ADVARSEL AVATTAESSA OLET ALTTIINA N KYV JA N...

Page 34: ...me l int rieur de l appareil il se peut que celui ci ne fonctionne pas Pour rem dier au probl me tablir le contact et attendre environ une heure que l humidit se soit vapor e 3 Chaleur loigner l appar...

Page 35: ...reprise de chapitre ou de titre Lecture programm e lecture al atoire Il est impossible d utiliser les fonctions de lecture programm e et lecture al atoire Affichage pendant la lecture Ic nes de rense...

Page 36: ...he d ouverture fermeture plateau des disques OPEN CLOSE 40 4 Touche de lecture 1 PLAY 40 5 Touche de pause STILL PAUSE 40 6 Touche d arr t STOP 40 7 Affichage 8 Voyant du mode attente STANDBY Ce voyan...

Page 37: ...us es utiliser ensemble des piles de types diff rents exposer les piles la chaleur ou la flamme d monter ou court circuiter les piles tenter de recharger des piles alcalines ou au mangan se utiliser...

Page 38: ...gnation des prises de signal vid o composante varie d un t l viseur ou d un moniteur l autre ex Y PB PR Y B Y R Y Y CB CR et ainsi de suite Relier les prises de m me couleur Apr s avoir effectu les co...

Page 39: ...ENTER 4 3 Pan Scan Panoramique et balayage par d faut S lectionner cette valeur lorsqu un t l viseur ordinaire est utilis et pour visionner des enregistrements destin s un grand cran dans un format p...

Page 40: ...ement Le mot finalis signifie que les disques ont suivi un proces sus permettant aux lecteurs CD R CD RW de lire des disques audio du m me format Nota Si le symbole s affiche Cela signifie que l op ra...

Page 41: ...ut des portions de chaque chapitre jusqu celle en cours et la lecture int grale continue au point o la lecture a t interrompue ou la touche PLAY MODE a t appuy e La fonction d aper u de chapitre ne fo...

Page 42: ...se Avec les CD Vid o il est impossible de faire une recherche en arri re pendant une avance image par image ou une lec ture ralentie 2 ou 6 Sens arri re 9 1 ou 5 Sens avant CD Vid o avec pilotage de l...

Page 43: ...les voix sur les disques comportant une fonction Karaoke Pour plus de d tails lire les notes d accompagnement du disque B Sous titres Pendant la lecture Appuyer sur SUBTITLE Le num ro change sur chaqu...

Page 44: ...rtuelles Appuyer sur V S S Sur chaque pression de la touche l affichage change 1 Effet naturel l l 2 Effet amplifi l OFF D sactiv par d faut L indicateur V S S s allume lorsque la fonction d effet amb...

Page 45: ...c nes de menu audio dans Menus ic nes utilisation page 50 pour plus de d tails sur le r glage Nota Modes voix de film peut ne pas fonctionner ou avoir moins d effet avec certains disques m me lors de...

Page 46: ...e de l affichage 2 Appuyer sur les touches num riques pour s lectionner la plage o la lecture doit commencer 3 Appuyer sur REPEAT MODE ci dessus Pour r tablir la lecture pilot e par menu appuyer sur p...

Page 47: ...ne soit plus affich e Les donn es programm es demeurent en m moire B Lecture al atoire Le lecteur lit les plages du disque dans un ordre au hasard Lecteur Appuyer sur RANDOM T l commande Dans le mode...

Page 48: ...es dialogues Appuyer sur ENTER dans le cas o le param tre ne serait pas modifi apr s avoir appuy sur 3 4 Si des chiffres s affichent ex le no de titre les touches num riques pourront galement tre util...

Page 49: ...l absence de signal d extr mes graves 0 Aucun effet ambiophonique 1 Effet ambiophonique monaural 2 Effet ambiophonique st r ophonique gauche droit 1 Centre 2 Avant gaucheiAvant droit 3 Avant gaucheiAv...

Page 50: ...Marquage d une autre position 2 1 ENTER Pour rappeler un marqueur 2 1 ENTER Pour effacer un marqueur 2 1 CLEAR Description DVD Dolby Digital 2 canaux ou plus seulement Ambiophonie virtuelle avanc e V...

Page 51: ...ETURN ENTER 1 2 3 4 RETURN Modification des r glages initiaux T l commande seulement Il est possible de modifier les r glages initiaux selon ses pr f rences et en fonction des conditions d utilisation...

Page 52: ...noir de l image si le lecteur est raccord un t l viseur par le truchement des prises COMPONENT VIDEO OUT Conv abaissement PCM DVD Sortie num rique avec DVD avec signal PCM lin aire 96 kHz page 55 Dolb...

Page 53: ...e si du texte en petits caract res ou des motifs fins ne peuvent tre vus clairement dans le mode Automatique Plus clair avec t l viseur connect aux prises de VIDEO OUT ou S VIDEO OUT Plus fonc avec t...

Page 54: ...7282 Danois 6865 Espagnol 6983 Esp ranto 6979 Estonien 6984 F ringien 7079 Fidjien 7074 Finnois 7073 Fran ais 7082 Frison 7089 Ga lique d cosse 7168 Galicien 7176 Gallois 6789 G orgien 7565 Grec 6976...

Page 55: ...ccordements et r glages effectu s 1 L quipement raccord doit tre en mesure de prendre en charge un signal LPCM 96 kHz pour pouvoir tirer profit de la haute qualit audio de ces disques Dolby Digital Bi...

Page 56: ...un amplificateur ou autre appareil num rique Conv abaissement PCM S lectionner PCM Dolby Digital S lectionner PCM DTS Digital Surround S lectionner Non 55 page Marche suivre 55 Accentuation des graves...

Page 57: ...param trage en fonction de l quipement utilis page 55 Note Il n est pas possible d utiliser des d codeurs DTS Digital Surround ne pouvant prendre les disques DVD en charge C ble audionum rique optiqu...

Page 58: ...es l quipement utilis D sactiver la fonction Ambiophonique virtuel avanc et Accentuation des graves page 44 Autrement le d codeur Dolby Pro Logic ne peut fonctionner correctement Connexion d une encei...

Page 59: ...r la mise en place du disque tiquette sur le dessus X La langue s lectionn e doit avoir t enregistr e sur le disque Sur certains disques la langue ne peut tre s lectionn e autrement par le truchement...

Page 60: ...ram tres Menus du disque de l cran SET UP pour s lectionner la langue de pr f rence d Les menus ne sont affich s que lorsqu ils ont t enregistr s sur le disque Le disque est sale le nettoyer S Un prob...

Page 61: ...stiques du signal de sortie audio 1 R ponse en fr quence DVD audio lin aire 4 Hz 22 kHz chantillonnage 48 kHz 4 Hz 44 kHz chantillonnage 96 kHz CD audio 4 Hz 20 kHz 2 Rapport signal sur bruit CD audio...

Page 62: ...62 MEMO...

Page 63: ...63...

Page 64: ...14 14 AKASAKA 4 CHOME MINATO KU TOKYO 107 8011 JAPAN Telephone 03 3584 8111 Printed in Japan RQT6065 Y...

Reviews: