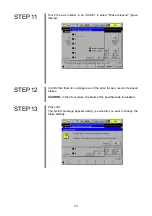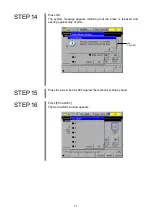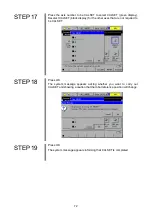
73
STEP 20
Press the ROBOT STOP button.
The robot brake becomes activated.
STEP 21
Turn the ROBOT STOP button to cancel robot stop.
STEP 22
Press the MOTOR to turn ON the power to the motor.
Caution: A "motor lock overload" error may occur just after the
power to the motor is turned ON. In this case, try to turn ON
the power several times, or release the brake, move the
axis a little in the opposite direction of the mechanical end,
and turn ON the power again.
STEP 23
Move the CALSETed axis in the opposite direction from the mechanical end
by the manual operation of the teach pendant.
STEP 24
Perform CAL. The single-axis CALSET of the specified axis is completed.
2.4.6.2 CALSETing All Axes
The CALSET of all axes is called all-axis CALSET.
The procedure is the same as that for single-axis CALSET except that you should
select all axes when releasing brakes and performing CALSET. For details of the
procedure, see Section 2.4.6.1 "CALSETing a Single Axis."
Summary of Contents for VS-6556G
Page 1: ...ROBOT Vertical articulated VS G SERIES INSTALLATION MAINTENANCE GUIDE...
Page 6: ......
Page 67: ...49 Reference Drawing of Part A Material A2017 T4...
Page 68: ...50 Reference Drawing of Part B Material A2017 T4 Reference Drawing of Part C Material A2017 T4...
Page 71: ...53 Reference Drawing of Stay for 3rd axis Mechanical End VS6556G Material A2017 T4...
Page 118: ......
Page 120: ......


