background image

E.           J.             I.   H.

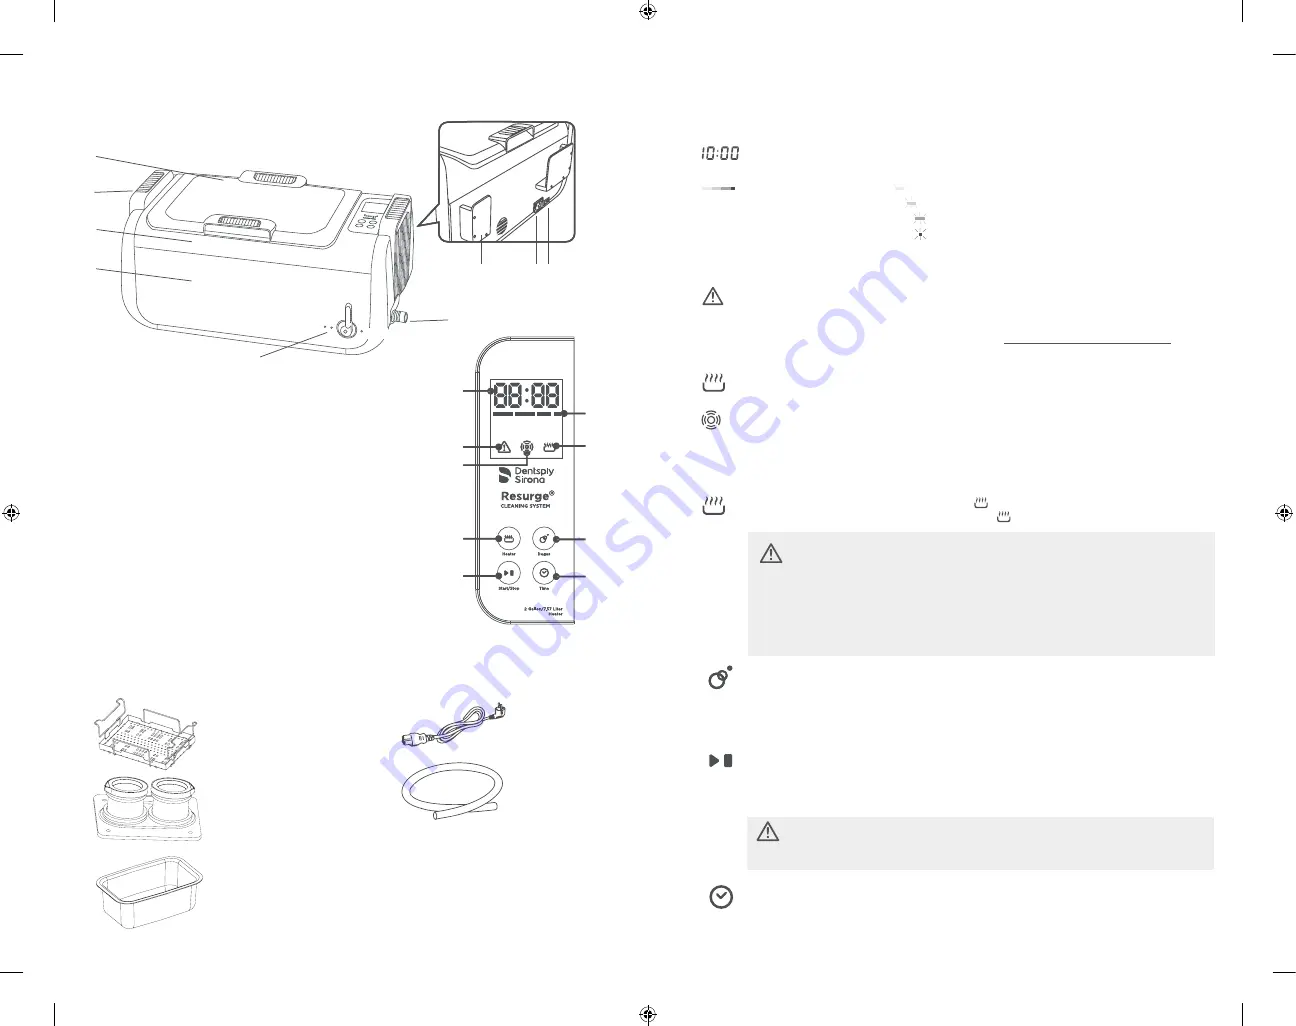
Control Panel and Operations


Working Time Display: 

It counts down after work is started. 

Heater Status:  

When illuminated, indicates heater is on.

Heater Button: 

Touching Heater key twice,      flashes, indicating the heater is turned on. 

To cancel heating, touch Heater key twice again,      dims, indicating the heater is turned off.

Normal Cleaning Status:  

When illuminated as solid light, it indicates that normal 

cleaning is underway. When illuminated as flashing light, it indicates that degas is 
underway.

Degas: 

Degassing is recommended each time you add fresh solution to maximize 

cleaning effi ciency. Touch the key twice to activate Degas. Make sure lid is off before 
activating. Cycle will run for 3 minutes. The time display will count down to 00:00 at 
which point the degas process is complete.

Timer Quick Set Button. 

Touch Time button, LED display shows the last timer setting. 

Each touch increases the time by 5 minutes. The system has a memory setting and will 
retain the timer setting for next use.

Overheat protection warning light: 

If the unit is working improperly or has been running 

for too long, the red warning light will illuminate, indicating the unit is under overheat 
protection. The unit can not be operated until idling for 15 to 20 minutes. The warning light 
then turns off and the operation can be resumed. You do not need to turn unit off.

Start/Stop Button: 

After powering on, the LED displays the last timer setting. The unit 

is ready under normal cleaning mode. Press Start/Stop key twice and the cleaning starts. 
The cleaning stops when the timer counts down to 00:00. If the unit needs to be stopped 
before the timer runs out, touch Start/Stop key twice.  

Multistage Thermometer: 


Solid green light indicates that the water temperature is 

0-30% of the set temperature.     Solid orange light indicates that the water temperature is 
30-60% of the set temperature.      Solid red light indicates that the water temperature is 
60-90% of the set temperature.      Flashing red light indicates that the water temperature 
is close to the set temperature. All lights indicate that the water temperature is at the set 
temperature (90-100%). 


             To prevent accidentally turning on or off the heater, the Heater key needs to be 
touched twice within 6 seconds to turn it on or off. Heater Status light flashes, indicating 
the heater is on. When the water reaches the set temperature, the heater will turn off 
automatically. 

IMPORTANT: 

Do not turn on the heater without water in the tank,

 as this will damage 

the unit.

             To prevent accidentally turning on or off the unit, the Start/Stop key needs to be 
touched twice within 6 seconds to turn it on or off.       


Product Structure and Accessories

A. 

Top Cover

B. 

Handles

C. 

Stainless Steel Tank

D. 

Housing

E. 

Control Panel

F. 

Drainage Valve Handle

G. 

Drainage Spout

H. 

Power Switch

I. 

Power Socket

J. 

Cover Holder

A. 

B. 

C. 

D. 

Optional Accessories:

Standard Accessories:

Power
Cord

See following page

Hose

Stainless Steel Rack and Tray

Double beaker holding set

Indirect cleaning tank

(removable cleaning chamber)

3

4

1. 

3. 

5. 


6.

8.

2. 

4. 


7.

9.

Indicator Lights

Functional Buttons

F.

G.

Close

Open

Summary of Contents for Resurge

Page 1: ...efficiency not susceptible to interference more durable Multiple circuit protectors When overloaded or improperly used the protectors shut down the power to certain areas to protect the machine Moisture proofed Printed Circuit Board with industrial IC PCBs are placed vertically for better moisture proof performance Better anti interference Three cooling fans Two for cooling of PCB boards one for c...

Page 2: ...e Control panel with capacitive sensing technology durable reliable resistant to water and harsh chemicals Electrical circuit features 1 Three transducers each has an independent PCB control The output power is increased by 40 compared to less expensive control method that uses one PCB to control multiple transducers 2 Multiple circuit protectors a Thermal switch to prevent running dry If temperat...

Page 3: ...lint hair and other materials Do not place the device on a soft surface where the vents could be blocked Observe the other warnings on the previous page If the supply cord is damaged it must be replaced by your dental dealer or its service agent or a similarly qualified person in order to avoid a hazard Other observations Do not operate the product without filling the tank with water Running dry w...

Page 4: ... ready under normal cleaning mode Press Start Stop key twice and the cleaning starts The cleaning stops when the timer counts down to 00 00 If the unit needs to be stopped before the timer runs out touch Start Stop key twice Multistage Thermometer Solid green light indicates that the water temperature is 0 30 of the set temperature Solid orange light indicates that the water temperature is 30 60 o...

Page 5: ...e the gases from the solution to maximize the cavitation energy If you do not degas the cavitation energy can be blocked by the gases making the cavitation energy less effective Adding Instruments a Put items in cassettes or stainless steel basket or trays provided b Lay the cassettes or trays in the metal rack c Lower the rack into the cleaning tank d Confirm that the water level is between MIN a...

Page 6: ...n Guidelines Quick Start cont Operation Guidelines Quick Start cont Notes on Operations This unit is equipped with advanced power off memory capability It memorizes the last timer setting once the cleaning cycle is started a 5 seconds after the timer counts down to 00 00 the last timer setting will reappear Press the Start Stop key twice it will repeat the last cycle with the same timer setting b ...

Page 7: ...r the housing Use a towel to wipe the tank and the housing dry Do not expose the unit under direct sunshine for a long time Keep the unit in a dry cool and ventilated area To clean the outside of the unit use a non abrasive cleaner and soft cloth Do not add cold water when unit is hot 4 5 6 7 Optional Accessories Stainless Steel Rack and Tray 9 10 Double beaker holding set Indirect tank removable ...

Page 8: ...11 12 PAGE INTENTIONALLY BLANK PAGE INTENTIONALLY BLANK ...

Page 9: ...x 6 0 L 1 6 gallon US Min 4 3 L 1 1 gallon US Tank Size 33 1x23 8x10 5 cm 13 0inx9 4inx4 1in Longest Item Fit Inside Tank 37 O cm 14 4in Power Supply 380W AC 100 12ov 60Hz 410W AC 220 240V SOHz 310W AC 100V 50 60Hz Digital Timer Settings Drainage Drainage valve Ultrasonic Frequency 35 000 Hz Tank Material Stainless Steel SUS304 Housing Material ABS Net Weight 9 5 kg 21 1 lb Gross Weight 10 9 kg 24...

Reviews: