6
Operation Guidelines - Quick Start, cont.
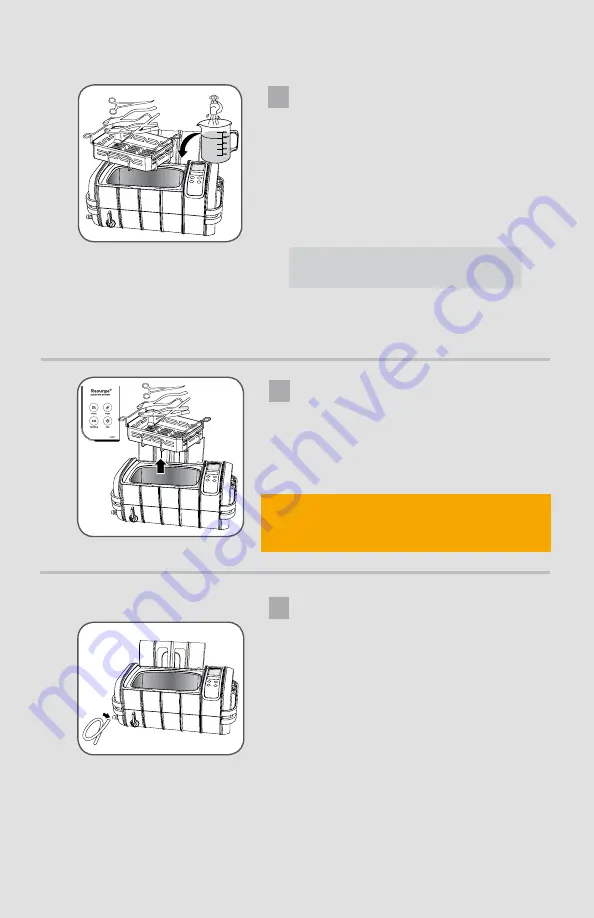
Add Instruments
a. Put items in cassettes or stainless steel
basket or trays provided.
b. Lay the cassettes or basket trays in the
stainless steel rack.
c. Lower the rack into the cleaning tank.
d. Confirm that the water level is between
MIN and MAX and above the area to be
cleaned.
e. If not, add warm water to the tank.
The unit can become damaged if there is
no water in the tank.
Cleaning
a. Make sure the lid is closed. Touch the Time
key to set the timer to desired time.
b. Touch the Start/Stop key twice to
activate the cleaning cycle.
c. When cleaning cycle is completed, open
the lid and retrieve the tray(s) or cassettes.
Draining Tank
At the end of the day, the tank should be
drained and fresh water and cleaning agent
added.
a. Turn off unit.
b. Connect the hose to the drainage pipe as
shown.
c. Turn the drainage valve handle clockwise to
open the drain and remove the dirty water.
d. Clean and wipe the tank dry.
e. Close the drainage valve.
3
4
5
500
400
300
200
100
IMPORTANT: When moving rack to sink or counter for
drying, avoid water from dripping onto the control panel. If
water gets on panel gently remove the water with a paper
towel or cloth.
0.8 Gallon/3 Liter
Summary of Contents for Resurge 0060100
Page 16: ...11 PAGE INTENTIONALLY BLANK ...
Page 17: ...12 PAGE INTENTIONALLY BLANK ...


