OPERATING INSTRUCTION - MAIN UNIT
A. Switch On/Off the Product
1. Before turning on the system, please connect it according to
the System Connection Instruction.
2. Connect AC power supply with this product.
(Caution: Power source must be consistent with this product.)
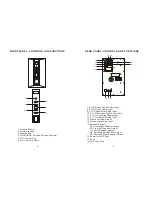
3. Press the Power switch button (16) on the Rear Panel of the
main unit to switch on the system, the Standby indicator will
light up. Press the Standby button(2) on the main unit to enter
the normal status.
B. VOLUME Selection
1. To increase the volume level, press the button(5)
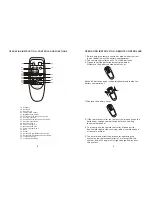
on the front panel of the main unit or button (29)
on the remote controller, the LED will show -70 to 0 dB, 0
dB expresses the volume is at the maximum level.
2. To reduce the volume level, press the VOLUME - button (6) on
the front panel of the main unit or VOLUME - button (31) on
the remote controller, the LED will show 0 to -70 dB, -70
dB expresses the volume is at the minimum level.
C. BASS Selection
1. To increase the bass level, press the BASS + button (28) on
the remote controller, the LED will show 0 to 10 dB. The
maximum bass level is 10 dB
2. To reduce the bass level, press the BASS - button (30) on the
remote controller, the LED will show 0 to -10 dB. -10 dB
is the minimum bass level.
D. TREBLE Selection
1. To increase treble level, press button(36) on the
remote controller, the LED will show 0 to 10 dB. 10 dB
expresses treble is at the maximum level.
2. To reduce treble level, press TREBLE - button (37) on the
remote controller, the LED will show 1 to -10 dB. -10 dB
expresses treble is at the minimum level.
E. BALANCE Selection
1. Press the BALANCE L button (22) on the remote controller to
minimize the Left speaker output.
2. Press the BALANCE R button (23) on the remote controller
to minimize the Right speaker output.
F. SURROUND DECODER Selection
1. Connect and place Centre and Surround speakers properly.
2. Press the SURROUND button (4) on the front panel of the main
unit or button (20) on the remote controller to select Surrouud
Decoder for Home Theatre system effects.
A. Press again SURROUND button, the LED display will show 2.1,
the unit is in 2.1 status.
B. Press again SURROUND button, the LED display will show
3.1, the unit is in 3.1 status. Surround speakers output are
off.
C. Press continuously the SURROUND button three times, the
LED display shows 5.1 ,the unit is in 5.1 status.
Note:
the above effects are only available at the status of 2.1 (the LED
display shows 2CH). When the unit is in the status of 5.1 (the
LED display shows 6CH), SURROUND do not have the effects.
G. CENTRE SPEAKER Selection
1.Press C + button (25) on the remote controller to maximize the
centre Speaker output.
2.Press C - button (27) on the remote controller to minimize the
centre Speaker output.
H. SURROUND LEFT SPEAKER Selection
1. Press SL + button (24) on the remote controller to maximize
the Surround Left Speaker output.
2. Press SL - button (26) on the remote controller to minimize the
Rear Surround Speaker output.
I. SURROUND RIGHT SPEAKER Selection
1.Press SR + button (34) on the remote controller to maximize
the Surround Right Speaker output.
OPERATING INSTRUCTION - MAIN UNIT
11
10


