background image

ENG-6 

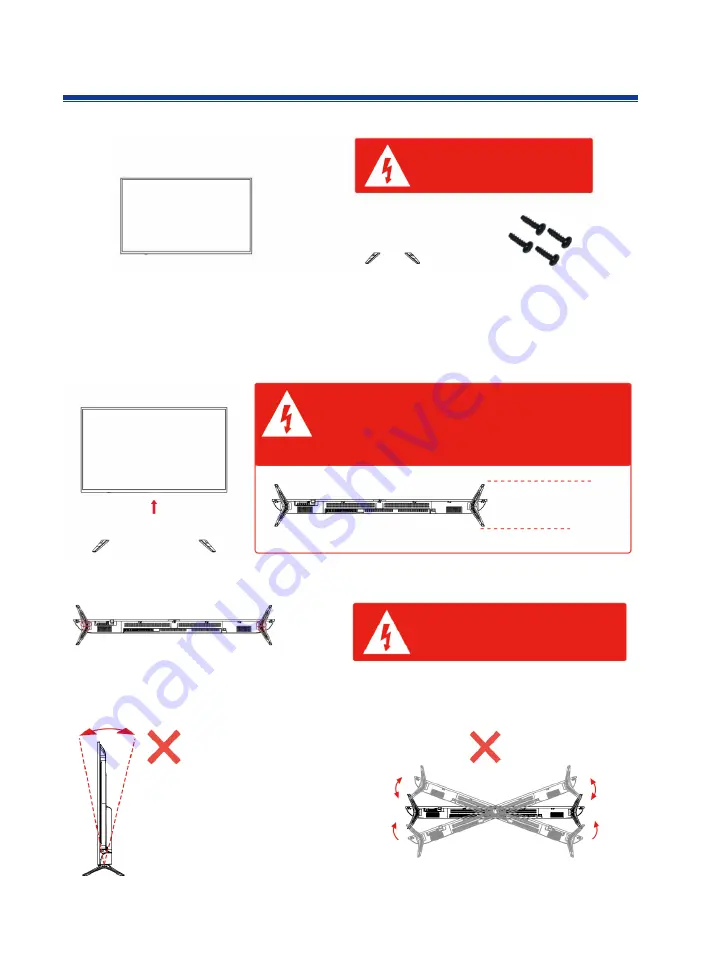
Attaching the stand


The pictures below are only for reference. 

1. 

The supplied accessories

 for attaching the stand to the TV


2. 

How to install the stand? 

Place the TV face down on a soft and flat surface (e.g. blanket, foam, cloth, etc.) to prevent any damage to 

the TV. 

Attach the stand to the bottom of the TV as shown below. 


Secure the stand with the supplied screws. 


3. 

Warnings. 

a. Do not tilt the stand forward or backward as 

shown below. Doing so may damage the stand. 

b. Do not tilt the stand leftward or rightward as shown 

below. Doing so may damage the stand. 


Before installing the stand, please check 
that you have all of the parts and that there 
is no visible damage. If a part is missing or 
appears damaged, please contact customer 
service. 

TV set 

Stand 

4x screws (M5 x 20) 

1.  Before you attach the stand, make sure the orientation of the stand is correct according to 

the front and rear view of the TV, as shown below. 

2.  When you are attaching the stand, make sure the stand is attached to the bottom of the TV i 

tightly  

If you do not attach the stand correctly, the TV will be unstable and can possibly tip over. 

Front  
(longer) 

Rear 

When attaching the stand, make sure the screws are 
attached tightly. 
If the screws do not attach tightly, it will lead the TV to be 
unstable or may even tip over. 

Summary of Contents for LDS-5575

Page 1: ...SMART TV with DVB T2 S2 DVB C and H 265 HEVC Support Model LDS 5575 Quick start guide The full user manual can be found by searching for this model number at www denver electronics com...

Page 2: ...er cable from being walked on or pinched particularly at plugs and the point where it exits from the TV Do not allow the power cable to overhang the edge of a table Unplug the product during lightning...

Page 3: ...splay the OSD menu press again to exit the menu CH CH Press to scan through channels move down up in the OSD menu screen volume up or down Press to adjust the volume move left right in the OSD menu sc...

Page 4: ...S2 jack Connect a satellite signal TV2 T2 C jack Connect to an aerial socket on the wall with the RF coaxial cable OPTICAL jack Connect to an external digital audio device CI Common Interface Cl slot...

Page 5: ...s Select a tuning mode DTV digital TV ATV analogue TV or both Then select a digital tuning mode DVB T for terrestrial if you have own antenna on the roof DVB C if you have digital cable TV and you nee...

Page 6: ...r package Read the instructions shown on the back of the TV on how to insert a CA module Streaming Press button on the remote control to display the home menu Use the arrow buttons to select an item o...

Page 7: ...amage the stand Before installing the stand please check that you have all of the parts and that there is no visible damage If a part is missing or appears damaged please contact customer service TV s...

Page 8: ...ld be disposed of separately As the end user it is important that you submit your used batteries to the appropriate and designated facility In this manner you make sure that the batteries are recycled...

Page 9: ...ENG 8 www facebook com denverelectronics...

Reviews: