background image

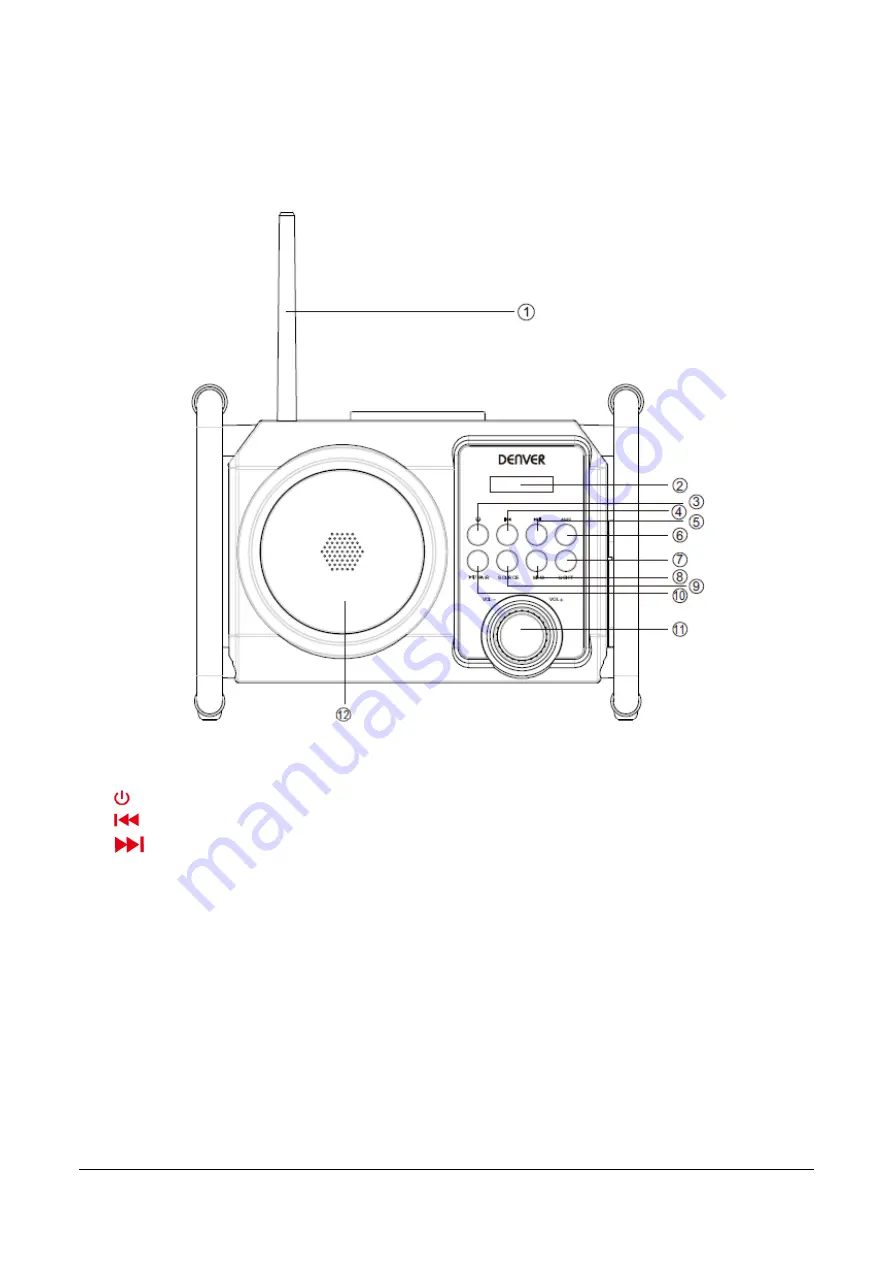
4.  Overview of the device 

4.1. Front view 


1) 

FM antenna 

2) 

Display 

3) 

  button (standby) 

4) 

  button (previous) 

5) 

  button (next) 

6) 

AMS button 

7) 

LIGHT button 


8) 

MEM button 

9) 

SOURCE button 

10) 

PLAY/PAUSE/PAIRING button 

11) 

Volume dial 

12) 

SPEAKER 


Summary of Contents for WRB-50

Page 1: ...information 3 1 Setting up the device safely If the device has been moved from a cold to a warm room wait a while before connecting it to the power supply The resulting condensation may damage the dev...

Page 2: ...of the device 4 1 Front view 1 FM antenna 2 Display 3 button standby 4 button previous 5 button next 6 AMS button 7 LIGHT button 8 MEM button 9 SOURCE button 10 PLAY PAUSE PAIRING button 11 Volume dia...

Page 3: ...the underside of the machine 5 Using the device for the first time 5 1 Mains operation Insert one end of the power cable into the DC IN jack on the device Insert the other end of the power cable into...

Page 4: ...off Press the button to switch the radio on NOTICE After switching on the device is in FM mode and set to volume level 5 6 2 Radio operation You can receive FM stations with this radio NOTICE When th...

Page 5: ...ccess the AUX IN jack open the storage cover on the rear of the device by turning the storage lock towards the unlock icon Plug one end of an audio cable into the AUX IN jack 3 5 mm Connect the other...

Page 6: ...ooth version V2 1 EDR Bluetooth Frequency 2 4GHz 2 480GHz Bluetooth Distance 10m Free space Output power 50 W max music output 5 W RMS Dimensions W x H x D approx 269 x 182 x 201 mm Weight approx 1 8...

Page 7: ...batteries to the appropriate and designated facility In this manner you make sure that the batteries are recycled in accordance with legislature and will not harm the environment All cities have estab...

Page 8: ...8 Denmark www facebook com denverelectronics...

Reviews: