background image

- 39 -

HANDLING COOLANT EG

COOLANT  EG  should  be  stored  at  ambient

temperatures,  while  periods  of  exposure  to

temperatures  above  35  °C  (95  °F)  should  be

minimized.  COOLANT  EG  can  be  stored  for  a

minimum of 5 years in unopened containers without

any effect on the product quality of performance.
COOLANT  EG  is  compatible  with  most  other

coolants based on ethylene glycol, but you only get

the benefits of 5 years protection when its used on its

own.  Exclusive  use  of  COOLANT  EG  is

recommended for optimum corrosion protection and

sludge control.
For simple density-measuring of Ethylene Glycol and

Propylene  Glycol  in  general  the  standard  available

‘density’ measuring devices are used to measure the

concentration  of  EG.  In  case  a  device  is  used  to

measure EG, no PG can be measured afterwards as a

result of the difference in the density. More specific

measurements  can  be  done  by  the  use  of  a

refractometer. This device can measure both EG and

PG. A mix of both products will be show unreliable

results!
Mixed EG coolants with identical glycol type can be

measured  by  use  of  a  refractometer  as  well  as  the

‘density’  system.  The  mixed  coolants  will  be

considered as one product.
The  use  of  distilled  water  is  recommended.  If  you

have exceptionally soft water it would be acceptable,

as  well.  Basically,  the  engine  metals  are  going  to

corrode to some extent no matter what water you use,

and  hard  water  will  encourage  the  resulting  metal

salts to precipitate.
COOLANT  EG  comes  as  a  pre-mixed  coolant  to

safeguard the quality of the complete product.
It  is  recommended  that  topping  up  of  the  cooling

system is always done with COOLANT EG.

COOLANT CHECK

In order to guarantee the lifetime and quality of the

product,  thus  optimising  engine  protection,  regular

coolant-condition-analysis is recommended.
The quality of the product can be determined by three

parameters:

Visual check

Verify the appearance of the coolant with regard to 

its colour and make sure that no loose particles are 

floating around.

pH measurement

Check the pH value of the coolant using a pH-

measuring device.

The pH-meter can be ordered from Denyo with 

part number 2913 0029 00.

Typical value for EG = 8.6.

If the pH-level is below 7 or above 9.5, the coolant 

should be replaced.

Glycol concentration measurement

To optimise the unique engine protection features 

of the COOLANT EG, the concentration of the 

Glycol in the water should always be above 33 

vol.%.

Mixtures exceeding a 68 vol.% mix ratio in water 

are not recommended, as this will lead to high 

engine operating temperatures.

A refractometer can be ordered from Denyo with 

part number 2913 0028 00.

TOPPING UP/REPLACING COOLANT

Verify whether the engine cooling system is in a 

good condition (no leaks, clean).

Check the condition of the coolant.

If the condition of the coolant is no longer up to 

standard, the complete coolant should be replaced 

(see section 

Replacing the coolant

).

Always top-up with COOLANT EG Concentrate / 

COOLANT EG.

Topping up the coolant with water only, changes 

the concentration of additives and is therefore not 

allowed.

Never  remove  the  cooling  system  filler

cap while coolant is hot.
The  system  may  be  under  pressure.

Remove  the  cap  slowly  and  only  when

coolant  is  at  ambient  temperature.  A

sudden release of pressure from a heated

cooling  system  can  result  in  personal

injury from the splash of hot coolant.

In  case  of  a  mix  of  different  coolant

products  this  type  of  measuring  might

provide incorrect values.

Summary of Contents for DU-190

Page 1: ...8 Instruction Manual English...

Page 2: ......

Page 3: ...Printed matter No 2950 8360 01 05 2019 Instruction Manual for Portable Compressors DU 190 Original instructions...

Page 4: ...he manufacturer s approval in writing Neglecting maintenance or making changes to the setup of the machine can result in major hazards including fire risk While every effort has been made to ensure th...

Page 5: ...ting instructions 25 4 2 Starting Stopping 26 4 3 Before starting 26 5 Controller Panel 27 5 1 Control panel description 27 5 2 Starting stopping 27 5 2 1 Emergency stop 28 6 Maintenance 29 6 1 Liabil...

Page 6: ...Problem solving 49 9 Available options 52 10 Technical specifications 53 10 1 Torque values 53 10 1 1 General torque values 53 10 1 2 Critical torque values 53 10 2 Compressor engine specifications 5...

Page 7: ...omponents Skill level 3 Electrical technician An electrical technician is trained and has the same qualifications as both the operator and the mechanical technician In addition the electrical technici...

Page 8: ...quipment shall be kept clean i e as free as possible from oil dust or other deposits 7 To prevent an increase in working temperature inspect and clean heat transfer surfaces cooler fins intercoolers w...

Page 9: ...cking device must be applied and kept in good order 6 To lift heavy parts a hoist of ample capacity tested and approved according to local safety regulations shall be used 7 Lifting hooks eyes shackle...

Page 10: ...ation so as not to disturb the cooling air flow inside the bodywork and or render the silencing less effective A door should be kept open for a short period only e g for inspection or adjustment 15 Pe...

Page 11: ...be locked in open position and the fuses shall be taken out A warning sign bearing a legend such as work in progress do not supply voltage shall be attached to the fuse box or main switch 4 Before dis...

Page 12: ...nction properly 20 Maintenance and repair work should be recorded in an operator s logbook for all machinery Frequency and nature of repairs can reveal unsafe conditions 21 When hot parts have to be h...

Page 13: ...d above and in accordance with the technical specifications Safety reasons prohibit any other applications 3 National legislation requirements with respect to re inspection must be complied with 4 No...

Page 14: ...ntinuous pneumatic regulating system and a blow off valve which is integrated in the unloader assembly The valve is closed during operation by air receiver pressure and opens by air receiver pressure...

Page 15: ...th sound absorbing material Lifting eye A lifting eye is accessible from the roof of the unit Control panel The control panel grouping the air pressure gauge control switch etc is placed at the left h...

Page 16: ...16 Main Parts...

Page 17: ...or element DPoc Drain plug compressor oil cooler DPosv Drain plug oil shut off valve DSe Dip stick engine E Engine EP Exhaust pipe F Fan FCc Filler cap coolant FCft Filler cap fuel tank FPco Filler pl...

Page 18: ...18 COMPRESSOR REGULATING SYSTEM...

Page 19: ...alve BV Bypass valve CH Coupling housing CE Compressor element CP Control panel F Cooling fan DP Drain plug E Engine OC Oil cooler OSE Oil separator element OSV Oil stop valve OFC Oil filter compresso...

Page 20: ...ressed air and oil pass into the air receiver oil separator AR OS The check valve CV prevents blow back of compressed air when the compressor is stopped In the air receiver oil separator AR OS most of...

Page 21: ...r lubrication cooling and sealing is injected through holes in the gallery Lubrication of the bearings is ensured by oil injected into the bearing housings The injected oil mixed with the compressed a...

Page 22: ...22 CONTINUOUS PNEUMATIC REGULATING SYSTEM...

Page 23: ...load speed and unloading speed the output of a screw compressor is proportional to the rotating speed 2 Air inlet throttling If the air consumption is equal to or exceeds the maximum air output the e...

Page 24: ...Do not stand on outlet valves Start Stop indication of switch Do not run the compressor with open doors Lifting permitted Use diesel fuel only Sound power level in accordance with Directive 2000 14 E...

Page 25: ...way that the compressor which must be placed level is lifted vertically Keep lifting acceleration and retardation within safe limits The lifting eye 1 can be accessed from the roof of the unit The ope...

Page 26: ...ment from the fuel filters until clean fuel flows from the drain cock See section Priming instructions 6 Empty the dust trap of each air filter AF See section Cleaning the dust trap 7 Check coolant le...

Page 27: ...el tank Do not overfill the fuel tank Fill fuel within the limits represented on the fuel gauge 6 7 The temperature switch at the outlet of the oil cooler continuously monitors the oil temperature If...

Page 28: ...rminated by the emergency stop itself hardware as well as by the software When the emergency stop button 1 is pressed the operator can unlock the emergency stop by turning it counterclockwise The emer...

Page 29: ...ll genuine parts needed for normal maintenance of both compressor and engine Service Paks minimize downtime and keep your maintenance budget low Order Service Paks at your local Denyo dealer SERVICE K...

Page 30: ...rranty claims Maintenance schedule running hours 50 hours after intial start up Every 250 hours Every 500 hours Every 1000 hours Every 1500 hours Yearly Biennially Service parts 3002 6085 20 3002 6085...

Page 31: ...3 7 x x Replace fan belt x Adjust engine inlet and outlet valves 2 x Replace oil separator element x x Check Replace safety cartridge x x x Replace compressor oil filter s 4 x x x Change compressor oi...

Page 32: ...filters mean fuel starvation and reduced engine performance 6 See section Oil specifications 7 The following part numbers can be ordered from Denyo to check on inhibitors and freezing point 2913 0028...

Page 33: ...oil releases excess heat efficiently whilst maintaining excellent bore polish protection to limit oil consumption Compressor oil has an excellent Total Base Number TBN retention and more alkalinity to...

Page 34: ...gal Order number Can 5 1 3 1630 0160 00 Can 20 5 3 1630 0161 00 Barrel 210 55 2 1630 0162 00 Container 1000 265 1630 0163 00 Use specified engine oil It greatly affects the startup operation and life...

Page 35: ...above the sight glass Add oil if necessary OIL AND OIL FILTER CHANGE ENGINE OIL AND OIL FILTER CHANGE See section Preventive maintenance schedule COMPRESSOR OIL AND OIL FILTER CHANGE The quality and t...

Page 36: ...Oil the gasket of the new filter element Screw it into place until the gasket contacts its seat then tighten one half turn only 5 Fill the air receiver until the pointer of the oil level gauge is in t...

Page 37: ...5 Put in a new oil separator screw on new compressor oil filter s and close the oil vessel according to the instructions 6 Fill the oil vessel with the minimum amount of replacement oil run the compre...

Page 38: ...liminates flow restriction problems through the engine coolant ducts and the radiator minimizing the risk of engine overheating and possible failure It reduces water pump seal wear and has excellent s...

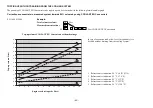
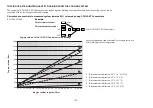
Page 39: ...T EG COOLANT CHECK In order to guarantee the lifetime and quality of the product thus optimising engine protection regular coolant condition analysis is recommended The quality of the product can be d...

Page 40: ...8 9 10 11 12 13 14 15 16 1 2 3 4 5 Example Total volume coolant Measured concentration In case of expansion tank at low level this quantity is to be filled without draining from the cooling system 1 R...

Page 41: ...ant Measured concentration In case of expansion tank at normal level this quantity is to be drained from the cooling system 1 Refractometer indication 20 C 4 F 33 2 Refractometer indication 22 C 7 6 F...

Page 42: ...f the engine and allow to cool From the Denyo Instruction book determine the amount of COOLANT EG required Mix concentrate and water before filling Fill with a maximum rate of 10 l min 0 35 cu ft min...

Page 43: ...r charging a battery always check the electrolyte level in each cell if required top up with distilled water only When charging batteries each cell must be open i e plugs and or cover removed Preferab...

Page 44: ...ely covered with petroleum jelly Carry out periodic condition tests Test intervals of 1 to 3 months depending on climate and operating conditions are recommended If doubtful conditions are noticed or...

Page 45: ...ed by turning the adjusting wheel clockwise and anti clockwise respectively To adjust the normal working pressure proceed as follows 1 Loosen the lock nut of the regulating valve 2 Release Regulating...

Page 46: ...S FILTER ELEMENT If element cleaning can not be avoided care should be taken that the filter element 4 is not washed out Please note that engine damage can cause considerable costs which makes the cos...

Page 47: ...mage it and there will be a danger of damage to the engine Carefully clean the inside of the housing and put the element in the housing see section Replacing the air filter element New elements must a...

Page 48: ...Prime the fuel system in order to purge trapped air The fuel system should be primed under the following conditions Compressor is put in operation for the first time Running out of fuel Storage Replac...

Page 49: ...cted by an Denyo Service representative Blow down valve stuck in open position Check and correct as necessary Loading valve LV leaking past O ring With compressor running at max load speed disconnect...

Page 50: ...first remove the short screws then release the spring tension unscrewing the long ones Minimum pressure valve malfunctioning Remove and inspect valve Blow off valve malfunctioning Remove and inspect v...

Page 51: ...ficient compressor cooling Locate compressor away from walls when banked with other compressors leave space between them Oil cooler clogged externally Clean oil cooler Refer to section Cleaning cooler...

Page 52: ...ons 1 Cold start 20 C 2 Aftercooler water separator bypass 3 Generator 15kVA 4 Inlet shut down spark arrestor 5 Tool box 6 Non return valve 7 Additional fuel filter 8 Lubricator 9 Additional fuel tank...

Page 53: ...10 21 M8 34 25 23 M10 70 52 24 M12 120 89 25 M14 195 144 23 M16 315 233 23 Assemblies Torque value Nm lbf ft Compressor to frame Bolts elements gear casing 46 33 95 Bolts elements support 80 59 04 Bo...

Page 54: ...S The inlet conditions are specified at the air inlet grating outside the canopy Designation Unit DU 190 7 bar Absolute inlet pressure bar 1 psi 14 5 Relative air humidity 0 Air inlet temperature C 20...

Page 55: ...ssure bar 2 psi 29 Maximum effective receiver pressure compressor unloaded bar 8 7 psi 126 18 Maximum ambient temperature at sea level 5 C 50 F 122 Minimum starting temperature C 10 F 14 Minimum start...

Page 56: ...Fuel consumption at 100 FAD kg h 8 52 lb h 18 78 at 75 FAD kg h 7 lb h 15 43 at 50 FAD kg h 5 27 lb h 11 61 at 25 FAD kg h 3 59 lb h 7 91 at unload kg h 2 69 lb h 5 93 Specific fuel consumption at 10...

Page 57: ...Noise level Sound pressure level Lp measured according to ISO 2151 under free field conditions at 7 m distance dB A 70 Sound power level Lw complies with 2000 14 EC dB A 98 Designation Unit DU 190 7...

Page 58: ...ut according to SAE J 1995 at normal shaft speed kW 32 5 BHP 43 58 Load factor NA Capacity of oil sump Initial fill l 5 5 us gallon 1 45 Refill maximum 1 l 6 7 us gallon 1 76 Capacity of cooling syste...

Page 59: ...required for engine and compressor cooling combustion and for compression 4 With filter change 5 With after cooler 5 C 6 With after cooler 1 7 Without after cooler Tolerance 5 25l s FAD 250l s 4 250l...

Page 60: ...60 ELECTRIC SYSTEM Circuit diagram 9829 3801 10...

Page 61: ...61 Circuit diagram 9829 3801 10...

Page 62: ...62 ELECTRIC SYSTEM Wire harness 1094 3133 02...

Page 63: ...63 Data plate 1 2 3 Bar 4 cfm 5 kW 6 RPM 7 8 1 Weight 2 Model 3 Serial number 4 Maximum working pressure 5 Free air delivery 6 Engine power 7 Speed 8 Year of manufacturing...

Page 64: ...ure is foreseen DISPOSAL OF MATERIALS Dispose of contaminated substances and material separately in accordance with locally applicable environmental legislation Before dismantling a machine at the end...

Page 65: ...65 Maintenance Log Compressor Customer Serial number Service hours Maintenance action Date By initials...

Page 66: ...01 226 5 416 5 R756 3 1388 268 5 1080 2744 831 5 1280 950 1135 973 50 If non service side placed near wall please keep more than mm distance Air Inlet Air Inlet Hot Air Out 693 892 Air Inlet 670 1080...

Page 67: ......

Page 68: ......

Reviews: