background image

Original User Manual | Groove 2.0 


  3

Introduction

Thank you for choosing the Pedelec Groove 2.0. This Pe-
delec is equipped with an innovative electric drive that 
assists you when you are cycling. This will make your trip 
much more enjoyable if you are riding up hills, carrying 
loads or riding into the wind. 

The purpose of this User Manual is to help you get the 
most out of your Pedelec Groove 2.0 and use it correctly.

Structure of the User Manual

You will ind information on how to use your Pedelec in 


 Chapter 1 „Safety“Safety”

.

You will ind a brief introduction in   

 Chapter 5 „Quick 

start““Quick start”

.

The most important components of your Pedelec are de-
scribed in detail in the following chapters.

You will ind the technical data for your Pedelec Groove 
2.0 in   

 Chapter 12 „Technical data“

.

The information in this User Manual speciically refers to 
your Pedelec Groove 2.0. For general information, on the 
bike technology, for example, refer to the 

“Original User 

Manual | General”

 (CD).

CD with important information

On the enclosed CD, you will ind versions of the 

“Original 

User Manual | Pedelec Groove 2.0”

 in various languages. In 

addition, the CD also contains the 

“Original User Manual | 

General”

 with general information on bike technology.

You can download the latest version of the User Manual 
rom the Internet. Manuals for the individual bike compo-
nents are also found there.

You can run the CD using any commercially available PC or 
laptop. Proceed as follows:

METHOD A:
1.  Insert the CD.
2.  Double-click on the ile shelexec.exe using the let 

mouse button.

3.  Select the desired language.
4.  Select “Open User Manual rom CD” or “Check for new 

version of User Manual online”.

METHOD B:
1.  Insert the CD.
2.  Using the mouse, right-click once on: “Open folder to 

display iles.”

3.  Double-click on “Start” using the let mouse button.
4.  Select the desired language.
5.  Select “Open User Manual rom CD” or “Check for new 

version of User Manual online”.

Printable version of the "Original User Manual | General"


To call up the iles, you need the Adobe Reader program. It 
has been included on the CD or can be downloaded ree of 
charge rom www.adobe.com.

If you would like a printed copy of the


“Original User Man-

ual | General”

, you can have it sent to you ree of charge by 

requesting it rom the following address:

Derby Cycle GmbH / Raleigh Univega GmbH 
Siemensstrasse 1–3 
49661 Cloppenburg, Germany 
+ 49 (4471) 966-0 
info@derby-cycle.com

Even if you can't wait to go for a ride, you should 
read through the 

“Original User Manual | Pedelec 

Groove 2.0”

 and the 

“Original User Manual | Gen-

eral”

 (CD) careully before using your Pedelec for 

the irst time.

The manufacturer accepts no liability for damage 
resulting rom the failure to adhere to this manual. 

Use your Pedelec only as intended. Otherwise, 
there is a risk of technical failure, which can lead 
to unforeseeable accidents! Improper use may 
void the warranty and guarantee.

Pass on the manual to anyone who uses, maintains 
or repairs this Pedelec.

Summary of Contents for Pedelec Groove 2.0

Page 1: ...Original User Manual Version 1 01 07 2014 Pedelec Groove 2 0 English Item no 1973K0015013 ...

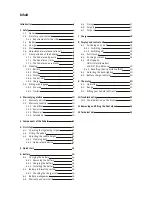
Page 2: ... 12 4 3 Adjusting the saddle height 12 4 3 1 Clamping bolt 12 4 3 2 Quick release device 12 5 Quick start 13 6 Battery 14 6 1 Charging the battery 14 6 1 1 Removing the battery 14 6 1 2 Charging the battery 15 6 1 3 Installing the battery 16 6 2 Battery information system 16 6 2 1 Checking the charge state 16 6 3 Battery management 16 6 4 Warranty and service life 16 6 5 Storage 17 6 6 Shipping 17...

Page 3: ...re You can run the CD using any commercially available PC or laptop Proceed as follows METHOD A 1 Insert the CD 2 Double click on the ile shelexec exe using the let mouse button 3 Select the desired language 4 Select Open User Manual rom CD or Check for new version of User Manual online METHOD B 1 Insert the CD 2 Using the mouse right click once on Open folder to display iles 3 Double click on Sta...

Page 4: ...ake any adjustments to the ride characteristics of your Pedelec please consult your specialist cycle shop 1 2 Statutory requirements The Pedelec like all other bikes must comply with the national regulations for road safety Please observe the relevant explanations and general information provided in the Original User Manual General CD These statutory requirements apply for a Pedelec The motor is d...

Page 5: ...e burns or ire Short circuit damage caused in this way voids all guarantee claims Batteries must not be exposed to mechanical shocks Even if a battery shows no visible signs of damage ater falling or being knocked it may be damaged For this reason even batteries that seem ine must be taken to a specialist dealer for inspection Damaged batteries must neither be charged nor used for another applicat...

Page 6: ...ent any ire rom spreading quickly exercise caution with carpeted loors Only use indoors Keep the charger away rom rain or water If water gets into a charger there is a risk of electric shock If water has nevertheless got into the charger disconnect it rom the mains immediately and have it checked by a qualiied workshop The battery may heat up during charging A maxi mum temperature of 45 C may be r...

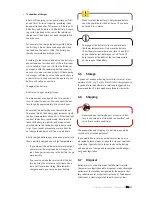
Page 7: ... for protection against the weath er the battery must be transported inside the car 1 7 2 The Pedelec on trains In Germany you can take your Pedelec with you on trains which are marked with the bike symbol On German Inter city IC and EuroCity EC trains you must book a place Condensation may form on the charger if the temperature changes suddenly rom cold to hot In case of condensation wait approxi...

Page 8: ...h the electrical compo nents are sealed it is not advisable to clean your bike with a hose or high pressure cleaner as it could cause damage When wiping down the bat tery be careul not to touch and connect the con tacts on the underside This could cause a short circuit and the battery to switch of If the battery connections are dirty clean them with a clean dry cloth 1 8 2 Motor Dirt should be rem...

Page 9: ... lighter ones at the top This will make your ride safer 1 9 2 Trailers You may use a trailer with your Pedelec Groove 2 0 Only use trailers that meet the requirements of the road traic licensing regulations in your country the Road Traic Licensing Regulations StVZO in Germany for example Non approved trailers can cause accidents Trailers adversely afect the handling Adapt your handling accordingly...

Page 10: ... regulations 2 1 Warranty periods The statutory warranty valid at the time of delivery ap plies to all models 2 2 Warranty conditions 2 2 1 Conditions A defect is present under the following conditions Manufacturing material or information error The cause of the change in the product is not wear or ageing arising naturally or as a result of its unc tions The damage was not caused by use of the Ped...

Page 11: ......

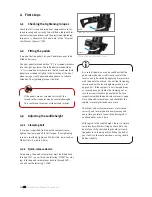
Page 12: ...m and an M5 bolt dia 5 mm to 5 5 Nm 4 3 2 Quick release device For opening the quick release lever must be folded back through 180 you will see the lettering OPEN For clos ing fold the quick release lever back in through 180 you will see the lettering CLOSE Opening the quick release lever OPEN Closing the quick release lever CLOSE As a rule of thumb you can be conident that the quick release devic...

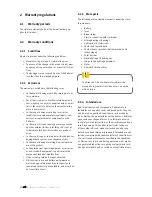
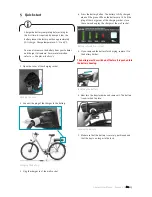
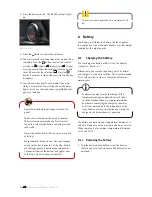
Page 13: ...rging the battery 3 Plug the charger in at the wall socket 4 Press the battery button The battery is ully charged when all the green LEDs on the battery are lit Pull the plug of the charger out of the charging socket close the cover and unplug the charger at the wall socket Battery information system 5 If you removed the battery for charging replace it in the battery holder Installing the battery ...

Page 14: ...wo panniers Put heavier items at the bottom and lighter ones at the top This will make your ride safer The carrier is only approved for a maximum of 15 kg 6 Battery Your battery is a lithium ion battery the ideal type for this application One of the main beneits is its low weight combined with a high capacity 6 1 Charging the battery You can charge the battery whilst it is on the Pedelec Chapter 5...

Page 15: ...a suitable surface which should be dry and non lammable 2 Connect the plug of the charger to the battery 3 Charging begins The charger s LED lights up red You can check the level to which the battery is charged by pressing the battery button As soon as the LED on the charger lights up green the battery is ully charged 4 Unplug the charger at the wall socket once charging is complete Damaged batter...

Page 16: ... 25 1 LED lights up 25 0 If the battery is empty it will work again briely follow ing a short period of rejuvenation and will then switch back of It must now be charged Check the battery charge level before every trip to make sure it is suicient for the planned journey 6 3 Battery management The battery management monitors the temperature of your battery and warns you of incorrect use If an extern...

Page 17: ...tially charged one at high temperatures If you always ride with maximum motor output your motor will always require a stronger cur rent Stronger currents cause the battery to age more quickly You can also extend the service life of the bat tery by using the assistance selectively Use a low assist level when riding With lower dis charge currents you conserve your battery Make sure that the battery ...

Page 18: ......

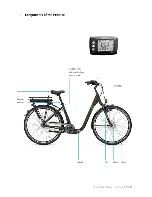
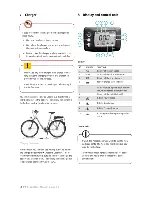
Page 19: ... to at most 20 km h Assistance up to at most 15 km h For a high range Press MODE briely to change the assistance The diferent modes change in the following sequence A box marks the selection You can ride without assis You can ride without assis tance when no box is displayed The most recently selected mode is displayed when you switch back on again 8 3 Pushing assistance The pushing assistance hel...

Page 20: ...conds The abbreviation bl appears on the display along with the current brightness value 1 2 or 3 1 Little light 2 Medium light 3 Maximum brightness 4 Use SET and MODE to choose the value you want 5 When you have made your decision hold the button down for three seconds 8 6 Battery charge indicator The battery charge indicator shows how much charge is available in the form of a stylised battery Th...

Page 21: ...If you are riding in gears that are harder to pedal and select a high assist level the motor will pro duce plenty of power to help you along However just as with driving a car at high speed this leads to higher consumption You will therefore have to recharge the battery sooner You can conserve bat tery power by pedalling with even force throughout the complete revolution of the pedals Ambient temp...

Page 22: ...ve the battery before you start work on the Pedelec e g assembly servicing etc 1 Check that the motor connector is properly plugged in 2 Check the contacts for dirt and oxidation Remove both of these with a dry cloth 3 Careully bend any contacts that are out of position back into place Contact your specialist cycle shop if you need help or if the error continues to appear 23 The bike lighting is d...

Page 23: ...nical data MOTOR Deinition Brushless electric motor with gear unit and reewheel Output 250 W Maximum torque 35 Nm Weight of motor 2 88 kg Assist levels 70 150 250 watts Control Via speed sensor Switch of speed 25 km h at the highest assistance level BIKE TYPE MAXIMUM PERMITTED GROSS WEIGHT bike rider luggage trailer load WEIGHT OF RIDER Pedelec 130 kg 105 kg max LI ION BATTERY Rated voltage 36 V R...

Page 24: ... Reproduction in whole or in part is not permitted without the consent of Derby Cycle Werke GmbH Raleigh Univega GmbH Subject to misprints errors and technical modiications Derby Cycle Werke GmbH Raleigh Univega GmbH Siemensstrasse 1 3 49661 Cloppenburg Germany 49 4471 966 0 ...

Reviews: