background image

©2021 by 3Gen Inc.  |   04 May 2021  |  HUD-1701B 

(English)

Instructions

Intended Use

This device is intended for medical purposes to illuminate 

body surfaces. It is used for non-invasive visual examination 

of intact skin.

Check the correct operation of the device before use! Do not 

use the device if there are visible signs of damage.

CAUTION: Do not look directly into the LED light. Patients 

must close their eyes during examinations.

In case of a serious incident with the use of this device, no-

tify 3Gen immediately and, if required by local regulations, 

your national health authority.

CAUTION: Do not use the device in fire or explosive risk 

area (e.g. oxygen-rich environment).

WARNING: This product can expose you to chemicals 

including methylene chloride and hexavalent chromium, 

which are known to the State of California to cause cancer 

or reproductive toxicity. For more information go to www.

P65Warnings.ca.gov.

Electromagnetic Compatibility

This device complies with the EMC Emissions and Immunity 

level requirements of the standard IEC 60601-1-2:2014. The 

emission characteristics of this equipment make it suitable 

for use in professional healthcare environment as well as 

residential environment (CISPR 11 Class B). This equip-

ment offers adequate protection to radio communication 

service. In the rare event of interference to the radio com-

munication service, the user might need to take mitigation 

measures, such as relocating or re-orienting equipment. 

WARNING: Use of this equipment adjacent to or stacked 

with other equipment should be avoided because it could 

result in improper operation. If such use is necessary, this 

equipment and the other equipment should be observed to 

verify that they are operating normally.

WARNING: Use of accessories other than those provided 

by the manufacturer of this equipment could result in in-

creased electromagnetic emissions or decreased electro-

magnetic immunity of this equipment and result in improper 

operation.

WARNING: Portable RF transmitters should be used no 

closer than 30 cm (12 inches) to any part of the device. Oth-

erwise, degradation of the performance of this equipment 

could result.

IMPORTANT: Before initial use, please charge the internal 

lithium ion battery. See “Battery and Charging” for details. 

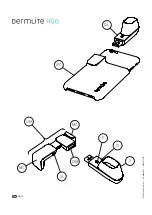
HÜD is a dermatoscope with polarized light designed for 

smartphone photography of skin lesions.

DermLite HÜD fits on virtually any smartphone 2.3”- 3.1” 

(58-78mm) in width. For best results, remove your smart-

phone case. To attach the device, place the Universal 

Mount (UM) over the back of your smartphone and firmly 

squeeze the Mount Clamps (MC) together. Move the Slide 

Lock (SL) into the locked position to hold the Mount Clamps 

(MC) in place. Slide the DermLite Mount (DM) left or right 

such that it is horizontally centered over your smartphone 

camera. Plug the DermLite dermatoscope into the DermLite 

Mount (DM). Adjust the vertical position such that the der-

matoscope is vertically centered over your phone’s camera.

Photography

Once you have chosen a skin lesion to photograph, lightly 

moisten it and its surrounding skin with hand sanitizer or a 

similar liquid. This increases the translucency of the skin 

and improves the quality of the image. With this product 

attached to your smartphone, place the black spacer (S) 

directly on the skin and push the power button (P) to turn on 

the DermLite dermatoscope (DL). Capture the image with 

your smartphone. Reapply moisture to flatten any hairs as 

needed. You may have to carefully shave the area.

To conserve energy, this device is designed to automatically 

turn off after 1 minute. The battery can be expected to sup

-

ply power for about 30 one-minute sessions. If the device 

turns off prior to 1 minute, it may need to be recharged. To 

charge your device, plug it into any IEC 60950-1 compliant 

(5V) USB charger. While charging, the Charge Indicator (CI) 

will light up red and, when fully charged, green.

Troubleshooting

Please check www.dermlite.com for the most current trou-

bleshooting information. If your device requires servicing, 

visit www.dermlite.com/service or contact your local 3Gen 

dealer.

Care and Maintenance

CAUTION: No modification of this equipment is allowed.

Your device is designed for trouble-free operation. Repairs 

shall be made only by qualified service personnel.

Cleaning

The exterior of your device, except the optical parts, may be 

wiped clean with isopropyl alcohol (70% vol.) prior to use on 

a patient. The lens should be treated as high-quality pho-

tographic equipment and should be cleaned with standard 

lens cleaning equipment and protected from harmful chemi-

cals. Do not use abrasive material on any part of the equip-

ment or immerse the device in liquid. Do not autoclave.

Warranty: 2 years for parts and labor. The battery is war-

ranted for 1 year. 

Disposal

This device contains electronics and a lithium-ion bat-

tery that must be separated for disposal and may not be 

disposed of with general household waste. Please observe 

local disposal regulations.

This set includes a DermLite dermatoscope and a Universal 

Mount.

Technical Description

Visit www.dermlite.com/technical or contact your local 3Gen 

dealer.

ENGLISH

Summary of Contents for HUD

Page 1: ...ilge 11 Hrvatski 12 Italiano 13 Latvietis 14 Lietuvis 15 Magyar 16 Nederlands 17 Polskie 18 Português 19 Română 20 Slovenščina 21 Slovenský 22 Suomi 23 Svenska 24 Türk 25 Ελληνικά 26 български 27 русский 28 Український 29 한국어 30 日本語 31 简体中文 32 HUD 2021 by 3Gen Inc 04 May 2021 HUD 1701B ...

Page 2: ...DL iPC MC MC SL S DM P UM CI 2021 by 3Gen Inc 04 May 2021 HUD 1701B HUD ...

Page 3: ...one case To attach the device place the Universal Mount UM over the back of your smartphone and firmly squeeze the Mount Clamps MC together Move the Slide Lock SL into the locked position to hold the Mount Clamps MC in place Slide the DermLite Mount DM left or right such that it is horizontally centered over your smartphone camera Plug the DermLite dermatoscope into the DermLite Mount DM Adjust th...

Page 4: ...pričvrstili uređaj postavite Universal Mount UM preko stražnje strane vašeg pametnog telefona i čvrsto stisnite Mount Clamps MC zajedno Pomaknite klizno zaključa vanje SL u zaključani položaj da biste držali držače za pričvršćivanje MC na mjestu Gurnite DermLite Mount DM lijevo ili desno tako da bude vodoravno centriran preko kamere vašeg pametnog telefona Uključite DermLite dermatoskop u DermLite...

Page 5: ...připojit zařízení umístěte univerzální držák UM na zadní stranu smartpho nu a pevně stlačte svěrky MC k sobě Posunutím posu vného zámku SL do uzamčené polohy přidržujte montážní svorky MC na místě Posuňte držák DermLite Mount DM doleva nebo doprava tak aby byl vodorovně vystředěn na fotoaparátu smartphonu Připojte dermatoskop DermLite k DermLite Mount DM Upravte svislou polohu tak aby byl dermatos...

Page 6: ...sag For at tilslutte enheden skal du placere Universal Mount UM på bagsiden af din smart phone og klemme Mount Clamps MC godt sammen Flyt glideskærmen SL i den låste position for at holde monter ingsklemmerne MC på plads Skub DermLite Mount DM mod venstre eller højre så det er vandret centreret over dit smartphone kamera Sæt DermLite dermatoskopet i Derm Lite Mount DM Juster den lodrette position ...

Page 7: ...male Ergebnisse zu erzielen Platzieren Sie zum Anbringen des Geräts die Universalhalterung UM auf der Rückseite Ihres Smartphones und drücken Sie die Halterung sklemmen MC fest zusammen Bewegen Sie die Schiebesperre SL in die verriegelte Position um die Montageklemmen MC an Ort und Stelle zu halten Schieben Sie die DermLite Halterung DM so nach links oder rechts dass sie horizontal über Ihrer Smar...

Page 8: ...dage oma nutitelefoni ümbris Seadme kinnitamiseks asetage universaalne kinnitus UM nutitelefoni taha ja pigistage kinnitusklambrid MC tugevalt kokku Liigutage liugkinnitus SL lukustatud asendisse et kinnitusklambrid MC oma kohal püsiks Libistage DermLite kinnitust DM vasakule või paremale nii et see oleks horisontaalselt keskelt üle teie nutitelefoni kaamera Ühendage DermLite dermatoskoop DermLite...

Page 9: ...apriete firmemente las abrazaderas de montaje MC Mueva el bloqueo deslizante SL a la posición bloqueada para mantener las abrazaderas de montaje MC en su lugar Deslice el DermLite Mount DM hacia la izquierda o hacia la derecha de modo que quede centrado horizontalmente sobre la cámara de su teléfono inteligente Conecte el dermatoscopio DermLite al DermLite Mount DM Ajuste la posición vertical de m...

Page 10: ...areil placez le support universel UM à l arrière de votre smartphone et serrez fermement les pinces de montage MC ensemble Déplacez le verrou coulissant SL en position verrouillée pour maintenir les pinces de montage MC en place Faites glisser le support Derm Lite DM vers la gauche ou la droite de sorte qu il soit centré hori zontalement sur l appareil photo de votre smartphone Branchez le dermato...

Page 11: ...liste agus brúigh na Mount Clamps MC le chéile go daingean Bog an Lock Sleamhnán SL isteach sa suíomh faoi ghlas chun na Clamps Mount MC a choinneáil ina n áit Sleamhnaigh an DermLite Mount DM ar chlé nó ar dheis ionas go mbeidh sé dírithe go cothrománach ar cheamara d fhón cliste Breiseán an dermatoscóp DermLite isteach sa DermLite Mount DM Coigeartaigh an suíomh ceartingearach ionas go mbeidh an...

Page 12: ...efonom Da biste pričvrstili uređaj postavite Universal Mount UM preko stražnje strane vašeg pametnog telefona i čvrsto stisnite Mount Clamps MC zajedno Pomaknite klizno zaključavan je SL u zaključani položaj da biste držali držače MC na mjestu Gurnite DermLite Mount DM lijevo ili desno tako da bude vodoravno centriran preko kamere vašeg pametnog telefona Uključite DermLite dermatoskop u DermLite M...

Page 13: ... supporto universale UM sul retro dello smartphone e stringere saldamente i morsetti di montaggio MC insieme Spostare il blocco scorrevole SL in posizione bloccata per tenere in posizione i morsetti di montaggio MC Fai scorrere il suppor to DermLite DM a sinistra o a destra in modo che sia centrato orizzontalmente sulla fotocamera dello smartphone Collegare il dermatoscopio DermLite al supporto De...

Page 14: ...pievienotu ierīci novietojiet universālo stiprinājumu UM virs viedtālruņa aizmugures un stingri saspiediet kopā stiprinājuma skavas MC Pārvietojiet slīdni SL bloķētā stāvoklī lai stiprināju ma skavas MC turētos vietā Bīdiet DermLite stiprinājumu DM pa kreisi vai pa labi tā lai tas būtu horizontāli centrēts virs viedtālruņa kameras Pievienojiet DermLite dermato skopu DermLite stiprinājumam DM Pielā...

Page 15: ...ikiklį UM virš išmaniojo telefono galinės dalies ir tvirtai suspauskite tvirtinimo spaustukus MC Stumkite Slide Lock SL į užfiksuotą padėtį kad laikytumėte tvirtinimo spaustukus MC Stumkite DermLite laikiklį DM į kairę arba į dešinę taip kad jis būtų horizontaliai nukreiptas per savo išmaniojo telefono kamerą Prijunkite DermLite dermatoskopą prie DermLite Mount DM Sureguliuokite vertikalią padėtį ...

Page 16: ...csatlakoztatásához helyezze az univerzális tartót UM az okostelefon hátuljára és szorosan nyomja össze a rögzítő bilincseket MC Helyezze a csúszózárat SL reteszelt helyzetbe hogy a rögzítőbilincseket MC a helyén tartsa Csúsztassa balra vagy jobbra a DermLite tartót DM úgy hogy vízszintesen az okostelefon kamera felett legyen Csatlakoz tassa a DermLite dermatoszkópot a DermLite Mount DM be Állítsa ...

Page 17: ...niversele houder UM over de achterkant van uw smartphone en knijpt u de montageklemmen MC stevig samen Verplaats de schuifvergrendeling SL naar de vergrendelde positie om de montageklemmen MC op hun plaats te houden Schuif de DermLite Mount DM naar links of rechts zodat deze horizontaal gecentreerd is over uw smartphonecamera Steek de DermLite der matoscoop in de DermLite houder DM Pas de vertical...

Page 18: ...i usuń obudowę smartfona Aby podłączyć urządzenie umieść uchwyt uniwersalny UM z tyłu smartfona i mocno ściśnij zaciski mocowania MC Przesuń blokadę suwaka SL w pozycję zablokowaną aby przytrzymać zaciski mocujące MC na miejscu Przesuń uchwyt DermLite DM w lewo lub w prawo tak aby był wyśrodkowany poziomo nad aparatem smartfona Podłącz dermatoskop DermLite do uchwytu Derm Lite DM Dostosuj pozycję ...

Page 19: ...e o DermLite Mount DM para a esquerda ou direita de modo que fique cen tralizado horizontalmente sobre a câmera do smartphone Conecte o dermatoscópio DermLite ao suporte DermLite DM Ajuste a posição vertical para que o dermatoscópio seja centralizado verti calmente sobre a câmera do seu telefone Fotografia Depois de escolher uma lesão de pele para fotografar umedeça levemente a pele e a pele ao re...

Page 20: ... Pentru a ataşa dispozitivul aşezaţi suportul universal UM pe spatele smartphone ului şi strângeţi ferm clemele de montare MC Deplasaţi blocarea diapozitivu lui SL în poziţia blocată pentru a menţine clemele de montare MC la locul său Glisaţi dispozitivul DermLite DM spre stânga sau spre dreapta astfel încât să fie centrat pe orizon tală peste camera smartphone ului Conectaţi dermatoscopul DermLit...

Page 21: ...ritrditi namestite Univerzalni nosilec UM čez zadnji del pametnega telefona in trdno stisnite Mount Clamps MC skupaj Premaknite drsno ključavnico SL v zaklenjen položaj da držite pritrdilne sponke MC na mestu Pod stavite DermLite Mount DM levo ali desno tako da je vodoravno osredotočen nad kamero vašega pametnega telefona Vključite dermatoskop DermLite v nosilec DermLite DM Prilagodite navpični po...

Page 22: ... Ak chcete zariadenie pripevniť umiestnite univerzálny držiak UM na zadnú stranu smartfónu a pevne ho pritlačte k sebe Posuňte posúvačový zámok SL do uzamknutej polohy aby ste držali montážne svorky MC na svojom mieste Zasuňte držiak DermLite Mount DM doľava alebo doprava tak aby bol vodorovne vystredený nad fotoaparátom vášho smartfónu Pripojte dermatoskop Der mLite do držiaka DermLite Mount DM U...

Page 23: ...eys on 2 3 3 1 tuumaa 58 78 mm Saat parhaat tulokset poistamalla älypuhelimen kotelo Asenna laite asettamalla Universal Mount UM älypuhelimen takaosaan ja purista kiinnityspidikkeet MC tiukasti yhteen Siirrä liuku kansi SL lukittuun asentoon pitääksesi kiinnityspihdit MC paikallaan Liu uta DermLite kiinnikettä DM vasemmalle tai oi kealle siten että se on vaakasuunnassa älypuhelimen kameran päällä ...

Page 24: ...in smartphone fodral För att ansluta enheten placera Univer sal Mount UM på baksidan av din smartphone och kläm fast monteringsklämmorna MC ordentligt Flytta glidlåset SL till det låsta läget för att hålla monteringsklämmorna MC på plats Skjut DermLite Mount DM åt vänster eller höger så att den är horisontellt centrerad över din smart telefonkamera Anslut DermLite dermatoskopet till DermLite Mount...

Page 25: ...lı telefon kasanızı çıkarın Cihazı takmak için Evrensel Montaj Parçasını UM akıllı telefonunuzun arkasına yerleştirin ve Montaj Kelepçelerini MC birlikte sıkın Montaj Kelepçelerini MC yerinde tutmak için Kaydırma Kilidini SL kilitli konuma getirin DermLite Montaj Parçasını DM akıllı telefonunuzun kamerası üzerinde yatay olarak ortalanacak şekilde sola veya sağa kaydırın DermLite dermatoskopunu Der...

Page 26: ...τε το Universal Mount UM επάνω στο πίσω μέρος της συσκευής σας και σφίξτε σταθερά τους σφιγκτήρες στερέωσης MC Μετακινήστε το Slide Lock SL στη θέση κλειδώματος για να συγκρατήσετε τους σφιγκτήρες στερέωσης MC στη θέση τους Σύρετε το DermLite Mount DM αριστερά ή δεξιά έτσι ώστε να είναι κεντραρισμένο οριζόντια στη φωτογραφική μηχανή smartphone Συνδέστε το DermLite dermatoscope στο DermLite Mount D...

Page 27: ...вете Universal Mount UM над гърба на вашия смартфон и здраво стиснете Mount Clamps MC заедно Преместете плъзгащото заключване SL в заключено положение за да държите монтажните скоби MC на място Плъзнете DermLite Mount DM наляво или надясно така че да е хоризонтално центриран върху камерата на вашия смартфон Включете дерматоскопа DermLite в DermLite Mount DM Регулирайте вертикалното положение така ...

Page 28: ...риной 2 3 3 1 58 78 мм Для достижения наилучших результатов снимите чехол для вашего смартфона Чтобы прикрепить устройство наденьте универсальное крепление UM на заднюю часть смартфона и крепко сожмите крепежные зажимы MC вместе Переместите сдвижной замок SL в заблокированное положение чтобы закрепить монтажные зажимы MC на месте Сдвиньте держатель DermLite DM влево или вправо так чтобы он был гор...

Page 29: ... зніміть футляр смартфона Щоб приєднати пристрій розмістіть універсальний кронштейн UM на задній панелі смартфона і міцно стисніть затискачі для кріплення MC Перемістіть засувку SL у заблоковане положення щоб утримувати кріплення MC на місці Зсуньте кріплення DermLite DM вліво або вправо так щоб воно було горизонтально відцентровано над камерою вашого смартфона Підключіть дерматоскоп DermLite до к...

Page 30: ...으려면 스 마트 폰 케이스를 제거하십시오 장치를 연결하려면 스 마트 폰 뒷면에 범용 마운트 UM 를 놓고 마운트 클램프 MC 를 단단히 누릅니다 마운트 잠금 MC 을 고정 시 키려면 슬라이드 잠금 SL 을 잠금 위치로 옮기십시오 DermLite Mount DM 를 왼쪽 또는 오른쪽으로 밀어 스 마트 폰 카메라의 가로 중앙에 오도록합니다 DermLite dermatoscope를 DermLite Mount DM 에 꽂습니다 Dermatoscope가 휴대 전화 카메라의 세로 중앙에 오도 록 세로 위치를 조정하십시오 사진 촬영할 피부 병변을 선택한 후에는 손 소독제 또는 유사 한 액체로 피부와 주변 피부를 가볍게 적 십니다 이것 은 피부의 반 투명성을 높이고 이미지의 품질을 향상시 킵니다 이 제품을 스마트 폰에 장...

Page 31: ...ださい デバイス を取り付けるには スマートフォンの背面にユニバーサルマ ウント UM を置き マウントクランプ MC をしっかり と押し込みます スライドロック SL をロック位置に移動 して マウントクランプ MC を所定の位置に保持します DermLite Mount DM を左右にスライドさせ スマートフォ ンのカメラの水平方向の中央に配置します DermLiteダーマ スコープをDermLiteマウント DM に差し込みます ダーマ スコープがスマートフォンのカメラの垂直方向の中央に来るよ うに 垂直位置を調整します 写真 撮影する皮膚病変を選択したら 手指消毒剤または類似の液体 を使用して 皮膚病変とその周囲の皮膚を軽く湿らせます こ れにより 肌の透明感が増し 画像の品質が向上します こ の製品をスマートフォンに取り付けた状態で 黒いスペーサー S を直接皮膚に置き 電源ボタ...

Page 32: ...DermLiteHÜD几乎可适用于任何宽度为2 3英寸至3 1英 寸 58 78毫米 的智能手机 为了获得最佳效果 请卸 下智能手机外壳 要连接设备 请将通用安装座 UM 放在智能手机的背面 然后将安装夹 MC 紧紧挤压 在一起 将滑动锁 SL 移至锁定位置 以将固定夹 MC 固定到位 左右滑动DermLite支架 DM 使 其在智能手机相机上水平居中 将DermLite皮肤镜插入 DermLite支架 DM 调整垂直位置 使皮肤镜在手机 摄像头上方垂直居中 摄影 选择要拍摄的皮肤病变后 请用洗手液或类似液体轻轻 润湿其及其周围的皮肤 这增加了皮肤的透明度 并改 善了图像质量 将本产品连接到智能手机后 将黑色垫 片 S 直接放在皮肤上 然后按电源按钮 P 打开 DermLite皮肤镜 DL 使用智能手机捕获图像 根据 需要重新涂抹水分以平整所有毛发 您可能需要仔细刮 胡子 为了节约能源 此...

Page 33: ... 번호 カタログ番号 目录编号 Serial Number Serijski broj Sériové číslo Serienummer Seriennummer Seerianumber Número de serie Numéro de série Uimhir Sraithuimhir Serijski broj Numero di serie Sērijas numurs Serijos numeris Sorozatszám Serienummer Numer seryjny Número de série Număr de serie Serijska številka Sériové číslo Sarjanumero Serienummer Seri numarası Σειριακός αριθμός Сериен номер Серийный номер Серійн...

Page 34: ...o de Dispositivos Médicos 2017 745 Le produit est conforme à la réglementation européenne sur les dispositifs médicaux 2017 745 Cloíonn an táirge le Rialachán Feistí Leighis na hEorpa 2017 745 Proizvod je u skladu s Europskom uredbom o medicinskim proizvodima 2017 745 Il prodotto è conforme al regolamento europeo sui dispositivi medici 2017 745 Produkts atbilst Eiropas medicīnisko ierīču regulai 2...

Page 35: ...rte Limitation de l humidité pour le stockage et le transport Teorainn taise le haghaidh stórála agus iompair Ograničenje vlage za skladištenje i transport Limitazione dell umidità per lo stoccaggio e il trasporto Mitruma ierobežojums uzglabāšanai un pārvadāšanai Laikymo ir gabenimo drėgmės apribojimas Páratartalom korlátozása tárolás és szállítás esetén Vochtigheidsbeperking voor opslag en transp...

Page 36: ... USA Tel 1 949 481 6384 Fax 1 949 240 7492 info 3geninc com www dermlite com E C REP Ltd 5 Fitzwilliam Square East Dublin 2 D02 R744 Ireland Tel 353 1 2 544 944 Email info ecrep ie Patents Trademarks www dermlite com patents 2021 by 3Gen Inc 04 May 2021 HUD 1701B ...

Reviews: