Total Exhaust Hood
Pg.5
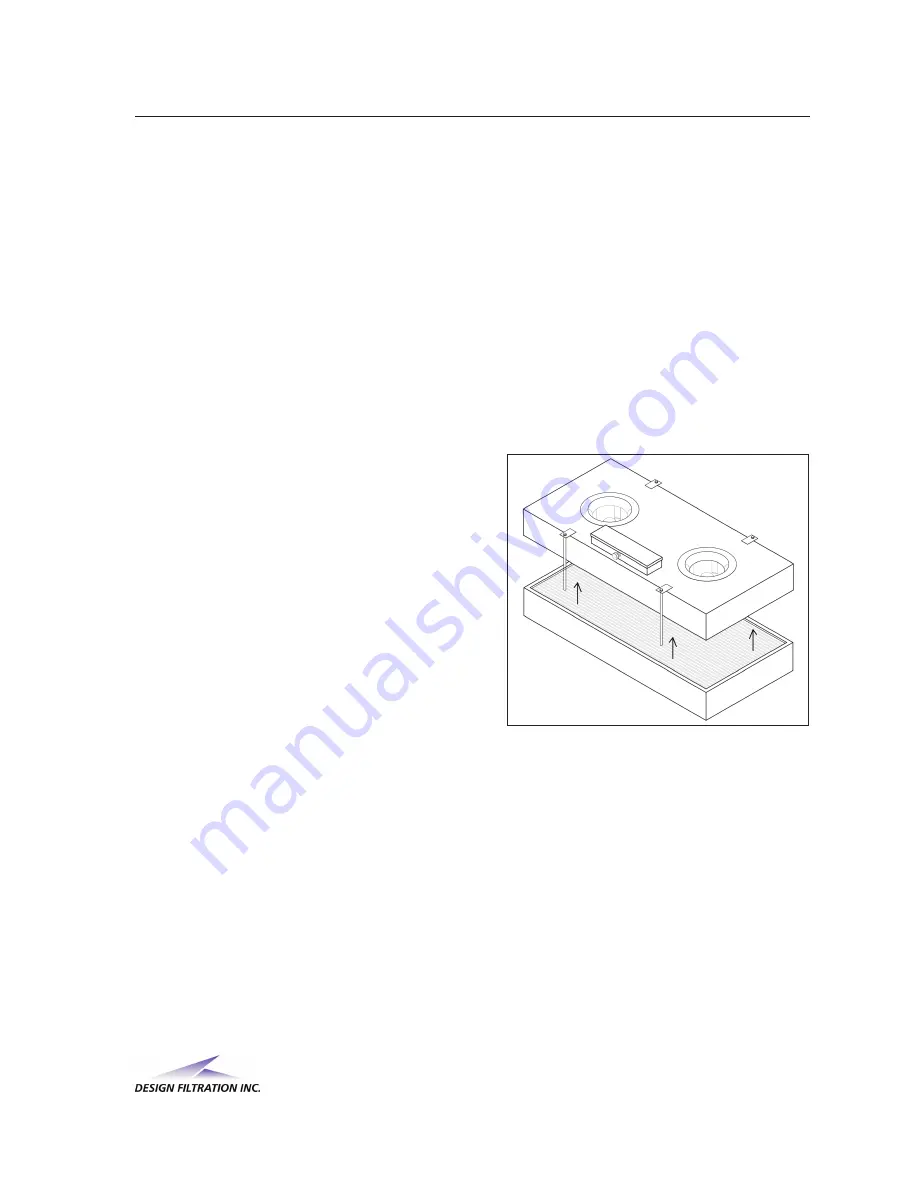
Figure 7.1
5.
HEPA Filter
Your Total Exhaust Hood features a 5.88” deep wood frame filter with a separatorless type
media to provide excellent even airflows. The wet laid glass media is set into the frame with
a urethane seal. Efficiency is 99.99% at 0.3-micron particle size and larger. HEPA filters
cannot be cleaned and must be replaced when necessary, consult factory for replacement
filters.
6.
ULPA Filter
The optional ULPA filter is rated 99.9995% at 0.12-micron particle size and larger. Other
features as per HEPA filter. ULPA filters cannot be cleaned and must be replaced when
necessary.
7.
Changing HEPA / ULPA Filters
Before beginning to change your HEPA Filter,
disconnect your hood from power source.
Carefully remove front access panel to reveal
interior compartment.
Loosen threaded rods at front and rear of fan
filter module. Unscrew and remove
polypropylene front locating bar. Remove
¼–20 nuts from rear clamping mechanism.
Unplug fan power cords from electrical outlet.
Carefully slide fan filter module from housing
(this may require two people.) Remove
aluminum foil tape and separate the filter from
motor housing. See Figure 7.1.
Carefully remove the new HEPA filter from crate. Using aluminum foil tape (do not use duct
tape) complete at least 3 layers of tape joining the fan housing to the filter. Apply a thin
layer of vacuum grease to gasket before re-installing the filter. Carefully lift and place filter
back into the hood making sure the HEPA filter is not damaged. W hen tightening threaded
rods, do not over tighten as these are only used to hold filter housing in place.
Once entire unit is re-assembled it must be tested and certified by a qualified certification
company.
8.
Changing the Fluorescent Light
Carefully remove the screws on the lense cover, remove the bulb and install new bulb with
same type and color as original supplied.


