3
Note
:
Confirm initialization by turning the ON/OFF control switch “OFF”
and then “ON”. The red LED on the Remote Start module will flash once
immediately as the switch is flipped from the “OFF” to the “ON” position.
If the unit is not initialized then the dash lights will come on (the Remote
Starter powers up the ignition wires) when the brake is depressed when
the hood is open when the control switch is on. REPEAT STEPS A THROUGH
F. See the purple colored Trouble Shooting Sheet if necessary.
13. Green Wire - Tach Input - Control Harness
The Remote Starter has two ways of monitoring the car during the start-
ing process. Both ways will ensure a clean, accurate start. Read about
both methods before deciding which one to use. Normally you should
try the
“No Tach
TM
”
method first.
“No Tach
TM
” Starting
This starting method does not require the connection of the
GREEN
tach
wire. This method will start the car by reading the car’s voltage before
attempting to start, and then looking for a voltage increase when the
alternator kicks in. This feature automatically takes into account voltage,
temperature, and the time since the vehicle was last run. The “No-Tach
TM”
starting is preset at the factory and you can skip step 13A if you would
like to use it. Note that if the vehicle is hard to start, set option #3 (step 22)
for “extended crank.”
Tachometer sensing
If the vehicle is generally hard starting (requiring a cranking time of more
than 1 second) you will get more accurate starting with the tachometer
sensing starting method. This method starts the car by reading the en-
gine speed (tach) information from a wire under the hood. If you choose
tachometer sensing, connect the
GREEN
(18 awg) wire to the car’s tach
wire under the hood (normally the negative side of the coil or tach out-
put of coil pack). After you have connected the
GREEN
wire, you need
to teach the Remote Starter the vehicle’s tach rate at idle. Proceed to
step 13A.
Note
:
You must have already initialized the module from Step 12.
13A. Tach Rate Learning
Note
:
Only use if the tachometer sensing method is chosen.
A.
Connect the GREEN wire to the car’s tach wire under the hood.
B.
Turn the On/Off control switch to the “OFF” position. Wait 5 seconds
for the first set of LED flashes to stop.
C.
Push the White “option” button once and you will see the red LED
flash. Now push the middle button on the transmitter for a second
until you see the red LED flash again. You are now in TACH mode. (If
the LED flashed twice -- simply push the transmitter button again until
you get only one flash).
D.
Wait 5 seconds for the red LED to flash 3 times.
E.
Turn the On/Off control switch back to the “ON” position
F.
Start the car and let it get to a
normal
idle. Do not press on the gas
pedal.
G.
Push the red “code” button for a second.
H.
Watch the red LED. It will turn on (solidly) after 3 or 4 seconds,
indicating that the idle rate has been learned.
I.
Watch the LED stay on steady as the vehicle is running and goes off
as you rev the rpms above twice the idle rate. The LED must go out
when you rev it above twice the idle rate to confirm correct tach
learning.
J.
Turn the key to the “Lock/Off” position.
K.
Turn the On/Off control switch off and the LED will go out.
Note
:
Once these steps are complete – you cannot use the LED to confirm
tach again. You can however repeat the above steps to learn tach over
again at any time.
14. Red/White – Remote Input Wire – Control Harness
The
Red/White
wire is used to trigger the remote starter to start the ve-
hicle. A negative pulse will trigger the remote starter to start the vehicle.
A second negative pulse will shut the remote starter down.
Connect this wire to the AUX output of the alarm system or keyless entry
system. If installing this remote starter on a vehicle and using the factory
keyless system to trigger the remote starter connect this Red/White wire
to either the lock or unlock wire. (Check this lock or unlock wire again
using the factory transmitter to check that the output is correct.) The
Red/White must “see” a negative trigger. If the trigger outputs are posi-
tive, a relay must be used to reverse the polarity. There is a double pulse
feature, option #8. Trigger the unit twice in 3 seconds and the remote
starter will start on the second pulse. See “Setting Program Features.”
To reverse a positive trigger to a negative trigger, connect the relay as
follows:
1.
Positive trigger output to terminal 86 on the relay.
2.
(-) Ground to terminal 85 on the relay.
3.
(-) Ground to terminal 87 on the relay.
4.
Red/White wire from remote starter to terminal 30 on the relay.
See the “HOW TO USE A RELAY” section at the end of the instructions.
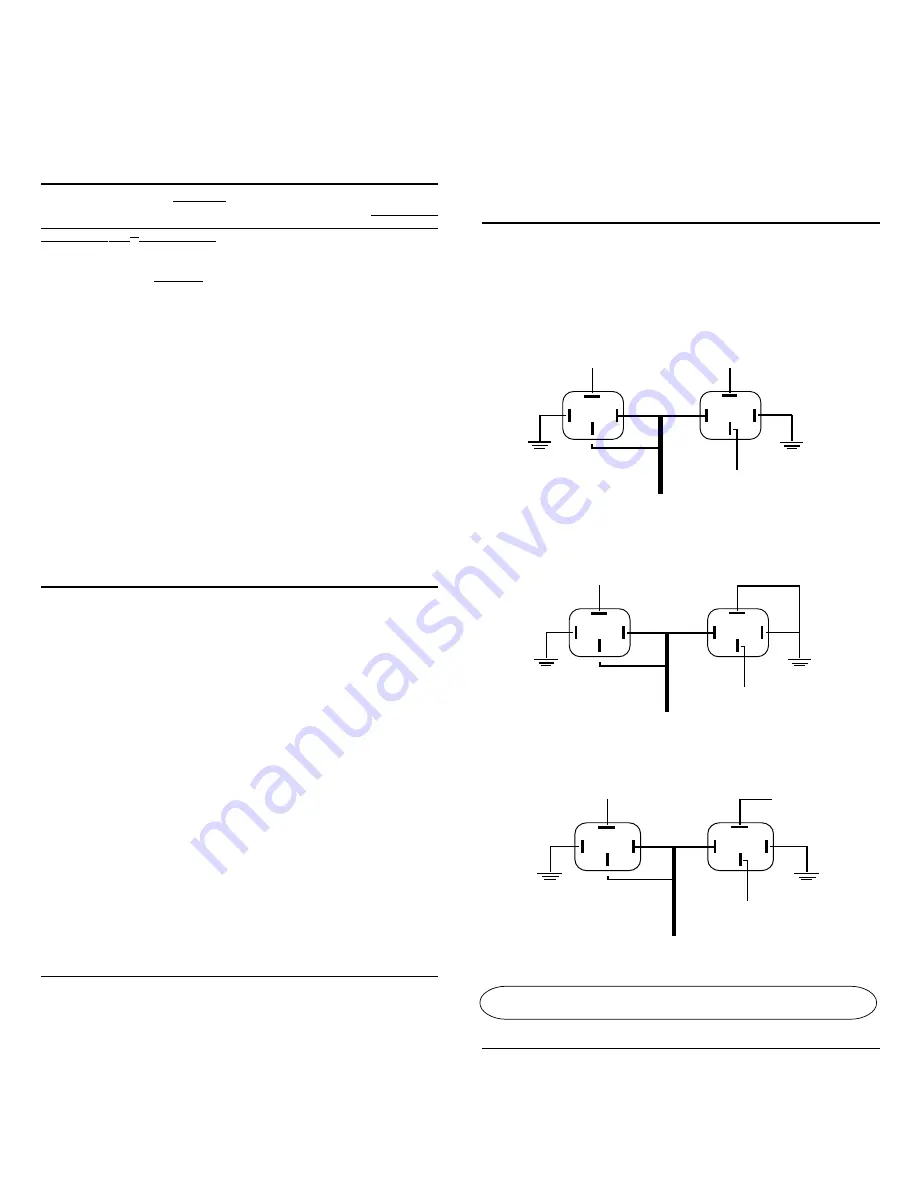
15. Providing an IGN 3 output or a Clutch Bypass
Many newer vehicles either have additional ignition circuits, alarm by-
pass units or the clutch needs to be triggered before the vehicle will
remotely start. By using additional relays, ignition circuits, alarm bypass
units and the clutch can be easily controlled. (The needed relays can be
easily purchased from DesignTech, Part # 20043 or Radio Shack, Cat #
275-226.)
Providing for a Clutch Bypass
Providing an Ignition 3 Output
Providing an Additional Ignition Circuit
OPTIONAL STEPS
16. Yellow/Green - Alarm Control - Control Harness
The
Yellow/Green
wire is specifically designed to control the Ignition In-
put of the remote control alarm system, which is triggering the remote
starter. Connect this Yellow/Green wire directly to the Ignition Input of
the alarm. This Yellow/Green wire will provide a positive 12-volt output
anytime it “sees” a positive 12-volt on the vehicle’s ignition #1 wire. This
output follows the Ignition #1 status. The only exception is that when the
remote starter is powering the vehicle, this wire will not activate. The
Ignition #1 (Blue)
From Remote Starter
87
86
Ground
85
30
To Additional
Ignition Circuits in
Vehicle
87
86
85
30
To Ignition #1 in Vehicle
Ground
Fused 12 volt Constant
(Tap into Large Pink Wire
From Battery)
Ignition #1 (Blue)
From Remote Starter
87
86
Ground
85
30
To Starter Side of
Clutch Switch
87
86
85
30
To Ignition #1 in Vehicle
To Key Side of Clutch Switch
Ground
Ignition #1 (Blue)
From Remote Starter
87
86
Ground
85
30
Ignition #3 Output
(-) Negative
87
86
85
30
To Ignition #1 in Vehicle
Ground

