background image

M

AINTENANCE


LAC/LFC Series Oven Owner

’s Manual 


44 


Version 1.12 


Copyright © 2018 by Despatch Industries. 

All rights reserved. No part of the contents of this manual may be reproduced, copied or transmitted in any form or by any 
means  including  graphic,  electronic,  or  mechanical  methods  or  photocopying,  recording,  or  information  storage  and 
retrieval systems without the written permission of Despatch Industries, unless for purchaser's personal use. 


3.1.


Start oven fans and then slowly turn the adjustment screw counter clockwise 
until the indicator moves to the ON/Closed position. 

4.


Once the airflow switch is adjusted so it is repeatable in turning ON/OFF when the 
oven fans are set ON or OFF, 
4.1.


Heat the oven to normal maximum operating temperature 

4.2.


Verify the airflow switch remains in the ON position 

 
The airflow switch has a normal tendency to turn OFF as the oven is heated, due to the 
air becoming less dense, which reduces the airflow signal to switch. If the airflow switch 
opens while the oven is heating, adjust the switch to a lower threshold by turning the 
adjuster screw counterclockwise while observing the indicator flag. Once the switch 
moves to the ON/closed position, repeat Steps 1-3 (Section 6.5.1).  
 

6.5.1.3.  Summary Switch Conditions 

In summary the switch must be set to satisfy two conditions: 


The switch must open when the oven fans are set to OFF. 


The switch must close when the oven fans are set to ON/Closed. The switch must 
remain ON/Closed when the oven is heated. 

 
If the switch cannot be adjusted to meet both of these conditions the switch is faulty and 
must be replaced 


Summary of Contents for LAC 1-38-8

Page 1: ...oduced copied or transmitted in any form or by any means including graphic electronic or mechanical methods or photocopying recording or information storage and retrieval systems without the written permission of Despatch Industries unless for purchaser s personal use LAC LFC SERIES OVEN WITH PROTOCOL 3 CONTROLLER OWNER S MANUAL C 266 PN 337069 VERSION 1 12 05 2018 ...

Page 2: ... or information storage and retrieval systems without the written permission of Despatch Industries unless for purchaser s personal use Revision History Revision Date Author Description 1 03 2015 E Anderson Updated from base LAC manual C242 Updates include addition of LFC1 38 Class A minor UL cleanup 1 1 04 2015 E Anderson Drawing restructure and solvent capabilities safety update 1 11 09 2015 E A...

Page 3: ...QUALITY OF THE PRODUCT BEING PROCESSED If the product on which the equipment is being used is critical of over temperature the Hi Limit should be used as a Process Hi Limit The sensor element is located on the supply duct where the hot air enters work chamber The temperature setting on the Process Hi Limit should be set somewhat below the temperature at which the product would be damaged If the pr...

Page 4: ... 1 5 6 LAC 8 Series Oven Environmental Operating Conditions 14 2 Safety 16 2 1 Safety Information 16 2 1 1 Lockout 16 2 1 1 1 Lockout Requirements 16 2 1 1 2 Lockout Procedure 16 2 1 2 Door and Panel 17 2 2 Provisions for Lifting and Carrying 17 2 3 Maintenance 18 2 4 Electrical Power 18 2 5 Fire 18 2 6 Equipment Lockout Requirements 19 2 6 1 Emergency Stop 19 2 7 Disconnecting Devices 19 2 7 1 Po...

Page 5: ...9 6 4 1 Cleaning the LAC 8 Series Oven 39 6 4 2 Decontaminating the LAC 8 Series Oven 40 6 5 Routine Tests 41 6 5 1 Recirculation and Exhaust Airflow Switch Test Operation 41 6 5 1 1 Alternative Method of Checking Power Switches and Timer 42 6 5 1 2 Recirculation And Exhaust Airflow Switch Adjustment 43 6 5 1 3 Summary Switch Conditions 44 6 6 Door Adjustment 45 6 7 Replacement Parts 45 6 7 1 Repl...

Page 6: ...Controller Operator Interface 27 Figure 9 LAC2 18 8 Nameplate 31 Figure 10 Rear Access Panel for Hard Wired Connections 32 Figure 11 Control panel removal 32 Figure 12 Power Connections at Main Circuit Board 33 Figure 13 Circuit Board 39 Figure 14 Test Recirculation and Exhaust Airflow Switches 42 Figure 15 Oven Control Circuit Board LEDs indicate status of switches 43 Figure 16 Shipping anchors F...

Page 7: ...nt a commitment on the part of Despatch Industries Despatch Industries does not assume any responsibility for any errors that may appear in this manual In no event will Despatch Industries be liable for technical or editorial omissions made herein nor for direct indirect special incidental or consequential damages resulting from the use or defect of this manual For here forward unless noted otherw...

Page 8: ...facturer Model Nomenclature Service The LAC 8 Series oven is manufactured by Despatch Industries 1 2 1 Model Nomenclature The LAC series of laboratory ovens uses a suffix to indicate the current revision level LAC 8 the current oven revision refers to the oven s eighth revision The LAC series of laboratory ovens consist of four Class B oven models o LAC 1 38 8 o LAC 1 67 8 o LAC 2 12 8 o LAC 2 18 ...

Page 9: ... is available to support your Despatch equipment From full service preventive maintenance to routine repair and certified calibration and uniformity the Despatch service network is positioned to respond to your business needs Our service programs are customized to meet your specific needs using our Advantage Service Assurance Program ASAP For more information on ASAP visit www despatch com Global ...

Page 10: ...ormation that describes an unsafe condition that may result in death serious injury or damage to the equipment Danger Danger is the signal word used to indicate a hazardous situation that if not avoided will result in death or severe injury Warning Warning is the signal word used to indicate a hazardous situation that if not avoided could result in death or severe injury Caution Caution is the sig...

Page 11: ...k of Chamber in cm W0F D H W D H LAC 1 38 19 48 18 45 19 48 3 8 105 31 79 27 69 38 96 9 2 5 6 4 LFC 1 38 19 48 18 45 19 48 3 8 105 31 79 33 84 38 96 9 4 0 10 2 LAC 1 67 24 61 20 51 24 61 6 7 187 36 91 29 74 43 110 11 2 5 6 4 LAC 2 12 24 61 24 61 36 91 12 336 36 91 33 84 55 139 17 2x 2 5 2x 6 4 LFC 2 12 24 61 24 61 36 91 12 336 36 91 39 99 55 139 17 4 0 10 LAC 2 18 36 90 24 61 36 91 18 500 47 120 3...

Page 12: ...ntaminants may be present may result in component failure Do not use liquids in the oven Do not set product or liquids on top of the oven Liquids that may spill on the oven floor or top of oven may cause considerable damage to the oven Contact Despatch for options available to help prevent such failures LAC 8 Model Number LAC1 38 8 120V 240V LFC 1 38 8 LAC 1 67 8 LAC 2 12 8 LFC 2 12 8 LAC 2 18 8 M...

Page 13: ...y longer and motors may overload or run hot If the line voltage is higher than the nameplate rating motors may run hot and draw excessive amperage The LAC Series oven designed for 240 volts see oven nameplate will operate satisfactorily on a minimum of 208 Volts but will result in 25 reduced heater output If your power characteristic is lower contact Despatch Industries An option is available to r...

Page 14: ...With dampers closed and no load 40 C 260 C 2 9 12 9 35 60 6 25 45 6 26 40 7 18 35 5 20 45 Recovery Time Door Open 100 C One Minute approximate 200 C minutes with no load 260 C N A N A 1 6 14 1 4 8 1 3 5 1 6 9 1 4 8 Temperature Uniformity at 100 C3F 200 C 260 C 2 of set point 1 C 2 C 2 5 C Operating Range with 20 C Ambient 40 C 260 C Control Stability 0 5 C per 5 C change in ambient Repeatability 0...

Page 15: ... or mechanical methods or photocopying recording or information storage and retrieval systems without the written permission of Despatch Industries unless for purchaser s personal use Table 1 Operating Environmental Conditions For indoor use Item Description Operating Temperature 18 C to 40 C 64 4 F to 104 F Relative Humidity 70 non condensing Maximum Altitude 2 000 meters 6 600 feet Fluctuations ...

Page 16: ...LAC 8 Series oven into a zero energy state and prevents accidental machine start up Always follow the Lockout Procedure described in this Section before cleaning maintaining or repairing the LAC 8 Series oven An accidental start up while working on the LAC 8 Series oven can result in serious injury or death 2 1 1 1 Lockout Requirements 1 Every power source that can energize any element of the LAC ...

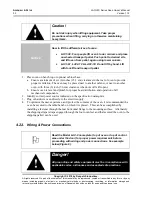
Page 17: ...el on the LAC 8 Series oven protects against hazards Operation without the control panel in place creates hazards that the control panel is intended to render safe for personnel 2 2 Provisions for Lifting and Carrying Caution Do not tilt oven while lifting Do not lift oven using the door handle to prevent damage to the oven and or personnel involved Caution Do not risk injury when lifting equipmen...

Page 18: ...modifications to LAC 8 Series oven are strictly forbidden Never modify any electrical circuits Unauthorized modifications can impair the function and safety of the LAC 8 Series oven 2 5 Fire Keep the LAC 8 Series oven clean and free of scrap materials oil or solvents to prevent the possibility of fire In the event of fire use a fire extinguisher as follows 1 Leave door as it is 2 De energize the m...

Page 19: ...op When a risk of personal injury or damage to the LAC 8 Series oven exists turn OFF the oven by removing unplugging the cord This shuts off all electrical power to the oven 2 7 Disconnecting Devices 2 7 1 Power Requirements Despatch recommends the LAC 8 have unobstructed access to a dedicated power source Use a power stabilizer if voltage fluctuation is greater than 10 nominal voltage fluctuation...

Page 20: ...tional Disconnect Switch The LAC 8 Series oven has an optional Disconnect Switch This Disconnect Switch is located on the front of the oven typically near the controls and connected to the load break switch behind the panel that disconnects or connects power from the main line When a risk of personal injury or damage to the LAC 8 Series oven exists turn off the Disconnect Switch This shuts off all...

Page 21: ... means including graphic electronic or mechanical methods or photocopying recording or information storage and retrieval systems without the written permission of Despatch Industries unless for purchaser s personal use Figure 2 Locate the recirculation airflow switches in the control compartment Figure 3 Locate the forced exhaust airflow switch on the back of the oven Recirculation airflow switche...

Page 22: ...proven reliability in demanding production and laboratory applications such as curing drying sterilizing aging and other process critical procedures The LAC 8 oven is especially useful for testing preheating sterilizing drying aging and curing along with other production applications The overall result is efficient productivity under strenuous conditions The chamber can be densely loaded without i...

Page 23: ...nimum air into the system allowed by NFPA 86 requirements The exhaust damper is designed in the same manner as the fresh air intake to ensure an adequate air mixture as well as to facilitate removal of solvent laden air from the system An airflow switch is employed as a safety mechanism to ensure that airflow is not inadvertently cut off The purge timer ensures the chamber has made a sufficient nu...

Page 24: ...ad distribution heat up and cool down rates desired temperature uniformity and most importantly the desired operating temperature Additionally engineering tradeoffs for each factor must be carefully weighed While considering each factor independently may be too daunting guidelines provide a simpler way to determine damper settings In general set the damper so the amount of fresh air flowing into a...

Page 25: ...iction heat from the air recirculation system builds up in the chamber This causes chamber temperature to rise slightly though the heating system is not ON After the recirculation motor has been ON for an extended period of time the chamber reaches a thermal equilibrium temperature When the damper is not set to full open position the chamber has no way to readily dissipate the heat generated by th...

Page 26: ...ct are achieved when no more than two thirds of any inside chamber dimension are used The best overall results are achieved when the product s are located in the center of the chamber Cool Down Rates The more open the damper the faster the cool down 3 4 The Protocol 3 Controller The Protocol 3 is a microprocessor based digital temperature controller designed for simple and flexible oven operation ...

Page 27: ...ents of this manual may be reproduced copied or transmitted in any form or by any means including graphic electronic or mechanical methods or photocopying recording or information storage and retrieval systems without the written permission of Despatch Industries unless for purchaser s personal use Figure 8 Protocol 3 Controller Operator Interface ...

Page 28: ...ols and indicators for normal movement bent shafts cracks chips or missing parts such as knobs and lenses Check the door and latch for smooth operation Caution Do not tilt oven while lifting or lift oven using the door handle to prevent damage to the oven and or personnel involved Caution Do not risk injury when lifting equipment Take proper precautions when lifting carrying or otherwise maintaini...

Page 29: ...rate in an industrial setting Despatch recommends the following environmental operating guidelines 1 Place the oven on a flat level solid foundation and secure it to prevent unintended movement 2 Do not expose the oven to excessive external vibration 3 Keep equipment away from flammable materials 4 Do not remove electrical cabinet covers 5 Where excessive particulate matter is present such as on a...

Page 30: ... clearance in the rear of oven to provide proper ventilation The oven may be placed next to another cabinet or next to another oven with three 3 inch 7 6 cm clearance the doors will still open b Ensure oven is level and plumb for proper heat distribution and operation of all mechanical components 2 Identify correct power source indicated on the specification nameplate 3 Plug or hardwire oven direc...

Page 31: ...e written permission of Despatch Industries unless for purchaser s personal use Models 1 38 and 1 67 come equipped with an appropriate plug and cord Models LAC 2 12 and 2 18 must be hardwired to the electric supply using 10 AWG or larger wires suitable for at least 75 C 167 F 4 2 3 1 Wire LAC 8 Models 2 12 and 2 18 For units that must be hardwired or where a power cord is shipped loose run the pow...

Page 32: ...atch Industries unless for purchaser s personal use Power cord access port Figure 10 Rear Access Panel for Hard Wired Connections 2 Remove the top panel for easy access to power connection remove controller if necessary for more room and easier access Figure 11 3 Connect power at main circuit board terminals L1 and L2 Figure 12 a Tighten terminals on the circuit board to 10 6 to 13 2 lb in 1 2 to ...

Page 33: ...roduced copied or transmitted in any form or by any means including graphic electronic or mechanical methods or photocopying recording or information storage and retrieval systems without the written permission of Despatch Industries unless for purchaser s personal use Connect power at main circuit board terminals L1 and L2 Figure 12 Power Connections at Main Circuit Board ...

Page 34: ...otection Association NFPA Section 86 of 1990 Notice Before using any cleaning or decontamination method except those recommended by the manufacturer users should check with the manufacturer that the proposed method will not damage the equipment 5 1 Load Oven Despatch Industries cannot be responsible for either the process or process temperature used or for the quality of the product being processe...

Page 35: ...re Startup Checklist Warning Do not use flammable solvent or other flammable material in the LAC oven Do not process closed containers of any substance or liquid in this oven because they may explode under heat The LFC may be operated with solvents but only up to the rating specified in this manual Know the system Read this manual carefully Make use of its instructions and explanations Safe contin...

Page 36: ... Start Oven 1 Start fan a Open oven door b Press Power Switch to ON Figure 1 Listen for the recirculating fan to start c Shut oven door d Check that control display turns ON 2 Operate temperature control as desired by following the control operation instructions to follow Notice The heater of the Class A oven cannot be energized until the forced exhaust system has brought in a minimum amount of fr...

Page 37: ...n result in unsatisfactory operation such as unbalanced temperature in the work chamber reduced heating capacity reduced production overheated components and the like Keep the walls floor and ceiling of the oven work chamber free of dirt and dust Floating dust or accumulated dirt may produce unsatisfactory work results Keep all equipment accessible Do not permit Danger Use PPE and follow standard ...

Page 38: ...ntenance will be more than paid for in continuous safe and economical operation Maintain equipment in good repair Make repairs immediately Delays may be costly in added expense for labor and materials and in prolonged shut down Check that safety devices are ON and enabled Practice safety Make it a prime policy to know what you are doing before you do it Make caution patience and good judgment the ...

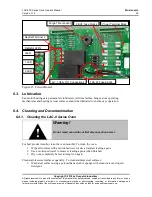
Page 39: ...and bearing or wear surfaces should be lubricated to ensure easy operation 6 4 Cleaning and Decontamination 6 4 1 Cleaning the LAC 8 Series Oven For best product results clean the oven monthly To clean the oven 1 Wipe all surfaces with a moistened towel or use a neutral cleaning agent 2 Use a moistened towel to remove cleaning agents when finished 3 Dry oven completely before turning it on again C...

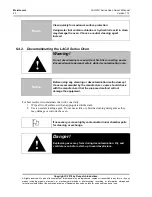
Page 40: ...t instead 6 4 2 Decontaminating the LAC 8 Series Oven Notice Before using any cleaning or decontamination method except those recommended by the manufacturer users should check with the manufacturer that the proposed method will not damage the equipment For best results decontaminate the work zone daily 1 Wipe all work surfaces with an appropriate disinfectant 2 Use a neutral cleaning agent Do not...

Page 41: ...ontrol setpoint value at least 11 C 20 F lower than the current process temperature 2 Press Menu and lower the High Limit setpoint to a value just below the current process temperature 3 Press Run 4 The High Limit alarm indicator will flash and a High Limit alarm message will display 5 Press Stop 6 Press Reset 7 Return the control setpoint and High Limit setpoint values to their original values 6 ...

Page 42: ...d Exhaust Airflow Switches 6 5 1 1 Alternative Method of Checking Power Switches and Timer Three LED lights on a circuit board indicate the status of power airflow switches and purge timer These LEDs serve as indicators if the switches are in the ON Closed position when the main oven power is switched ON Locate the circuit board behind the front control Figure 15 1LED illuminates when the main ove...

Page 43: ...ional Adjust Airflow Switch If after performing the steps in Section 6 5 1 the airflow switches are not in the OFF Open position when the oven is OFF or are not in the ON Closed position when the oven is turned ON use the following procedure to adjust the airflow switch sensitivity 1 Remove the threaded cap located at the top of the airflow switch to gain access to the sensitivity adjustment screw...

Page 44: ...eat the oven to normal maximum operating temperature 4 2 Verify the airflow switch remains in the ON position The airflow switch has a normal tendency to turn OFF as the oven is heated due to the air becoming less dense which reduces the airflow signal to switch If the airflow switch opens while the oven is heating adjust the switch to a lower threshold by turning the adjuster screw counterclockwi...

Page 45: ...pallet can be used Figure 16 Shipping anchors Figure 17 Wall separator anchor To increase or decrease latch tension slightly or to gain a better door seal on the latch side Turn the door strike in or out on its threads by loosening the Allen head set screw If necessary adjust the vertical alignment of the strike to increase or decrease latch tension 1 Loosen the two screws on the latch strike and ...

Page 46: ...s for purchaser s personal use Global Headquarters Contact Service Technical Support Parts Despatch Industries 8860 207th Street Lakeville MN 55044 USA International Main 1 952 469 5424 US toll free 1 888 337 7282 Fax 1 952 469 4513 info despatch com www despatch com Service 1 952 469 8230 US toll free 1 800 473 7373 Fax 1 952 469 8193 Service despatch com usparts itweae com 6 7 1 Replace the Prot...

Page 47: ...hout the written permission of Despatch Industries unless for purchaser s personal use 6 7 2 Replace Heater Unit Tools needed 3 8 wrench T20 Torx bit driver 1 Remove the ceiling plate a Remove the screws from the plate Figure 20 b Slide the ceiling plate out of the oven to expose heater panel inlet cone Figure 21 2 Disconnect the heater leads from heater element with wrench Before disconnecting le...

Page 48: ... to expose electrical cabinet 2 Disconnect the motor leads from motor element with wrench 3 Unscrew the screws holding the motor frame to the oven body 4 Unplug the motor harness from the circuit board and remove motor ground wires from ground stud 5 Remove the fan motor 6 Install the fan motor a Insert shaft seal onto shaft b Insert the shaft into shaft collar c Fasten motor to plug assembly 7 In...

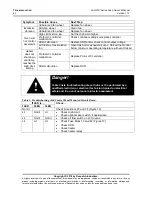
Page 49: ...low heat up Improperly loaded Reduce load or redistribute load in chamber Low line voltage Supply sufficient power and proper connections Check for circuit overload Heating element s are burned out Replace burned out element see Warranty Section 8 1 240 volt oven is connected to a 208V line Raise line voltage to a 240 volt line or modify oven for 208V operation consult factory Fan motor failure Re...

Page 50: ... or replace controller SSR malfunction Replace SSR and or check control output voltage Air friction of recirculation fan Open fresh air or exhaust air vent Unit will not control below minimum operating temperature with vent closed Heater does not shut down until temp reaches the High Limit setting Protocol 3 controller malfunction Replace Protocol 3 controller SSR malfunction Replace SSR Table 3 T...

Page 51: ...ssible Problem Next Step HI LIMIT LED ON Problem with thermocouple High Limit setpoint has been exceeded Once the problem has corrected press RESET DEV HOLD LED flashing Oven temperature has not entered or dropped out of the Auto Hold band and the soak timer has stopped Program a slower ramp rate or if oven is not heating check heater circuit Top PV displays OPEN Control thermocouple is disconnect...

Page 52: ... or transmitted in any form or by any means including graphic electronic or mechanical methods or photocopying recording or information storage and retrieval systems without the written permission of Despatch Industries unless for purchaser s personal use 8 Appendices 8 1 Standard Products Warranty Also found in proposal and online at http www despatch com pdfs standard_warranty pdf ...

Page 53: ...r from the controller To set up the recorder 1 Ensure hardware jumper JU1 is in place for the 5 VDC setting Refer to MRC5000 Manual included 2 Move MODE to PROG TEST CAL to display Prog 3 Press twice to display Inps Move to each Parameter Code using or Adjust each Parameter Code using the settings in Table 5 4 After adjusting all settings move MODE to RUN Display on both the recorder and controlle...

Page 54: ...k switch automatically shuts OFF either the heater only or both the heater and fan when the door is opened This option provides an extra measure of safety for the user 8 2 5 Optional High Limit Alarm with Alarm Silence The LAC 8 Series oven optional High Limit Alarm provides an audible and visual alarm when the temperature exceeds the High Limit setpoint on the control The alarm horn is typically ...

Page 55: ...ogen provides clean dry air or inert gas for moisture removal CDA helps drive off moisture Nitrogen helps drive off moisture and or provide a light blanket of nitrogen Using nitrogen does not create low oxygen content since this is an air unit it always contains a small amount of fresh air exchange and the internal seams are not welded Flow is controlled by a solenoid valve turned ON or OFF throug...

Page 56: ...e and retrieval systems without the written permission of Despatch Industries unless for purchaser s personal use 8 3 Mechanical Drawings See mechanical facility drawings included on the manual CD The drawings included are intended to be reference only and the latest revision may be found online at www despatch com 8 4 Electrical Schematics See the electrical schematics included on the manual CD T...

Reviews: