Model TP-700
TP-700 Instruction Manual
Rev. 4.1
Page 19 of 42
d)
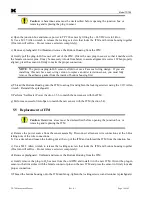
Remove the span gas and calibration adapter, or the optional gas ampoule or gas generator calibration
technique components when AutoSpan cycle is complete. The ITM will report a live reading as it clears
toward “0”. When the reading clears below 5ppm, the ITM will display “Span Complete” and will revert to
normal operation. If the sensor fails to clear to less than 5ppm within 5 minutes, a “Clearing Fault” will be
reported twice and the ITM will return to normal operation, aborting the AutoSpan sequence. The ITM will
continue to report a “Clearing Fault” and will not clear the fault until a successful AutoSpan is completed.
e)
AutoSpan calibration is complete.
NOTE 1
: If the sensor fails the minimum signal change criteria, a
“Range Fault”
will be
declared and a “Fault Detected” message will be displayed alternately with the sensor’s current
reading. The 4-20mA output will be taken to 0mA and the “Range Fault” fault bit will be set on
the Modbus™ output.
NOTE 2
: If the sensor fails the stability criteria, a
“Stability Fault”
will be declared and a “Fault
Detected” message will be displayed alternately with the sensor’s current reading. The 4-20mA
output will be taken to 0mA and the “Stability Fault” fault bit will be set on the Modbus™ output.
NOTE 3
: If the sensor fails the clearing time criteria, a “
Clearing Fault
” will be declared and a
“
Fault Detected” message will be displayed alternately with the sensor’s current reading. The 4-
20mA output will be taken to 0mA and the “Clearing Fault” fault bit will be set on the Modbus™
output.
NOTE 4
: The most common cause of “
Range Fault
” and “
Stability Fault
” is the improper
storage of the unit / sensor cell. When the sensor power is removed for any period of time, the
sensor cell should be protected with a Desiccant Pack (P/N 960-240010-000) and covered by the
Dust Cap (P/N 600-003232-000)
3.5
Program Mode
Program Mode provides a “View Sensor Status” menu to check operational and configuration parameters.
Program Mode provides for adjustment of the AutoSpan Level, Sensor Range, Heater Power, and Serial ID.
Additionally, Program Mode includes the diagnostic function “Signal Output Check” and “Restore Factory
Defaults”.
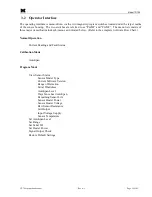
The Program Mode menu items appear in the order presented below:
View Sensor Status
Set AutoSpan Level
Set Range
Set Serial ID
Set Heater Power
Signal Output Check
Restore Default Settings
3.5.1
Navigating Program Mode
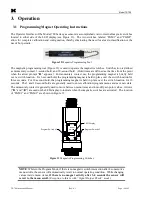
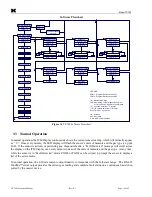
From Normal Operation, enter Program Mode by holding the magnet over PGM2 for 4 seconds (until the
displays starts to scroll “View Sensor Status”). Note, the “
►” prompt will show that the magnetic switch is
activated during the 4 second hold period. The ITM will enter Program Mode and the display will display the
first menu item “View Sensor Status”. To advance to the next menu item, hold the magnet over PGM1 or PGM2
while the current menu item’s text is scrolling. At the conclusion of the text scroll the arrow prompt (“
►” for
PGM2 or “
◄” for PGM1) will appear, immediately remove the magnet. The ITM will advance to the next menu

