Modular Multi-service Integrated Optical Transmission Multiplexer
User Manual
32
Appendix 1. An Illustrated of 75
Ω 2M Coax Connector Fabricating Method
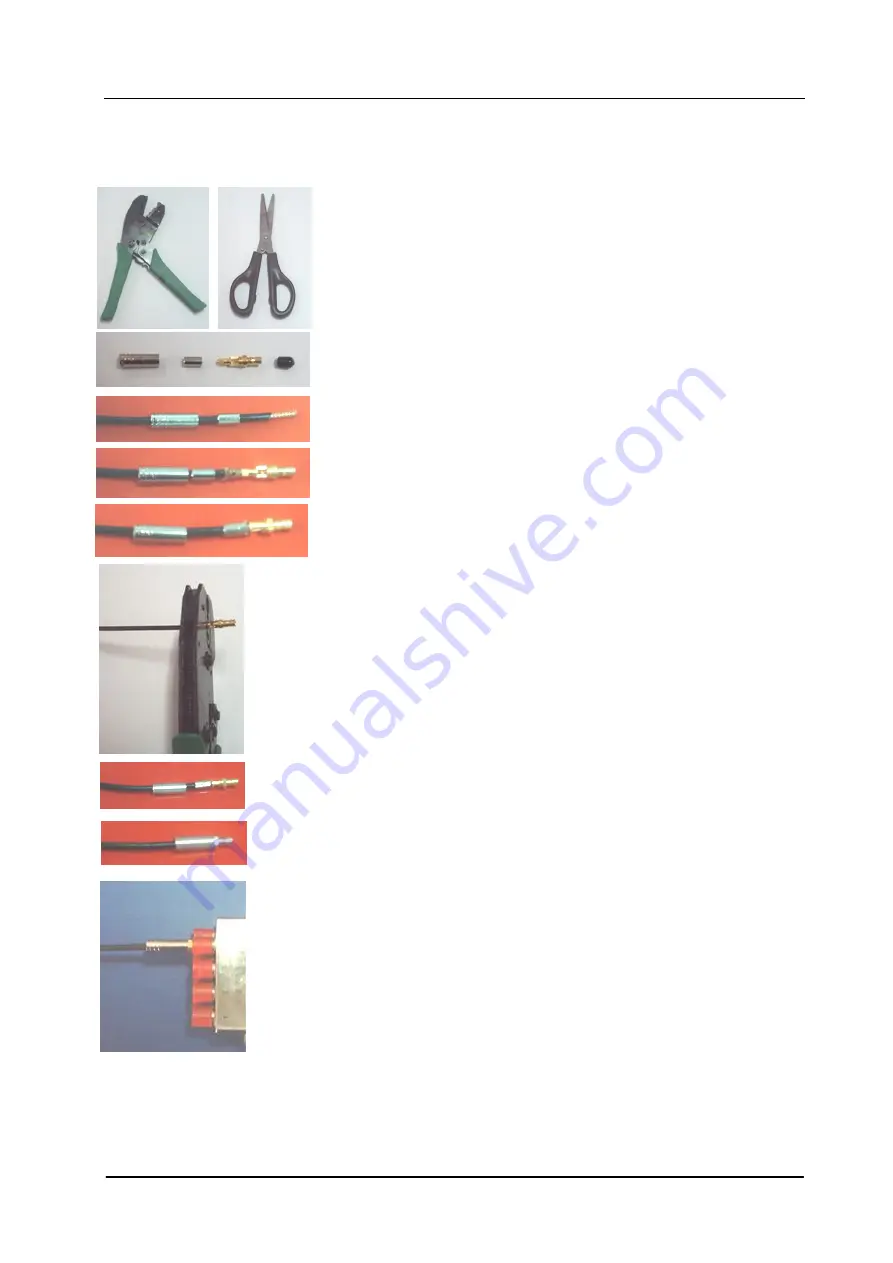
E. Back set the coax wire shielded copper grid at the tail of
connector fitting, and tighten the tight loop around its outside. Clip
off excessive burrs of the shielded copper grid with scissors.
A. Tools: Press Line Pliers, Scissors, Electric Iron, and
Soldering Tin Wire, etc.
B. Micro coax connector including 4 parts: 1. Outer bushing, 2.
Tight loop, 3. Connector fitting, and 4. Rubber Cap
C. Steps: Set 1. Outer bushing and 2. Tight loop in turn on the
slender coax cable SYV-75-2-1, and then strip off the dressing of
cable with scissors in a length of about 10mm. Pay attention not to
damage the shielded copper grid.
D. Turn over the shielded copper grid, remove the plastic filling
outside the inner core by about 5mm, then cut the inner core
evenly, and expose the plastic filling outside by about 3mm.
Afterwards, insert the connector fitting carefully, with inner core
inserted into the flume hole of connector fitting, and weld it with
electric iron and soldering tin wire.
Pay attention that false
welding is not allowed, nor the outer wall of connector
fitting to be touched.
F. Place part of the tight loop into the suitable teeth hole (such
as 151 marked) of the press line pliers to be tightly pressed. If
there is no way to set outer bushing on the connector fitting,
press it once more after the press line pliers is turned by 90
degrees.
G. Set the outer busing on the connector fitting.
H. Now a 2M coax connector is fabricated.
I. Insert it into Adapter CC3-K3, and the adapter will
automatically lock it up at once. Press down the red lock cap of
adapter to pull it out.
A
B
C
D
E
F
G
H
I


