background image

Accessories - Pneumatic Autodrain

Maximum working pressure of 200 psi (13.8 Bar).

Minimum working pressure of 30 psi (2.1 Bar).

Anodized aluminum body.

Stainless steel piston, spring, ball, screens, and 
reservoir.

Buna seals and teflon ring.

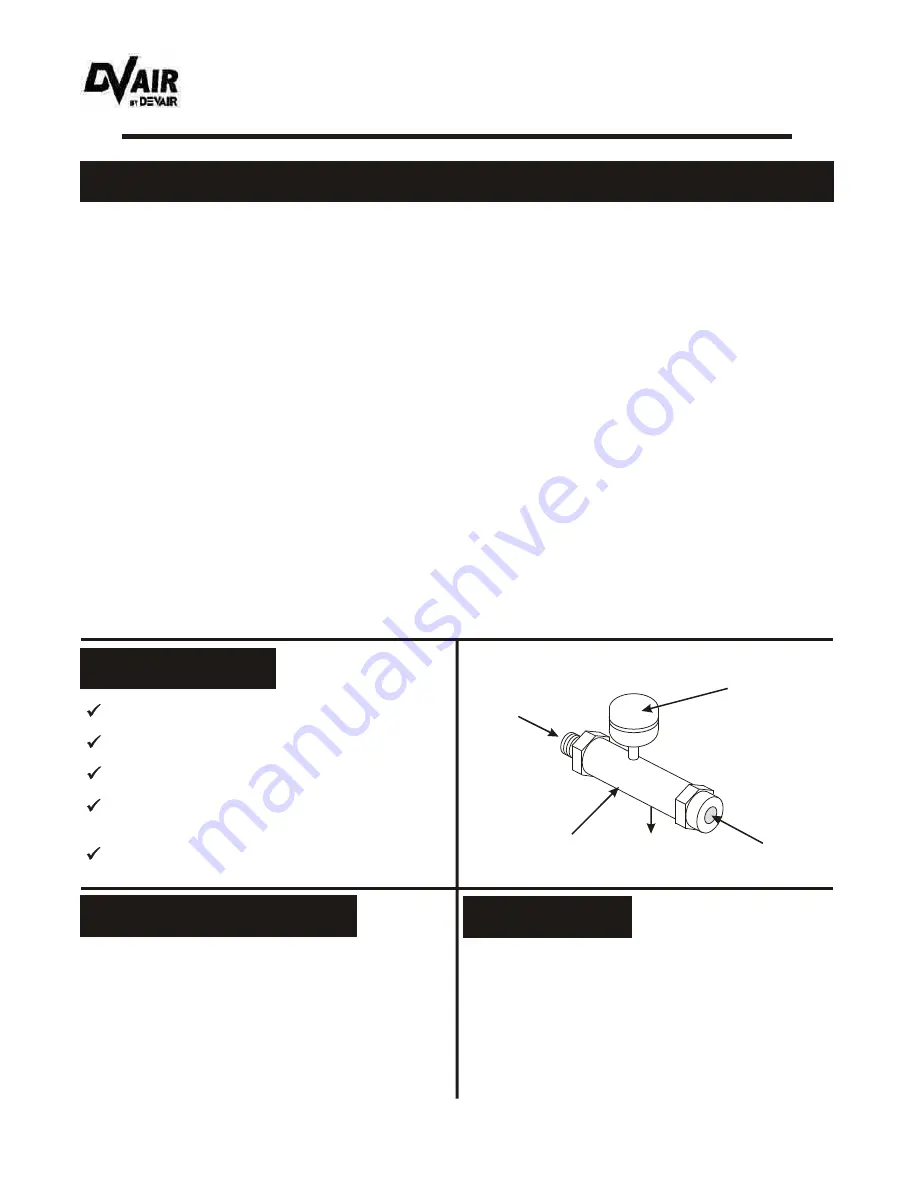
AutoDrain Assembly

Drain 

Port

Reservoir

Moisture 

from Tank

Pilot Signal 

from 

Unloader

1.

Maintenance/service work must only be done when 
the Autodrain is not under pressure.

2.

Ensure the Autodrain is not subjected to 

temperatures below freezing.

3.

Suitable arrangements must be made to ensure the 

moisture is properly contained once evacuated from 
the AutoDrain.

The ‘AD-9400’ Autodrain is designed to drain moisture from the Compressor Unit each time the Unit 
reaches maximum pressure and shuts off. As shown, the Unit receives its ‘pilot’ signal from the 
Compressor Unloader, being tied into the Unloader Line by means of a Compression Tee.

All that is required for the automatic operation of the Autodrain is an intermittent air source like that 
obtained by tapping into the Compressor Unloader Line.

A) The pilot signal (or air pressure) on the Unloader Line forces an internal Piston past the Drain Port, 

sealing the internal Chamber from atmosphere.

B) As the Piston is forced forward, the internal Stainless Steel Ball Valve is opened, permitting 

condensate and oil to be forced  up into the Reservoir.

C) The air in the top of the Reservoir is compressed to system pressure.
D) As the pilot signal is returned to zero, the internal Piston returns, closing the system from the 

atmosphere.

E) When the Piston reaches it’s original position, the Drain Port is opened, allowing the condensate to 

escape.

As noted, suitable arrangements must be made to contain the condensate that is expelled from the 

Autodrain. As the condensate may contain traces of oil, it must be disposed of accordingly.

What is the purpose of the ‘AD-9400’ Autodrain?

Specifications:

Important Information:

Maintenance:

The Trap Mesh and Flat Mesh in the AutoDrain must be 
cleaned periodically in order to ensure the Unit works 
properly, and does so for a long period of time.

Devair offers a Repair Kit for the Unit, namely an ‘RK-AD-
9400’. The Kit includes a Flat Screen, Trap Screen, ‘O’ 
Ring, Piston and Seal Assembly, and an End Cap 
Gasket.

 - 13 -

HDI-01

Mar ‘07

Distributed by:     CENTRAIR Air Systems & Supplies,    68 Hooper Rd., Unit 5, Barrie, ON  L4N 8Z9

                               Phone: 705-722-5747  Fax: 705-722-5458     sales@centrair.ca    www.centrair.ca

All manuals and user guides at all-guides.com

Summary of Contents for HDI-01

Page 1: ...atic Autodrain Accessories Electronic Autodrain Accessories Oil Monitor Accessories Beltguard Aftercoolers Accessories Duplex Alternator Relays Initial Start Up Procedures Trouble Shooting Devair Warranty Statement Page Cover 2 3 4 5 6 7 8 9 10 11 12 13 14 15 16 17 18 19 20 23 23 As the owner of a new Devair Air Compressor Unit it is your responsibility to ensure that it is installed correctly as ...

Page 2: ...revent damage to equipment or to avoid a situation that may cause minor injury Information that you should pay special attention to NOTE 2 Safety Precautions As the Unit starts and stops automatically do not come into contact with moving parts Shut off all power to the Unit before attempting to repair or maintain the Compressor Air compressed by the Unit is not suitable for inhaling It may contain...

Page 3: ...r Filter Replace oil synthetic Check Safety Valves Inspect Check Valve Inspect Pressure Gauge Air Filters are available in the Maintenance Kit Consult your Pump Bulletin for the appropriate Kit number Mineral Oil is available in the Maintenance Kit Consult your Pump Bulletin for the appropriate Kit number Synthetic Oil is available in the Maintenance Kit Consult your Pump Bulletin for the appropri...

Page 4: ... Replace Safety Valves on Pump and Tank Replace Pressure Gauge Replace Belts Replace Belts Belts are available through your local Devair Distributor Valve Discs and Springs are available through your local Devair Distributor Consult your Pump Bulletin for the appropriate Kit number The CPR Centrifugal Pressure Release is the Unloader which may be located on the front of the Pump The CPR Assembly a...

Page 5: ... to photograph the damage Also it may be wise to discuss with the carrier representative the time allotted to give notice of loss or damage to the product there may be guidelines which limit time frames of same 4 Do not attempt further unpacking or operation of the product Also do not discard any packing material used 5 A Loss or Damage Claim must be submitted to the carrier and supported by the f...

Page 6: ... 12345 AB Example 230volt 60 3phase Example 447 Example 54321 Unit Identification 12345 AB 175 psi i When a flammable liquid is sprayed there may be danger of fire or explosion especially in a closed area Ii Read operating instructions Iii Arcing parts Keep the Compressor at least 20 feet from explosive vapours For Parts and Service always give Model and Serial Number VAV 5062 69 Devair Air Compre...

Page 7: ...building piping Refrigerated Air Dryer removes the moisture from the compressed air by lowering its temperature Oil Water Separator separates the oil from the moisture drained by the Refrigerated Air Dryer and Filters The oil is trapped by internal Filters while the water is allowed to be dispensed to the building drain Separator Filter acts as a pre filter to the Refrigerated Air Dryer Coalescing...

Page 8: ...ntercooler Tube This Tube cools the compressed air while leading it from the low pressure Cylinder to the high pressure Cylinder Electric Motor Belt Guard Ball Valve Discharge outlet Drain Valve Allows the operator to drain the moisture from the Tank Air Receiver Tank Pressure Switch A pneumatically operated electric Switch for starting and stopping the Unit at predetermined minimum and maximum pr...

Page 9: ...t that when not taken from the Unit area could cause severe problems It is very important that the Unit be located in a relatively large area or when in an enclosed area cool air is introduced and the heat is taken out this by means of intake and exhaust fans The amount of heat generated by an Air Compressor is calculated by simply multiplying the Unit Horsepower by 2500 Example 15 HPUnit x 2500 3...

Page 10: ...ompressor Pump performance or shorten Pump life Resulting problems are not covered by the Devair Inc Air Compressor Warranty Pump Lubrication 10 Devair Premium Mineral Oils Devair Pump Model Devair Pump Model Devair Premium Synthetic Oil used in high heat or high duty applications or when Beltguard Aftercoolers are used DV Lube20 20 Wgt Part No PR20 DV Lube30 30 Wgt Part No PR30 123 247 44642 OJ 2...

Page 11: ...te intermittently The Unit starts stops without warning Should it be necessary to service the Unit ensure the power source has been shut down and locked off This must be done to prevent personal injury or damage to the unit Do not attempt to operate the Air Compressor Unit without first checking the Oil level in the Pump Add Oil as required Serious damage may result from use without Oil Failure to...

Page 12: ... of the Unit meets with all applicable codes and regulations E when completed the Unit works in both a safe and correct manner Failure of the Compressor due to an incorrect electrical installation is not covered by the manufacturers warranty Use of an incorrect Electric Motor for your particular building service will result in premature Motor failure and is not covered by the Devair or Motor manuf...

Page 13: ... the Drain Port sealing the internal Chamber from atmosphere B As the Piston is forced forward the internal Stainless Steel Ball Valve is opened permitting condensate and oil to be forced up into the Reservoir C The air in the top of the Reservoir is compressed to system pressure D As the pilot signal is returned to zero the internal Piston returns closing the system from the atmosphere E When the...

Page 14: ...ilter this to clean any impurities from the air moisture and prevent them from clogging the Autodrain mechanism By simply adjusting the two dials on the Autodrain Timer the duration of the drains and the time between drains can be altered to suit your particular application The duration for the drain can be set between 0 5 to 10 seconds the time between drains 1 to 45 minutes As noted suitable arr...

Page 15: ...he Electrician must then ensure that the wiring of the Monitor s meets all applicable codes and regulations To ensure the Oil Monitor is functioning as designed it is best to a test the Monitor on a regular basis and b check the oil level manually on a regular basis To test the Monitor simply turn the Knob on the Monitor Face in a counter clockwise direction thereby leading the Switch to believe t...

Page 16: ...HDI 01 Mar 07 Distributed by CENTRAIR Air Systems Supplies 68 Hooper Rd Unit 5 Barrie ON L4N 8Z9 Phone 705 722 5747 Fax 705 722 5458 sales centrair ca www centrair ca All manuals and user guides at all guides com a l l g u i d e s c o m ...

Page 17: ...guard Aftercooler it is imperative that A the Beltguard be at least the required minimum distance of 18 0 5 m from any obstruction or wall With this design maximum air flow through the Aftercooler is critical to both ensure the cooler works effectively and the Pump receives proper cooling B the Oil used in the Pump be a synthetic oil namely Oj2000 If the above criteria are not met the Aftercooler ...

Page 18: ...lates the Units to start and is therefore set at the maximum pressure setting In smaller Compressors this is generally the Switch with the Unloader The Lag Pressure Switch or PS2 is set at 10 psi less than the Lead Switch and will bring the second Unit on only if the pressure in the Tank goes below that of the cut in pressure of PS2 For example this will occur when the Unit is started at 0 psi in ...

Page 19: ...t Ensure that the air is escaping to atmosphere Allow the Unit to operate in this fashion for approximately 30 minutes This lubricates the Pistons Bearings and all internal surfaces Initial Start Up Do not place any materials on or against the Belt Guard or the Compressor Unit as a whole Placing materials there will limit the cooling of the Compressor and could lead to premature failure Shut off a...

Page 20: ...terial on head of piston 8 Normal sound amplified through floor or carried through remote air intake when used 9 If the noise is a knock and cannot be attributed to any of the above the problem could be worn bearings 1 Tighten as required 2 Inspect valve for damage Replace as required Check to ensure valve is seated properly in head Reinstall tightening valve plug and set screw 3 Tighten until no ...

Page 21: ... Do not over tighten 3 Clean repair or replace 4 Fix leaks 5 Contact local distributor or service centre for suggestions Should the items as noted in D not provide any insight as to why the unit is overheating the problem may lie in the environment in which the unit is operating A compressor unit located in a warm room may show signs of overheating The unit should either be moved to a cooler envir...

Page 22: ... or end plates 7 Oil seal leak 1 CPR may be dirty or faulty 1 The Disc in the check valve is not seating properly as it may be wedged open by debris or damaged Air is then allowed to escape from the receiver out through the unloader 1 Clean or replace check valve as required 1 Clean repair or replace Repair kit is available for CPR mechanism 1 Use care in filling and wipe unit clean 2 Drain oil un...

Page 23: ...done by returning the completed Warranty Registration Card by email fax or post have been maintained in accordance with the Devair Preventative Maintenance Schedule as provided here in have been maintained and serviced using only Genuine Devair parts and kits this including but not limited to Oil and Filters With the above noted Warranty Devair has also implemented a new 5 Year Limited Motor Warra...

Page 24: ...All manuals and user guides at all guides com ...

Reviews: