ELECTROVAP
®
RTH-HC
58
6.
MAINTENANCE
6.1
STAINLESS STEEL TANK
Take care:
the tank gasket should be changed whenever the tank is maintained. Retighten all clamps.
Do not scratch harshly, hit or use corrosive liquids on the heating elements.
Very important:
- Do not use solvents to clean the water level detector. If necessary, you can use a scraper to clean the level sensors. If you need
to intervene on the detector, do not use special glues but only Teflon.
- Check that
the “
T” and the anti
-clogging system
of the tank have not been pulled down with the limescale deposit. Otherwise,
pick it up from the collecting bag and reinstall it.
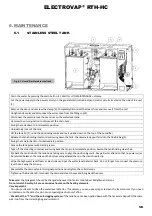
Drain the water by pressing the drain button (1). Wait for «DO MAINTENANCE » display.
Cut the power supply to the power circuits (in the general electrical cabinet) and control circuits located on the side of the unit
(2).
Remove the door and unscrew the clamp (3). Completely disconnect the steam hose and remove it from the unit.
Untighten clamp (s) and disconnect the water hose from the filling cup (4).
Disconnect the pressure level hose and uncap the water level tank.
Unscrew the union junction to disconnect the drain hose.
Swing the tank down to intermediate position.
Unlock the 4 locks of the tank.
Lift the tank lid (7), mind the positioning marks and lay it upside down on the top of the humidifier.
Release the tank holding steel cord and swing down the tank: the limescale deposit falls into the flexible bag (5).
Swing the tank (6) back to its intermediate position.
Grease the tank gasket with silicon grease.
Take off the collecting container and swing back the tank in intermediate position. Fasten the tank holding steel chain.
Put back the tank lid onto the tank body taking care to align the positioning mark. Pay particular attention that no power wires
be jammed between the tank and the bottom and gathered them in the insert bundle clip
Wipe the high water level floats or electrodes and put the water level detector back. Do not forget to reconnect the pressure
level hose. Swing the tank up.
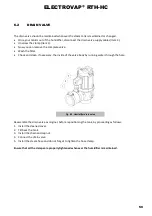
Reassemble the drain valve in its original position and retighten the collar clamps.
Tighten up the black knob, reconnect the drain and steam hoses and hang back the doors.
Fig. 6-1.
Humidifier Stainless steel tank
Summary of Contents for ElectroVap RTH-HC Series
Page 1: ...ElectroVap HUMIDIFIERS RTH HC Series Instruction Operation Manual ...
Page 30: ...ELECTROVAP RTH HC 30 3 8 6 Wiring diagrams Up V 1x200 240V 50 60Hz ...
Page 31: ...ELECTROVAP RTH HC 31 RTH HC 8 18 Up V 3x200 240V 50 60Hz ...
Page 32: ...ELECTROVAP RTH HC 32 RTH HC 5 30 Up V 3x380 690V 50 60Hz ...
Page 33: ...ELECTROVAP RTH HC 33 RTH HC 40 50 Up V 3x380 690V 50 60Hz ...
Page 34: ...ELECTROVAP RTH HC 34 RTH HC 60 70 Up V 3x380 690V 50 60Hz ...
Page 35: ...ELECTROVAP RTH HC 35 RTH HC 80 100 Up V 3x380 690V 50 60Hz ...
Page 36: ...ELECTROVAP RTH HC 36 RTH HC 8 18 Up V 3x200 240V 50 60Hz ...
Page 37: ...ELECTROVAP RTH HC 37 RTH HC 44 Up V 3x200 240V 50 60Hz ...
Page 39: ...ELECTROVAP RTH HC 39 Case 2 Up V 3x200 240V 50 60Hz Only for Case 3 ...
Page 40: ...ELECTROVAP RTH HC 40 Case 3 Up V 3x380 690V 50 60Hz ...
Page 42: ...ELECTROVAP RTH HC 42 3 9 OPTION TRANSFORMER CONNECTION ...

