10. Service Mode
Field Service Ver. 1.0 Apr. 2005
92
ineo 161
ineo 210
Adjustment / Setting
C. CCD MAIN ZOOM
Function
Test Copy
Adjust
Purpose/Use
To adjust variations in machining and installation accuracy of different IR parts by vary-
ing the scanning zoom ratio in the main scanning direction.
✽
When the CCD Unit has been replaced (After the CCD Unit has been adjusted for
correct position)
Setting/
Procedure
Press the Start key to start a test copy
cycle.
• The default setting is “100.”
Setting range: 95 to 105 (1 step: 0.4%)
Adjustment
Procedure
• Adjust so that the amount of error falls within ±1.0% of the length to be measured.
• Adjust so that the following specifications are met when the length of the scale is 200
mm.
Zoom Ratio/Specifications
Zoom Ratio: Full size (× 1.00)
Specifications: 200 ± 2.0 mm
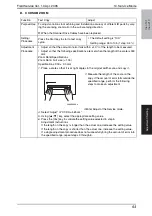
1. Place a scale on the Original Glass in parallel with the Original Width Scale and
make a copy.
2. Measure the length of the scale on the
copy. If the amount of error falls outside the
specified range, perform the following
steps to make an adjustment.
3. Enter Adjust of the Service mode.
4. Select “Adjust” of “CCD Main Zoom.”
5. Using [
▲
/
▼
] key, select the appropriate setting value.
6. Press the [Yes] key to validate the setting value selected in step 5.
Adjustment Instructions
If the length on the copy is longer than the actual one, decrease the setting value.
If the length on the copy is shorter than the actual one, increase the setting value.
If a single adjustment procedure does not successfully bring the amount of error into
the specified range, repeat steps 3 through 6.
4030D528AA


