background image

Regulatory information

4

4-4

ineo 25e

4.1

4.1.5

Ozone release

CAUTION

-

Locate the machine in a well ventilated room.

-

A negligible amount of ozone is generated during normal operation of this machine. An unpleasant odor 
may, however, be created in poorly ventilated rooms during extensive machine operations.

-

For a comfortable, healthy, and safe operating environment, it is recommended that the room be well 
ventilated.

4.1.6

Environmental Information

ENERGY STAR

®

As an ENERGY STAR

®

 Partner, this machine meets the ENERGY STAR

®

 Guidelines for energy efficiency.

What is an ENERGY STAR

®

 Product?

An ENERGY STAR

®

 product has a special feature that allows it to automatically switch to a "low-power 

mode" after a period of inactivity. An ENERGY STAR

®

 product uses energy more efficiently, saves you money 

on utility bills and helps protect the environment.

Environmental benefits of power management

Electricity consumption of a device depends on both its properties and the way of using the device.

Suitable power management setting offers you resource saving usage way. By setting the time to go into 
power saving modes (e.g. sleep mode) shorter (or optimal), electricity consumption can be reduced.

Recycled Paper

This product can print on recycled paper and environmental stewardship initiatives certified paper which 
complies with European standard EN 12281 as well as virgin paper. In addition it can print on lighter paper, 
64g/m

2

 for example. Using such light paper contributes to resources-saving.

Duplex printing

With a product which has a duplex unit, you can print on both sides of paper automatically.

Using this function leads to reducing consumption of natural resources and your cost.

Attached printer driver provides this duplex printing function as initial setting in your computer (The setting 
can be changed after installation manually).

Ergonomische Grundlagen für die GS-Prüfung von ITGeräten in Verbindung 
mit Bildschirmgeräten

Das Gerät ist nicht für die Benutzung im unmittelbaren Gesichtsfeld am Bildschirmarbeitsplatz vorgesehen. 
Um störende Reflexionen am Bildschirmarbeitsplatz zu vermeiden, darf dieses Produkt nicht im unmittelbar-
en Gesichtsfeld platziert werden.

Summary of Contents for ineo 25e

Page 1: ...Dynamic balance www develop eu ineo 25e Quick Guide ...

Page 2: ......

Page 3: ...ion 2 3 2 2 Scan 2 5 2 2 1 Basic operation 2 5 2 2 2 Advanced scan settings 2 8 2 3 Fax 2 10 2 3 1 Basic transmission 2 10 2 3 2 Canceling the transmission 2 13 2 4 PC Fax 2 14 2 5 Print 2 15 2 5 1 Basic operation 2 15 2 5 2 Canceling a print job 2 16 2 5 3 Printing from a USB memory device 2 16 2 6 Using Message Board 2 17 2 6 1 Accessing Message Board 2 17 2 6 2 Registering e mail and fax destin...

Page 4: ...ication 4 3 4 1 4 Acoustic noise 4 3 4 1 5 Ozone release 4 4 4 1 6 Environmental Information 4 4 4 2 Safety information 4 5 4 2 1 Safety information for proper use 4 5 4 3 How to read PDF manuals 4 9 4 4 Consumables and options 4 10 4 5 Energy and noise data according to RAL UZ 122 4 11 4 5 1 Power Consumption and Switch Time 4 11 4 5 2 Noise Emissions 4 12 5 Index ...

Page 5: ...1 Preparation ...

Page 6: ......

Page 7: ...ine in the Administrator s Guide 1 2 How to read this manual Key descriptions In this manual the operating keys are described as follows Keys on the control panel For example the start key Start Buttons on the display and computer For example the Setting button Setting Descriptions for paper and documents v symbol This shows that paper should be set with the shorter side positioned at the top symb...

Page 8: ...asic functions and setup Review this guide when using the machine for the first time or when performing a new function Administrator This guide covers the setup of soft keys default settings machine usage manage ment network settings and performing basic machine maintenance such as replac ing the consumables and routine cleaning of the unit Copier This guide covers the copy capabilities of the mac...

Page 9: ...er cassette 2 4 Optional 2 Paper cassette 1 3 Front cover 4 Control panel 5 ADF cover 6 Document guide 7 Document tray 8 Document output tray 9 USB connector 10 Side cover 1 11 2 bin tray Optional 12 Bypass tray 13 Side cover 2 4 1 2 3 5 6 4 7 9 10 12 8 13 11 ...

Page 10: ... names 1 1 6 ineo 25e 1 5 No Name 1 Power jack 2 Primary power switch 3 Telephone line jack 4 External phone jack 5 USB port 6 Network connector 7 Platen cover 8 Document glass 9 ADF glass 6 5 9 8 7 1 2 3 4 ...

Page 11: ...cate as a registered device user 6 Personal Mode Press this key to switch between the personal screen and shared screen 7 Information lamp Lamp illuminates when error occurs 8 Numeric keys Use these keys to enter numbers and characters 9 Reset Press this key to reset the settings back to the default settings and re turn to the ready screen 10 Job Confirm Fax Cancel Press this key to confirm reserv...

Page 12: ...te For details on the acceptable paper sizes see chapter 6 in the Adminis trator s Guide d Do not stack paper above the paper limit mark inside the cassette Follow the instructions on the next page in order to set the paper size When setting paper longer than A4 remove the guide stopper from the back of the end guide and then re place and secure it on the groove in front of the end guide the guide...

Page 13: ...ize paper that was previously used in the cassette 1 Press Setting on My MFP Menu screen If My MFP Menu screen is not displayed press Mode repeatedly until My MFP Menu screen is displayed 2 Press Paper Settings 3 Select the cassette Cassette 2 to Cassette 4 are displayed only when the optional cassettes have been attached to the machine 4 Select the paper size and press Enter ...

Page 14: ...tray Loading paper into the bypass tray You can load up to 100 sheets of paper For details on the acceptable paper types see chapter 6 in the Ad ministrator s Guide d Set the paper face down Follow the instructions on the next page in order to set the paper size 1 3 2 4 5 ...

Page 15: ...s operation is not required if you are loading the same size paper that was previously used in the bypass tray 1 Press Setting on My MFP Menu screen If My MFP Menu screen is not displayed press Mode repeatedly until My MFP Menu screen is displayed 2 Press Paper Settings 3 Press Bypass 4 Select the paper size and press Enter ...

Page 16: ...TION Before turning the primary power switch off please make sure the secondary power switch has been turned off Turning the machine off When you do not use the machine for a long time be sure to turn the primary power off 1 Press the power button When you are turning the power off Shutting down will be displayed and then the display turns off 2 Switch the primary power switch to off Turning the m...

Page 17: ... Copy Scan Fax Print Select these menu to enter to copy scan fax or online mode print ready screen Scan to PC Folder Select this to scan a document and save the data on a PC folder For de tails see page 2 5 Scan to e mail Select this to scan a document and send it via e mail For details page 2 5 Setting Select this to enter machine setting menu Machine info Select this to display the machine infor...

Page 18: ...About the display screens 1 1 14 ineo 25e 1 9 ...

Page 19: ...2 Operation ...

Page 20: ......

Page 21: ...guides to the document width On the document glass 1 Open the platen cover 2 Set the document face down aligned with the back left corner 3 Close the platen cover d When you set a document on the document glass be sure that there are no documents in the automatic doc ument feeder 2 Switch the machine to copy mode Press Copy from My MFP menu screen Or press Mode repeatedly until copy ready screen i...

Page 22: ...esired number of copies using the numeric keys Press Advanced to set advanced settings 4 Press Start Press Stop to stop the copy job Advanced settings Here are a few examples of useful copy settings See the Copier Guide for more information Combined copy Card copy Sorting 4 3 2 1 3 4 1 2 3 4 1 2 ...

Page 23: ... directly to a computer using a USB cable The machine has been assigned an e mail address to use the scan to e mail function Shared folders have been registered to the machine to use the scan to folder function FTP server information has been registered to the machine to use the scan to FTP function The TWAIN driver has been installed on the computer to scan using the TWAIN driver Document FTP ser...

Page 24: ...k left corner 2 Close the platen cover d When you set a document on the document glass be sure that there are no documents in the automatic doc ument feeder 2 Switch the machine to scan mode Press Scan from My MFP menu screen Or press Mode repeatedly until scan ready screen is displayed d To use the personal address book or shortcuts log in to the machine See chapter 2 in the Administrator s Guide...

Page 25: ...der Scan to FTP 1 Press PC USB 2 Press Folder or FTP 3 Specify the destination Select your desired destination from the display or Press Browse and browse to your desired folder Select the folder and press Enter Enter the user ID and password to en ter the folder if required or Press Host and enter the details on your desired FTP server Press Enter Scan to USB 1 Press PC USB 2 Press USB 3 Connect ...

Page 26: ...default file name for scanned images is a 14 digit number consisting of the current year month day hour minute and second ex 20120115143045 pdf You can customize the file name when scanning 1 Switch the machine to scan mode 2 Press File Name 3 Enter the file name and press Enter Press Delete to clear the entered characters Press Upper to switch the entry mode from lower case to upper case and Symb...

Page 27: ...lso convert images into TIFF format monochrome JPEG color or PDF with password monochrome and color 1 Switch the machine to scan mode 2 Press Advanced 3 Press FileFormat 4 Select the file format and press Enter When you have selected PDF w Password press Setting and set the details for encryption When you have selected PDF w Password you can set password to open the file and to edit the file after...

Page 28: ...in the Scan and Fax Guide 1 Set the document In the automatic document feeder 1 Set the document face up 2 Align the document guides to the document width On the document glass 1 Open the platen cover 2 Set the document face down aligned with the back left corner 3 Close the platen cover d When you set a document on the document glass be sure that there are no documents in the automatic doc ument ...

Page 29: ...s the desired destination To use the address book the fax number should be regis tered in advance For details see page 2 19 4 Press Start This step is not necessary when you have selected the destination from the address book If the document was set on the document glass Set next document will be displayed once the scan has been completed Press Tx Start to complete the operation or set the next do...

Page 30: ...ed ON automatically when you enter a destination How to confirm destinations When you have selected multiple destinations you can confirm the destinations using the following opera tion 1 When all destinations have been selected press Location 2 Confirm the destinations 3 To start the transmission press Start To delete a destination select the destination and press De lete How to receive a fax As ...

Page 31: ...ing transmitted 1 Press Job Confirm Fax Cancel 2 Press Delete When you have scheduled a broadcast you can remove a destination from the transmission by pressing Detail Select the destination to delete and press Delete d For details on canceling a delayed transmission see chapter 4 in the Scan and Fax Guide ...

Page 32: ...river see chapter 2 in the Printer Guide 1 Create or edit the document on your computer 2 Select Print from menu According to the application software you are using the command name may be something other than print 3 Select the ineo 25e fax driver from the print menu The driver name is BW MF25 1 Fax Click Preferences to change the settings as needed To use your personal address book register your...

Page 33: ...computer For details on installing the drivers see chapter 2 in the Printer Guide 1 Select Print from the menu According to the application software you are using the command name may be something other than print 2 Select the bizbub 25e printer driver Click Preferences to change the settings as needed 3 Change preferences as needed 4 Click Print Advanced settings Here are a few examples of the ad...

Page 34: ... on the computer 2 Right click on the print job you wish to cancel and click Cancel Canceling printing on the machine 1 Press Print from My MFP menu screen Or press Mode repeatedly until On Line Mode screen is displayed 2 Press On Line 3 Select the file to cancel and press Delete 4 Press Yes 2 5 3 Printing from a USB memory device You can print documents you have scanned with your machine 1 Connec...

Page 35: ...ry device d For details on printable documents see chapter 5 in the Printer Guide 2 6 Using Message Board 2 6 1 Accessing Message Board When the machine is connected to the network you can operate it using the web browser on your computer See the Message Board Guide for more information Prerequisite To use Message Board the following requirements must be met The machine is connected to a network T...

Page 36: ...ed this step is not necessary To access Message Board as a guest click Guest User Login To log in using SSL click SSL https and then enter user ID and password When the user list is displayed on the right you can enter the user ID by selecting your user name on the list Now you can access the machine using Message Board ...

Page 37: ...age 2 17 d According to the user policy you cannot edit the address book For details on the user policy see chapter 5 in the Message Board Guide 2 Click Address Book 3 Click Add To add a destination to your personal address book select Personal from the drop down box located to the left of the Add button Personal address books may not be available based on the administrator settings or authenti ca...

Page 38: ...e contact information click this button For details see chapter 3 in the Message Board Guide Number The lowest available address book number will be displayed You can change it to any available number between 1 9999 Name Enter the destination name within 30 characters Fax Number Enter the fax number Pause tone and other dialing options should be entered with the fax number See the table below for ...

Page 39: ...Board Guide for more information 1 Click User Information For details on how to access Message Board see page 2 17 d According to the user policy you cannot edit the shortcut For details on the user policy see chapter 5 in the Message Board Guide 2 Click Shortcut 3 Click Folder Shortcut or FTP Shortcut ...

Page 40: ...u click Browse a screen will open allow ing you to browse to the location User Name Enter the user name for the folder if needed Password Enter the password for the folder if needed Auto Login Check ON to enable log in using the saved user name and password Item Description Shortcut Number The lowest available number will be displayed You can change it to any avail able number between 1 20 Shortcu...

Page 41: ...artridge gently shake it to distribute the toner evenly inside the cartridge When you have changed the toner cartridge clean the charge nee dle by pulling the charging needle cleaning rod Making sure it fully extends and then return the rod to its original position Perform this several times When you have replaced the toner cartridge the following screen will be displayed Press Yes to use the new ...

Page 42: ...ing the cosumables 2 2 24 ineo 25e 2 7 2 7 2 Replacing the drum cartridge d When you have replaced the drum cartridge the following screen will be displayed Press Yes to use the new drum cartridge 1 3 2 4 5 6 ...

Page 43: ...3 Troubleshooting ...

Page 44: ......

Page 45: ...ineo 25e 3 3 3 1 Clearing document jams 3 3 Troubleshooting 3 1 Clearing document jams Clearing document jams ...

Page 46: ...o 25e 3 1 Document jam recovery When the following message appears after you have cleared the jam you can restart scanning from the con tinuous page of the document Set the document from the page listed on the display then press Start ...

Page 47: ...sh with clean water and seek medical assistance d If a paper jam occurs during printing the toner will not be fused to the paper Be careful not to stain your hands or clothes with the toner If your hands or clothes get stained wash them immediately with cold water The stains may become permanent if washed using warm water Carefully remove the jammed paper so as not to leave fragments of paper insi...

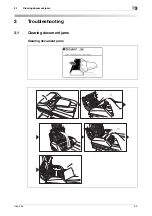
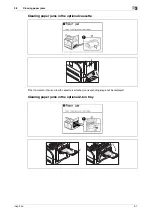
Page 48: ...Clearing paper jams 3 3 6 ineo 25e 3 2 ...

Page 49: ... 3 2 Clearing paper jams 3 Clearing paper jams in the optional cassette If the third and or third and fourth cassette is attached corresponding image will be displayed Clearing paper jams in the optional 2 bin tray ...

Page 50: ...rrors the information lamp will not turn off after you press Stop In this case clear the error by following the instructions on the display 3 Follow the message and clear the error d Errors you can clear by pressing Stop include communication errors and memory over flows When a paper cassette is empty a paper or document has jammed the toner is empty or a cover has been left open you cannot clear ...

Page 51: ... loaded prop erly Load the paper properly Set the paper guides so that they fit the paper Set the paper size For details see Setup the paper size page 1 9 and page 1 11 Is the cassette loaded correctly Make sure that the cassette is pushed all way in Does the paper meet the specification of the ma chine Use paper that meets the specification for the ma chine See chapter 6 in the Administrator s Gu...

Page 52: ...duct name ineo 25e Serial number located on the label affixed to the left side of the machine Details on the problem Steps you have taken to try to resolve the problem and the results of those efforts Troubles References Image quality is poor Chapter 5 in the Administrator s Guide A message is displayed on the display Cannot connect to the network A communication error has occurred Chapter 9 in th...

Page 53: ...4 Appendix ...

Page 54: ......

Page 55: ...with the COMMISSION REGULATION EC No 1275 2008 implementing the ErP Direc tive 2009 125 EC This product complies with the RoHS directive 2011 65 EU 4 1 2 WEEE directive For European Union only WEEE Waste of Electrical and Electronic Equipment law This Equipment is marked with the European Directive 2002 96 EC recycling symbol It in dicates that at the end of the equipments life you must dispose of...

Page 56: ... Suitable power management setting offers you resource saving usage way By setting the time to go into power saving modes e g sleep mode shorter or optimal electricity consumption can be reduced Recycled Paper This product can print on recycled paper and environmental stewardship initiatives certified paper which complies with European standard EN 12281 as well as virgin paper In addition it can p...

Page 57: ...Make sure you observe all of the precautions listed in this manual Ver06 Please note that some parts of the contents of this section may not correspond with the purchased product Warning and precaution symbols Meaning of symbols Symbol Meaning WARNING Ignoring this warning could cause serious injury or even death CAUTION Ignoring this caution could cause injury or damage to property Symbol Meaning...

Page 58: ...ese conditions be found immediately turn OFF the power switch unplug the power cord from the power outlet and then call your authorized service representative Do not use an extension cord in principle Use of an extension cord could cause a fire or electrical shock Contact your authorized service representative if an extension cord is re quired Do not place a flower vase or other container that con...

Page 59: ...se personal injury The inside of this product has areas subject to high temperature which may cause burns When checking the inside of the unit for malfunctions such as a paper misfeed do not touch the locations around the fusing unit etc which are indicated by a CAUTION HOT caution label Do not place any objects around the power plug as the power plug may be difficult to pull out when an emergency...

Page 60: ...ce Do not use this product in an environment with a temperature outside the range specified in the User manual as a breakdown or malfunction could result Do not attempt to feed stapled paper carbon paper or aluminum foil through this product as a malfunction or fire could result Do not touch or scratch the surface of the toner cartridge developing roller and the drum as poor image quality could re...

Page 61: ...ion screen is not displayed double click the InstMenu exe file on the disk If you are using Windows 8 Windows 7 Windows Vista Windows Server 2012 Windows Server 2008 R2 or Windows Server 2008 enter an administrator password or provide confirmation when the User Account Control screen is displayed 2 Click Manual Select the language if needed 3 Click on the manual you would like to view d In order t...

Page 62: ... consumables please contact your local technical representative Items Description Toner cartridge Please order a new toner cartridge when the The toner is almost empty message is displayed Drum cartridge Please order a new drum cartridge when the Drum life nearing end message is displayed Stamp If the stamp ink becomes faint replace the stamp ...

Page 63: ...Power consumption of 0 Watt is only achieved by disconnecting the machine from the power line Items Description 500 sheet paper cassette You can attach an additional paper cassette to enable increased paper storage or to hold a variety of paper sizes types 2 bin tray You can sort the output to a second tray Mechanical counter This counts the number of printed pages PostScript Enabler This enables ...

Page 64: ...ce equipment with LWAd 63 0 dB A is not suitable for use in rooms where people do primarily intel lectual work Such equipment should be placed in separate rooms because of the noise emission 1 Declared sound power level according to RAL UZ 122 Mode Noise LWAd according BAM 1 Working 66 9 dB A ...

Page 65: ...5 Index ...

Page 66: ......

Page 67: ...als 4 9 Menu screen 1 13 Message Board 2 17 N Network connector 1 5 O Options 4 11 P Paper size setting Bypass tray 1 11 Cassette 1 9 PC Fax 2 14 Print Basic operation 2 15 Cancel a print job 2 16 R Ready screens 1 13 Registering destinations e mail and fax destination 2 19 Folder or FTP shortcut 2 21 Regulatory information 4 3 Reset key 1 7 S Scan Basic operation 2 5 Color scan 2 9 Entering a fil...

Page 68: ...5 4 ineo 25e 5 ...

Page 69: ...c transmission 2 10 2 3 2 Canceling the transmission 2 13 2 4 PC Fax 2 14 2 5 Print 2 15 2 5 1 Basic operation 2 15 2 5 2 Canceling a print job 2 16 2 5 3 Printing from a USB memory device 2 16 2 6 Using Message Board 2 17 2 6 1 Accessing Message Board 2 17 2 6 2 Registering e mail and fax destinations 2 19 2 6 3 Registering a folder or FTP destination 2 21 2 7 Replacing the cosumables 2 23 2 7 1 ...

Page 70: ...4 4 2 Safety information 4 5 4 2 1 Safety information for proper use 4 5 4 3 How to read PDF manuals 4 9 4 4 Consumables and options 4 10 4 5 Energy and noise data according to RAL UZ 122 4 11 4 5 1 Power Consumption and Switch Time 4 11 4 5 2 Noise Emissions 4 12 5 Index ...

Page 71: ... 9 Menu screen 1 13 Message Board 2 17 N Network connector 1 5 O Options 4 11 P Paper size setting Bypass tray 1 11 Cassette 1 9 PC Fax 2 14 Print Basic operation 2 15 Cancel a print job 2 16 R Ready screens 1 13 Registering destinations e mail and fax destination 2 19 Folder or FTP shortcut 2 21 Regulatory information 4 3 Reset key 1 7 S Scan Basic operation 2 5 Color scan 2 9 Entering a file nam...

Page 72: ...2 2 ineo 25e ...

Reviews: