background image

Contents

x-11

6

Proof/Print and Memory Direct functions .................................................... 6-1
Proof/Print ...................................................................................................... 6-2

Printing a job saved on the hard disk .......................................................... 6-2
Deleting a job saved on the hard disk ......................................................... 6-2

Memory Direct ................................................................................................ 6-3

Printing from a connected USB memory device ......................................... 6-3
Selecting the type of files to be displayed ................................................... 6-4

7

Performing Copy mode operations .............................................................. 7-1
Basic copy operation  .................................................................................... 7-2
[Original Size] ................................................................................................. 7-4

Documents of mixed page sizes ................................................................. 7-4

[Paper] ............................................................................................................ 7-5
[Zoom] ............................................................................................................. 7-6
[Duplex/Combine] .......................................................................................... 7-7
[Density] ......................................................................................................... 7-8
[Original Type]  ............................................................................................... 7-9
[Color] ............................................................................................................. 7-9
[Finishing] .................................................................................................... 7-10
[Proof Copy]  ................................................................................................. 7-10

Proof Copy operation ................................................................................ 7-10

[Separate Scan] ............................................................................................ 7-11

Scanning the document in separate batches ............................................ 7-11

[ID Copy]  ....................................................................................................... 7-12
[Paper Margin] .............................................................................................. 7-13
[Scan Quality] ............................................................................................... 7-14

8

Additional copy operations  .......................................................................... 8-1
Interrupting a copy job .................................................................................. 8-2
Copy programs  .............................................................................................. 8-3

Storing a copy program............................................................................... 8-3
Deleting a copy program ............................................................................. 8-3
Copying using stored settings (copy programs).......................................... 8-4

9

Scanning From a Computer Application  ..................................................... 9-1
Basic Scanning Operation  ............................................................................ 9-2
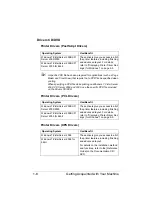
Windows TWAIN Driver Settings .................................................................. 9-3

Mode settings.............................................................................................. 9-3
When [Basic Mode] is selected ................................................................... 9-3
When [Advanced Mode] is selected............................................................ 9-4

Windows WIA Driver Settings  ...................................................................... 9-7
Macintosh TWAIN Driver Settings ................................................................ 9-8

Mode settings.............................................................................................. 9-8
When [Basic Mode] is selected ................................................................... 9-8
When [Advanced Mode] is selected............................................................ 9-9

Summary of Contents for ineo+35

Page 1: ...Dynamic balance www develop eu ineo 35 User s Guide Printer Copier Scanner ...

Page 2: ... ...

Page 3: ...opyright Notice This document is copyrighted with all rights reserved This document may not be copied in whole or part nor transferred to any other media or language without writ ten permission of publisher ...

Page 4: ...under this Agreement to an assignee of all of Licensee s right and interest to such Software and Documentation Assignee provided you transfer to Assignee all copies of such Software and Documentation Assignee agrees to be bound by all of the terms and conditions of this Agreement 5 You agree not to modify adapt or translate the Software and Documentation 6 You agree that you will not attempt to al...

Page 5: ...tware documentation as such terms are used in 48 C F R 12 212 Consis tent with 48 C F R 12 212 and 48 C F R 227 7202 1 through 227 7202 4 all U S Govern ment End Users acquire the Software with only those rights set forth herein 12 You agree that you will not export the Software in any form in violation of any applicable laws and regulations regarding export control of any countries ...

Page 6: ...z Internal revenue stamps canceled or uncanceled z Passports z Immigration papers z Motor vehicle licenses and titles z House and property titles and deeds General z Identification cards badges or insignias z Copyrighted works without permission of the copyright owner In addition it is prohibited under any circumstances to copy domestic or foreign cur rencies or works of art without permission of ...

Page 7: ...posal instructions In the case of a new device being purchased the used one can also be given to our dealer for appropriate disposal Recycling of this product will help to conserve natural resources and prevent potential negative consequences for the environment and human health caused by inappropriate waste handling This product complies with RoHS 2002 95 EC directive ...

Page 8: ...x 6 ...

Page 9: ...g Acquainted with Your Machine 1 2 Space Requirements 1 2 Part Names 1 4 Front View 1 4 Rear View 1 6 Front View with Options 1 6 Adjusting the angle of the control panel 1 7 Drivers CD DVD 1 8 Printer Drivers PostScript Drivers 1 8 Printer Drivers PCL Drivers 1 8 Printer Drivers XPS Drivers 1 8 Printer Drivers PPD Files 1 9 Scanner Drivers 1 9 PC Fax Drivers 1 9 ...

Page 10: ...that appear in the screens 2 13 User authentication and account track 2 15 With user authentication 2 15 Device authentication 2 15 External server authentication 2 15 With account track 2 16 3 Utility Settings 3 1 Accessibility 3 2 Meter Count 3 7 Address Registration 3 8 User Settings 3 9 Machine Settings 3 12 Copy Settings 3 14 Scan Settings 3 15 Print Settings 3 16 Fax Settings 3 19 Admin Sett...

Page 11: ... Letterhead 4 8 Postcard 4 8 Glossy Media 4 9 Single Side Only 4 10 Special Paper 4 11 Printable Area 4 12 Envelopes 4 13 Page Margins 4 13 Loading Media 4 14 How do I load media 4 14 Tray 1 Manual Feed Tray 4 14 Loading Plain Paper Single Side Only and Special Paper 4 14 Other Media 4 16 Loading Envelopes 4 17 Loading Label Sheets Letterhead Postcards Thick Stock and Glossy Media 4 19 Tray 2 4 21...

Page 12: ...er for Windows 5 4 Windows 7 Vista Server 2008 XP Server 2003 2000 5 4 Displaying Printer Driver Settings for Windows 5 5 Windows 7 5 5 Windows Vista Server 2008 5 5 Windows XP Server 2003 5 5 Windows 2000 5 5 Using the Postscript PCL and XPS Printer Driver 5 6 Common Buttons 5 6 OK 5 6 Cancel 5 6 Apply 5 6 Help 5 6 Favorite Setting 5 6 Printer View 5 7 Paper View 5 7 Quality View 5 7 Printer Info...

Page 13: ... Proof Copy 7 10 Proof Copy operation 7 10 Separate Scan 7 11 Scanning the document in separate batches 7 11 ID Copy 7 12 Paper Margin 7 13 Scan Quality 7 14 8 Additional copy operations 8 1 Interrupting a copy job 8 2 Copy programs 8 3 Storing a copy program 8 3 Deleting a copy program 8 3 Copying using stored settings copy programs 8 4 9 Scanning From a Computer Application 9 1 Basic Scanning Op...

Page 14: ... Position 10 6 Color 10 7 Original Type 10 7 Specifying scan settings 10 8 Background Density 10 8 Resolution 10 8 File Settings File Type 10 9 File Settings Scan Setting 10 9 File Settings PDF Encrypt 10 10 Specifying communication settings 10 12 Binary Div 10 12 E mail Encryption 10 12 Send Use Signature 10 12 E mail 10 12 Specifying destinations 10 14 Selecting from registered destinations 10 1...

Page 15: ...n type or name 10 27 Directly typing in the address 10 28 With FTP 10 28 With PC SMB 10 28 With WebDAV 10 29 With USB Memory 10 29 With HDD 10 30 With Web Service Settings 10 30 Selecting from the log 10 31 Selecting a program destination 10 31 Registering destinations 10 33 Destination registration 10 33 Address Book 10 33 Group Address 10 33 Program Address 10 33 Registering an address book dest...

Page 16: ...th 13 5 Clearing Media Misfeeds 13 6 Media misfeed indications 13 6 Clearing a Media Misfeed in Tray 2 13 7 Clearing a Media Misfeed in Tray 3 4 13 11 Clearing a Media Misfeed from the ADF 13 13 Clearing a Media Misfeed from the Duplex 13 15 Clearing a Media Misfeed from the Fuser Unit 13 16 Clearing a Media Misfeed from Tray 1 Manual Feed Tray and Transfer Roller 13 20 Solving Problems with Media...

Page 17: ...A 1 Technical specifications A 2 Consumable Life Expectancy Chart A 6 User Replaceable A 6 Service Replaceable A 7 Text input A 8 Entering text A 8 Our Concern for Environmental Protection A 9 What is an ENERGY STAR product A 9 ...

Page 18: ...Contents x 16 ...

Page 19: ...1Introduction ...

Page 20: ...ements To ensure easy operation consumable replacement and maintenance adhere to the recommended space requirements detailed below Side View Front View 1068 mm 42 0 100 mm 3 9 150 mm 5 9 530 mm 20 9 288 mm 11 3 937 mm 36 9 70 mm 2 8 508 mm 20 0 776 mm 30 6 359 mm 14 1 226 mm 8 9 550 mm 21 7 ...

Page 21: ...quainted with Your Machine 1 3 The option appears shaded in the above illustrations Side View with Options 954 mm 37 6 70 mm 2 8 508 mm 20 0 1009 mm 39 7 359 mm 14 1 226 mm 8 9 550 mm 21 7 376 mm 14 8 233 mm 9 2 ...

Page 22: ...ew 1 Control panel 2 Automatic Document Feeder ADF 2 a ADF feed cover 2 b Document guide 2 c Document feed tray 2 d Document output tray 2 e Document stopper Lower the document stopper when scanning Legal size paper with the ADF 3 USB HOST port 4 Tray 1 Manual feed tray 5 Tray 2 6 Output tray 7 Scanner lock lever 8 Original glass 9 Original cover pad 10 Scanner unit 10 9 6 7 8 4 3 2 e 2 2 c 2 d 5 ...

Page 23: ...uainted with Your Machine 1 5 11 Fuser unit 12 Right door 13 Transfer roller 14 Transfer belt unit 15 Imaging unit s 16 Front cover 17 Waste toner bottle 18 Toner cartridge s 11 12 13 14 15 16 17 18 18 17 13 14 15 ...

Page 24: ...itch 2 Rear cover 3 Power connection 4 LINE telephone line jack 5 TEL telephone jack 6 10Base T 100Base TX 1000Base T Ethernet Inter face port 7 USB port Front View with Options 1 Lower feeder unit PF P08 Tray 3 2 Lower feeder unit PF P08 Tray 4 1 2 3 4 5 6 7 2 1 ...

Page 25: ...sted to any of three angles Adjust the control panel to the angle that allows for easy operation 1 Grab the sides of the control panel and then tilt it up Before moving the control panel to a lower angle tilt it up first and then slowly tilt it down When tilting the control panel do not press on the touch panel ...

Page 26: ...luding finishing and advanced layout For details refer to Displaying Printer Driver Set tings for Windows on page 5 5 Windows 7 Vista Server 2008 XP Server 2003 for 64bit Operating System Use Benefit Windows 7 Vista Server 2008 XP Server 2003 2000 These drivers give you access to all of the printer features including finishing and advanced layout For details refer to Displaying Printer Driver Set ...

Page 27: ...erver 2008 XP Server 2003 2000 These drivers enable you to set scan ning functions such as the color set ting and size adjustments For details refer to Windows WIA Driver Settings on page 9 7 TWAIN Driver for Macintosh OS X 10 3 9 10 4 10 5 10 6 WIA Driver for Windows 7 Vista Server 2008 XP This driver enables you to set scan ning functions such as the color set ting and size adjustments For detai...

Page 28: ...for all functions of Download Manager Device Manager Printer management functions such as status monitoring and network set tings can be accessed For details refer to the Device Man ager User s Guide on the Applications CD DVD Data Administrator Data Administrator is an administra tion tool with which authentication data and addresses registered with the control panel of supported devices multifun...

Page 29: ...ting Acquainted with Your Machine 1 11 Enterprise Suite Plug In This plug in provides the additional functions of Enterprise Suite which enables centralized management of devices and permission management ...

Page 30: ...machine and installing the drivers Printer Copier Scanner User s Guide this manual This manual provides details on gen eral daily operations such as using the drivers and control panel and replacing consumables Facsimile User s Guide This manual provides details on gen eral fax operations such as sending and receiving faxes and using the control panel Reference Guide This manual provides details o...

Page 31: ...Ultimate Business Enterprise x64 Edition Windows XP Home Edi tion Professional Service Pack 2 or later Windows XP Professional x64 Edition Windows Server 2003 Windows Server 2003 x64 Edition Windows 2000 Service Pack 4 or later Mac OS X 10 2 8 10 3 9 10 4 10 5 10 6 We recommend installing the most recent patch Mac OS X Server 10 2 8 or later Red Hat Enterprise Linux 5 Desktop SUSE Linux Enterprise...

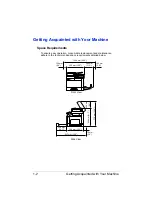
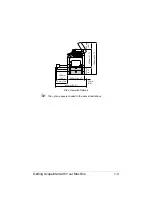
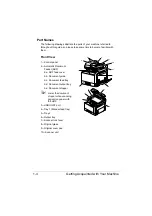
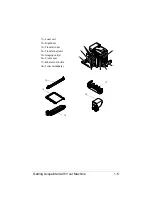
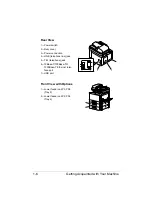
Page 32: ...Getting Acquainted with Your Machine 1 14 ...

Page 33: ...2Control panel and touch panel screens ...

Page 34: ...x mode the indicator on the Fax key lights up in green 4 E mail key indi cator Press to enter Scan to E mail mode While the machine is in Scan to E mail mode the indicator on the E mail key lights up in green 5 Folder key indi cator Press to enter Scan to Folder mode While the machine is in Scan to Folder mode the indicator on the Folder key lights up in green 6 Copy key indi cator Press to enter ...

Page 35: ...art black and white copying scanning or faxing Press to continue interrupted printing 13 Keypad Use to enter the number of copies a fax number an E mail address or a name Use to type in the various settings 14 C clear key Press to erase numbers or text Press to delete a job stopped during the scan opera tion 15 Error indicator Flashes in orange if an error occurred Lights up in orange when the ser...

Page 36: ...ings can be recalled 19 Access key If user authentication or account track settings have been applied press the Access key after entering the user name and password for user authentica tion or the account name and password for account track in order to log on to this machine While logged on press the Access key to log off No Name Function ...

Page 37: ...e For details on the Scan to E mail mode operations refer to Performing Scan to E mail mode opera tions on page 10 3 4 Scan to Folder Press to enter Scan to Folder mode For details on the Scan to Folder mode operations refer to Performing Scan to Folder mode opera tions on page 10 17 5 Copy Press to enter Copy mode For details on the Copy mode operations refer to Performing Copy mode operations on...

Page 38: ...a print job saved on hard disk 8 Status Press to view information on consumables and devices 9 Job Press to check a print transmission reception or stored data job 10 Toner supply indicators Shows the amount of toner remaining for yellow Y magenta M cyan C and black K No Indication Description ...

Page 39: ...on 1 Number of cop ies Indicates the specified number of copies 2 Copy mode operations Press to display the corresponding screen for speci fying various settings 3 Confirm Press to check the currently specified copy settings 4 Home Press to return to the home screen 1 3 4 2 ...

Page 40: ...ns 2 Direct Input Press to directly enter an address of the selected destination type 3 Log Press to specify a destination from the log 4 Confirm Press to check the currently specified Scan to Folder mode settings 5 Settings Press to specify settings such as the document scanning method 6 Home Press to return to the home screen 4 5 6 2 3 1 ...

Page 41: ...ription 1 Favorites Press to display frequently used destinations 2 Direct Input Press to directly enter a destination address 3 Log Press to specify a destination from the log 4 Confirm Press to check the currently specified Scan to E mail mode settings 5 Settings Press to specify settings such as the document scanning method 6 Home Press to return to the home screen 4 5 6 2 3 1 ...

Page 42: ...ave Press to display a screen listing the stored data jobs 5 Active Log Press to display screens listing the jobs currently being performed or the job log 6 Job list Displays the list of jobs The job number user name and job status can be checked 7 Delete Press to delete the selected job Next press Yes then OK When the job log is displayed Details appears To view job details press Details 8 Home P...

Page 43: ...lay a screen showing the status of con sumables The percentages remaining for the consumables may be different from the actual amounts and should be used only as reference 2 Device info Press to display a screen showing the information of devices 3 Home Press to return to the home screen 2 3 1 ...

Page 44: ... Direct on page 6 3 No Indication Description 1 Proof Print Press to print a print job saved on hard disk User Name Select a user 2 Memory Direct Press to print files on a USB memory device File List Select the file to be printed In addition print settings can be specified File Type Select the type of files to be displayed 3 Home Press to return to the home screen 2 1 3 ...

Page 45: ... scan or fax operation Press or to change the entered value Press to view the error message when an error occurs Press to display descriptions of the various functions A description of the current screen will be displayed Press to display the address book From this screen you can select single destinations and group destinations registered in the address book Appears while scanning and printing wh...

Page 46: ...mission Appears when there are fax documents received with memory reception or PC faxing Appears when data or documents are being sent from this unit Appears when this unit is receiving data or documents Appears when enhanced security settings have been applied Appears when a USB memory device is connected Icon Description ...

Page 47: ... User Name the name can be specified either by directly typing it in or selecting from a list 2 Press Login If authentication was successful the functions of this machine can be used External server authentication 1 Specify a name and password for User Name and User PW For User Name the name can be specified either by directly typing it in or selecting from a list 2 Specify a server for Server 3 P...

Page 48: ... authentication and account track 2 16 With account track 1 Specify an account and password for Account and Password 2 Press Login If authentication was successful the functions of this machine can be used ...

Page 49: ...3Utility Settings ...

Page 50: ...on of control panel keys Invalid Input Sound Input Confir mation Sound Key Repeat Interval Set All Sound Set tings Accessibility Time to Start Enable Enable Key Interval Volume Confirmation Sound Volume Enable Volume Enable Volume Completed Oper ation Sound Enable Successful CompleteSound Volume CompletedTX Sound Enable Volume Basic Sound ...

Page 51: ...Sound Level 2 Low Caution Sound Level 1 Completed Preparation Panel Adjust Error Message Display Time Enable Enable Volume Caution Sound Volume Enable Volume Enable Volume High Enable Volume Low Caution Sound Level 3 LCD Bright ness ...

Page 52: ...ith key operations Set all Settings Enable Yes No Volume Low Middle High To specify that sounds be produced press Enable and then press Yes To adjust the volume press Volume and then press Low Middle or High To specify that sounds not be produced press Enable and then press No Confirmation Sound Select if confirmation sounds are to be produced with key operations Input Confirmation Sound Settings ...

Page 53: ...re to be produced when cautions occur Low Caution Sound Level 1 Settings Enable Yes No Volume Low Middle High Select whether sounds are produced when a mes sage appears in the touch panel warning that it is almost time to replace consumables or a replaceable part Low Caution Sound Level 2 Settings Enable Yes No Volume Low Middle High Select whether sounds are produced when the user performs an inc...

Page 54: ...h and then press the Start key The check points can be pressed in any order To reset the adjustment press the C key and then press the four check points again To cancel the touch panel adjustment press the Stop key If the touch panel cannot be adjusted contact the service representative Error Message Display Time Settings 3 sec 5 sec Specify the length of time for displaying warning mes sages whic...

Page 55: ... Meter Count 3 Press or to display the desired information Item Description Total Displays the total page count for each opera tion mode Copy Displays the page count for copy operations Print Displays the page count for print operations Scan Displays the page count for scan operations Fax Displays the page count for fax operations Scan Total Print Copy Meter Count Fax ...

Page 56: ...ed and viewed For details on registering refer to Registering an address book destination on page 10 34 Details Press to view the details for the selected destina tion New Press to register a new destination Specify settings for No Name E mail Favor ites and Index Fax Fax destinations can be registered and viewed For details on registering refer to the Facsimile User s Guide Details Press to view ...

Page 57: ... to be changed by the user Machine Settings Paper Tray Settings Copy Settings User Settings Language Auto Tray Switch Tray 1 Measurement Unit Setting Enable ATS APS ACS Level Tray 2 Tray 3 Copy Initialize Setting Auto Zoom for Combine Auto Sort Group Selection Separate Scan Output Method Tray 4 ...

Page 58: ...Compression Level Paper Tray Settings Paper Size Black Compression Level Default Tray Custom Size Paper Settings Tray 1 Tray 2 Tray 3 Simplex Duplex Copies Collate Auto Tray Switching Paper Type Paper Size Custom Size Paper Type Paper Size Paper Type Tray 4 Paper Size Paper Type ...

Page 59: ... Tray 0 Logical Tray 3 Logical Tray 4 Tray Mapping Logical Tray 1 Logical Tray 2 Logical Tray 5 Logical Tray 6 Logical Tray 7 Logical Tray 8 Logical Tray 9 Report Print Stats Page Postscript Font List PCL Config Page HDD Direct Counter List Print ...

Page 60: ... Traditional Chinese Czech Hungarian Polish Slovak Russian Dutch Danish Nor wegian Swedish Finnish Greek Turkish Catalan Specify the language for the screens that appear in the touch panel Measurement Unit Setting Settings Inch mm Select the measurement units for the values that appear in the touch panel screens The default setting is Inch for 120V model and mm for other models Fax Settings Fax In...

Page 61: ...ings ON OFF Select whether or not Tray 1 can be selected with the automatic tray switching feature Tray 2 Settings ON OFF Select whether or not Tray 2 can be selected with the automatic tray switching feature Tray 3 Settings ON OFF Select whether or not Tray 3 can be selected with the automatic tray switching feature Tray 4 Settings ON OFF Select whether or not Tray 4 can be selected with the auto...

Page 62: ... that are selected when the machine is turned on or the Reset key is pressed Private The manufacturer s default settings are used as the default settings Current Setting The currently specified set tings are used as the default settings Separate Scan Output Method Settings Batch Print Page Print Select whether or not printing begins after all document pages have been scanned when the document is d...

Page 63: ...n High Compression The data size will become small but the image quality will be low Black Compression Level Settings MH MMR Select this machine s transmission quality when sending data with the TIFF file format selected MH The data size will become large MMR The data size will become small Scan Initialize Setting Settings Private Current Setting Select the default scan settings that are selected ...

Page 64: ...pecify settings for the paper trays Default Tray Settings Tray 1 Tray 2 Tray 3 Tray 4 Select the paper tray that is given priority Tray 3 and Tray 4 do not appear if the optional lower feeder units have not been installed Tray 1 Tray 4 Specify the default settings for Tray 1 through Tray 4 Tray 3 and Tray 4 do not appear if the optional lower feeder units have not been installed ...

Page 65: ...ect the size of paper loaded in the selected tray The default setting is Letter for 120V model and A4 for other models With Tray 2 Env C6 Env DL Env Monarch Env Chou 3 Env Chou 4 B5 ISO Env 10 J Postcard J Postcard D do not appear With Tray 3 and Tray 4 only Letter Legal Govt Legal Executive A4 and B5 JIS appear Custom Size Press Width and Length and then type in the paper size These settings can ...

Page 66: ... Long Edge is selected the pages will be printed on both sides of the paper for long edge binding If Short Edge is selected the pages will be printed on both sides of the paper for short edge binding Copies Settings 1 to 9999 Default 1 Specify the number of copies to be printed Collate Settings ON OFF Select whether or not to enable collated sort printing Auto Tray Switching Settings ON OFF If ON ...

Page 67: ...cal Tray 1 Physical Tray 2 Physical Tray 3 Select the tray that is used for printing when a print job is received from another manufac turer s printer driver Report Print Specify settings for printing the various reports Config Page Prints information and status of this machine Stats Page Prints the statistics page Font List Prints the font list Postscript Prints the PostScript font list PCL Print...

Page 68: ...Admin Settings screen the user must log on using the administrator password Machine Settings Date Time Settings Admin settings Date XX XX XX Sleep Time Setting Time Daylight Saving Time List Counter Report Input Tray Time Zone Enable Job Settings List Administrator Registration Administrator Registration Name Ext Number Machine Settings Device Name Address Address ...

Page 69: ...ress Book Fax E mail List Output Number of Addresses List Output FTP Start Number Number of Addresses List Output WebDAV Start Number Number of Addresses List Output Start Number Number of Addresses Start Number SMB Start Number Number of Addresses List Output ...

Page 70: ...rogram Address Fax E mail FTP Group Address Start Number Number of Addresses List Output Start Number Number of Addresses List Output Start Number Number of Addresses List Output Start Number Number of Addresses List Output ...

Page 71: ...ut Confirmation Display WebDAV SMB Address Book Start Number Number of Addresses List Output Start Number Number of Addresses List Output Start Number Number of Addresses List Output Group Address Start Number Number of Addresses List Output ...

Page 72: ... Admin Settings 3 24 Ethernet TCP IP Enable BOOTP ARP Ping HTTP FTP IP Address Subnet Mask Gateway DHCP Telnet Bonjour Dynamic DNS RAW Port SLP SMTP Enable Bidirectional IPP ...

Page 73: ...ttings 3 25 SNMP IPv6 WSD Print IPSec IP Address Filter Netware AppleTalk Network Speed Binary Division IEEE802 1X Access Permission Access Rejection Enable Auto Setting Link Local Global Address Gateway Address ...

Page 74: ... S MIME Settings Print Digital Signature Copy Settings Select Tray when APS OFF Paper Priority Job Timeout Memory Direct Print Print Settings Grayscale Page Startup Page Setting Auto Continue Paper Default Paper Paper Size Custom Size Paper Type Measurement Unit Setting Width Length ...

Page 75: ...ightness Halftone Edge Strength Economy Print PCL Settings Text Printing Image Printing Text Printing Graphics Printing Image Printing Text Printing Graphics Printing Image Printing Quality Settings Contrast RGB Source RGB Intent RGB Gray RGB Source RGB Intent RGB Gray ...

Page 76: ...Gray PS Settings Graphics Printing Text Printing Image Printing RGB Source RGB Intent RGB Gray RGB Source RGB Intent RGB Gray Simulation Simulation Profile Sim Intent CMYK Gray RGB Source RGB Intent RGB Gray Destination Profile Destination Profile Destination Profile ...

Page 77: ... Admin Settings 3 29 Gradation Adjust Tone Calibration Cyan Magenta Yellow Black AIDC Process CMYK Density Highlight Middle Shadow Highlight Middle Shadow Highlight Middle Shadow Highlight Middle Shadow ...

Page 78: ...LF Mapping Lines Per Page Wait Timeout Print PS Errors PS Protocol Auto Trapping Color Separation Postscript Black Overprint Font Source Font Number Pitch Size Symbol Set XPS Digital Signature XPS Error Page Fax Settings Sender Settings Sender Sender Fax No ...

Page 79: ...3 31 Header Footer Settings Header Position Fax TX Header Name Footer Position Comm Settings PB DP RX Mode Number of RX Call Rings Redial Redial Interval Line Monitor Line Monitor Volume Ring Pattern Manual RX V 34 OFF ...

Page 80: ...ty Paper Priority Print Paper Size Tray Selection for RX Print Min Reduction for RX Print Print Separate Fax Pages Duplex Print F Code TX Dest Check Display Func Confirm Addr TX Confirm Addr Register Restrict Fax TX Restrict Fax RX Restrict PC Fax TX Memory RX Memory RX Password ...

Page 81: ...int Remote RX Settings Remote RX Enabled Remote RX No PC Fax RX Settings PC Fax RX Setting PC Fax RX Print PBX Connection Settings PBX Function PBX Number Nighttime RX Settings Night Fax RX Print Night RX Start Time Night RX End Time Fax Report Activity Report TX Result Report TX Result Report Image Output Settings Output Interval Activity Report ...

Page 82: ...TX Result Report Screen PC Fax TX Error Report Broadcast Report TX Reserve Fax Target Fax Factory Default Fax File initializing Maintenance Menu Print Menu Event Log Halftone 64 Cyan 64 Magenta 64 Yellow 64 Black 64 Halftone 128 Cyan 128 Magenta 128 Yellow 128 Black 128 ...

Page 83: ... Cyan 256 Magenta 256 Yellow 256 Black 256 Gradation Activity Report Scan Send Report Print Scan Event Log Printer Adjustment Leading Edge Adjustment Plain Paper Thick 1 Thick 2 Envelope Side Edge Adjustment Tray 1 Tray 2 Tray 3 Tray 4 ...

Page 84: ...6 Left ADJ Duplex Tray 1 Tray 2 Tray 3 Tray 4 2nd Image Transfer Current Simplex Pass Plain Paper Thick 1 Thick 2 Postcard Envelope Label Glossy 1 Glossy 2 Manual Duplex Plain Paper Thick 1 Thick 2 Postcard Envelope Label ...

Page 85: ...k Paper Image Density Cyan Magenta Yellow Black Black Image Density Engine DipSW 1 Engine DipSW 2 Engine DipSW 3 Engine DipSW 26 Glossy 1 Glossy 2 Fine Line ADJ AIDC Mode Thick Mode Engine DipSW Engine DipSW 27 Engine DipSW 28 ...

Page 86: ...to Del Interval File Storage Security Settings Administrator Password Security Details Password Rules Tranfer Belt Unit Transfer Roller Unit Consumables Replace Supplies Fusing Unit Document Hold Setting Manual Destination Input Direct Input HidePersonal Data Disable Job History Display Restrict Scan to USB ...

Page 87: ...ngs 3 Press Password Restore Defaults Restore NetWork Restore System Mode Check HDD Capacity HDD Settings Execute Restore All Enhanced Security Mode Overwrite All Data SSD Low level Format HDD Format User Area Only User Area Scan All Paper Empty Tray 1 Tray 2 Tray 3 Tray 4 ...

Page 88: ... min 11 min 12 min 13 min 14 min 15 min 30 min 1 Hour 3 Hours Specify the length of time until the machine enters Power Save mode Date Time Settings Specify the date time and time zone Date XX XX XX Specify the current date The default setting is set in the order month day then year MM DD YY for 120V model month then year DD MM YY for 220V model Europe and year month then day YY MM DD for 220V mod...

Page 89: ...offset from the current time appears Offset Settings 1 to 150 Default 60 Specify the length of time applied for daylight saving time between 1 and 150 minutes in 1 minute increments List Counter The machine settings can be printed Job Settings List Settings Print Cansel Prints the list of machine settings Report Input Tray Settings Tray 1 Tray 2 Tray 3 Tray 4 Select the paper tray loaded with the ...

Page 90: ...Machine Settings Specify machine information Device Name Specify the name of the machine The name specified for Device Name will be used as the file name for scan data Address Specify the E mail address for the machine Item Description Address Book The destination lists for Address Book Group Address and Program Address can be printed or viewed Address Book Specify settings for printing the list o...

Page 91: ...s the list of group destina tions Program Address Specify settings for printing the list of program destinations Fax E mail FTP WebDAV SMB Address Book Group Address Start Number Specify the starting program destination number Number of Addresses Specify the number of program destinations List Output Prints the list of program destina tions Item Description Logout Confirmation Dis play Settings ON...

Page 92: ...ettings 0 0 0 0 Specify the gateway address DHCP Settings ON OFF If there is a DHCP server on the network spec ify whether the IP address and other network information are automatically assigned by the DHCP server BOOTP Settings ON OFF If there is a BOOTP server on the network specify whether the IP address and other net work information are automatically assigned by the BOOTP server ARP Ping Sett...

Page 93: ...not to enable RAW port bidi rectional communication SLP Settings Enable Disable Select whether or not to enable SLP SMTP Settings Enable Disable Select whether or not to enable E mail trans mission operations for this machine SNMP Settings Enable Disable Select whether or not to enable SNMP WSD Print Settings Enable Disable Select whether or not to enable WSD printing IPSec Settings Enable Disable...

Page 94: ...x 10 Mbps Half Duplex 100 Mbps Full Duplex 100 Mbps Half Duplex 1 Gbps Full Duplex Specifies the transmission speed for the net work and the transmission method for bidirec tional transmission IEEE802 1X Settings Enable Disable Select whether or not to enable IEEE802 1X Binary Division Settings ON OFF Select whether or not transmission data is divided S MIME Settings Specify S MIME communication s...

Page 95: ...ble Disable Select whether or not to enable the Memory Direct function Description Settings 5 to 300 Default 15 Specify the length of time until a job timeout occurs Item Description Select Tray when APS OFF Settings Tray Before APS ON Default Tray Select which paper tray is selected when the automatic tray switching feature APS is dis abled Paper Priority Settings Tray 1 Tray 2 Tray 3 Tray 4 Spec...

Page 96: ...Printing is automatically performed according to the first page of the job Grayscale Print Black and white printing is automatically performed depending on each page Color Print Color printing is performed even for a black and white page Startup Page Setting Settings ON OFF Select whether or not a startup page is printed when the machine is turned on Auto Continue Settings ON OFF Select whether or...

Page 97: ...ct the paper size The default setting is Letter for USA and Canada and A4 for other countries Custom Size Press Width and Length and then type in the paper size Setting range for Width For inches 3 63 to 8 50 inches For millimeters 92 to 216 mm Setting range for Length For inches 5 83 to 14 00 inches For millimeters 148 to 256 mm These settings can be specified if Paper Size is set to Custom Size ...

Page 98: ... Settings 15 to 15 Default 0 The brightness of the printed image can be adjusted Halftone Select how halftones in images text and graphics are reproduced Image Printing Settings Line Art Detail Smooth Select how halftones in images are repro duced Line Art Halftones are reproduced with high precision Detail Halftones are reproduced with detail Smooth Halftones are reproduced with smoothness Text P...

Page 99: ...re emphasized ON The edges are emphasized OFF The edges are not emphasized Text Printing Settings ON OFF Select whether text edges are emphasized ON The edges are emphasized OFF The edges are not emphasized Graphics Printing Settings ON OFF Select whether graphics edges are empha sized ON The edges are emphasized OFF The edges are not emphasized Edge Strength Settings OFF Low Middle High Select th...

Page 100: ...ect the color space for RGB image data If Device Color is selected no color space is specified RGB source profiles downloaded with Down load Manager or Web Connection are available as RGB Source RGB Intent Settings Vivid Photographic Select the characteristic applied when convert ing RGB image data to CMYK data Vivid A vivid output is produced Photographic A brighter output is produced RGB Gray Se...

Page 101: ...ay K Bk K Gray CMYK Select how black and grays are reproduced in RGB text data Bk CMYK Gray CMYK Black is reproduced using the CMYK colors Bk K Gray K Black and gray are reproduced using black only Bk K Gray CMYK Black is reproduced using only black Graphics Printing Specify settings for RGB graphics data RGB Source Settings Device Color sRGB Select the color space for RGB graphics data If Device ...

Page 102: ... Settings Device Color sRGB AppleRGB AdobeRGB1998 ColorMatchRGB BlueAdjus tRGB Select the color space for RGB image data If Device Color is selected no color space is specified RGB source profiles downloaded with Down load Manager or Web Connection are available as RGB Source RGB Intent Settings Vivid Photographic Relative Color Absolute Color Select the characteristic applied when convert ing RGB...

Page 103: ...ination profile that the machine automatically adapts is selected based on a combination of the specified color matching halftones and other profiles Destination profiles downloaded with Down load Manager or Web Connection are available as Destination Profile Text Printing Specify settings for RGB text data RGB Source Settings Device Color sRGB AppleRGB AdobeRGB1998 ColorMatchRGB BlueAdjus tRGB Se...

Page 104: ... Gray CMYK Bk K Gray K Bk K Gray CMYK Select how black and grays are reproduced in RGB text data Bk CMYK Gray CMYK Black is reproduced using the CMYK colors Bk K Gray K Black and gray are reproduced using black only Bk K Gray CMYK Black is reproduced using only black Destination Pro file Settings Auto Select the destination profile Auto A destination profile that the machine automatically adapts i...

Page 105: ...ive Color Absolute Color Select the characteristic applied when convert ing RGB graphics data to CMYK data Vivid A vivid output is produced Photographic A brighter output is produced Relative Color Relative color is applied to the RGB source profile Absolute Color Absolute color is applied to the RGB source profile RGB Gray Settings Bk CMYK Gray CMYK Bk K Gray K Bk K Gray CMYK Select how black and...

Page 106: ...n profile If NONE is selected no simulation profile is specified Simulation profiles downloaded with Download Manager or Web Connection are available as Simulation Profile Sim Intent Settings Relative Color Absolute Color Select the characteristic applied to the simula tion profile Relative Color Relative color is applied to the simulation profile Absolute Color Absolute color is applied to the si...

Page 107: ...sted Middle The density of the middle color in images can be adjusted Shadow The density of the shadow color in images can be adjusted Color Separation Settings ON OFF ON Color separation is performed The con tents of a color page is separated into the color pages for yellow magenta cyan and black and each is printed with black gradations as individual pages The printing order is yellow magenta cy...

Page 108: ...ream Auto Trapping Settings ON OFF Select whether or not neighboring colors are printed superimposed in order to prevent white space around images Black Overprint Settings Text Graphic Text OFF Specify whether black objects are printed superimposed on a neighboring color in order to prevent white space around black characters or figures If Text Graphic is selected superimposed printing is applied ...

Page 109: ...uage If the setting selected for Font Number is for a bitmap font Pitch Size appears If the setting selected for Font Number is for an outline font Point Size appears Symbol Set Settings PC8 Desktop IOS4 ISO6 ISO11 ISO15 ISO17 ISO21 ISO60 ISO69 ISOL1 ISOL2 ISOL5 ISOL6 ISOL9 Legal Math8 MCText MSPUBL PC775 PC850 PC852 PC858 PC8DN PC8TK PC1004 Pi Font PS math PS Text Roman 8 WIN30 WIN Balt WINL1 WIN...

Page 110: ...abled XPS Error Page Settings ON OFF Select whether or not an error report is printed after an XPS error has occurred ON The error report is printed OFF The error report is not printed Item Description Print Menu Specify settings for printing event logs and gra dations Event Log Settings Print Cancel Prints the event log Halftone 64 Settings Print Cancel Prints the halftone pattern using a 25 dens...

Page 111: ...Specify various machine adjustments Leading Edge Adjust ment Adjust the top margin for various types of media Plain Paper Settings 15 to 15 Adjust the top margin of plain paper for simplex single sided printing Thick 1 Settings 15 to 15 Adjust the top margin of thick paper for simplex single sided printing Thick 2 Settings 15 to 15 Adjust the top margin of Thick 2 paper for sim plex single sided p...

Page 112: ...ex double sided printing Tray2 Settings 15 to 15 Adjust the left margin of media fed from Tray 2 for duplex double sided printing Tray3 Settings 15 to 15 Adjust the left margin of media fed from Tray 3 for duplex double sided printing Tray4 Settings 15 to 15 Adjust the left margin of media fed from Tray 4 for duplex double sided printing 2nd Image Transfer Current Adjust the 2nd image transfer cur...

Page 113: ...tput ATVC for simplex single sided printing of Glossy 1 media Glossy 2 Settings 8 to 7 Adjust the 2nd image transfer output ATVC for simplex single sided printing of Glossy 2 media Manual Duplex Adjust the 2nd image transfer output ATVC for duplex double sided printing Plain Paper Settings 8 to 7 Adjust the 2nd image transfer output ATVC for duplex double sided printing of plain paper Thick 1 Sett...

Page 114: ...fault 0 Adjust the density of images printed on thick paper Cyan Settings 5 to 5 Default 0 Finely adjust the density of cyan for images printed on thick paper Magenta Settings 5 to 5 Default 0 Finely adjust the density of magenta for images printed on thick paper Yellow Settings 5 to 5 Default 0 Finely adjust the density of yellow for images printed on thick paper Black Settings 5 to 5 Default 0 F...

Page 115: ...approximately 70 seconds occurs every 400 seconds or so of half speed operation Speed Mode While printing on thick paper only the drive of the developer unit periodically switches to full speed for a fixed length of time Since printing continues during full speed drive the print quality is slightly affected how ever the standby time is short Engine DipSW Change the DIP switches to control machine ...

Page 116: ...nters for various con sumables Consumables Replace Transfer Belt Unit Settings Yes No Reset the transfer belt counter Transfer Roller Unit Settings Yes No Reset the transfer roller counter Fusing Unit Settings Yes No Reset the fuser unit counter Item Description Auto Del Interval Settings Erase Disabled 12 Hours 1 Day 2 Days 3 Days 7 Days 30 Days Select the length of time until files saved on the ...

Page 117: ...ity Details Specify detailed security settings to limit machine functions Security can be enhanced if machine functions are limited Password Rules Settings ON OFF Select whether or not password rules are applied Manual Destination Input Settings Allow Restrict Select whether or not to prohibit editing of the address book If Restrict is selected the address book cannot be edited Direct Input Settin...

Page 118: ...Restrict is selected the Scan to USB function cannot be used Enhanced Security Mode Settings ON OFF Select whether or not to apply enhanced secu rity settings If ON is selected the enhanced security settings are applied HDD Settings Check the capacity of the hard disk or delete data by overwriting Check HDD Capacity Check the total capacity of the hard disk the amount of space used and the amount ...

Page 119: ...n with 0x00 Overwritten with 0xff Mode 5 Overwritten with 0x00 Overwritten with 0xff Overwritten with 0x00 Overwrit ten with 0xff Mode 6 Overwritten with 0x00 Overwritten with 0xff Overwritten with 0x00 Overwrit ten with 0xff Overwritten with 0x00 Over written with 0xff Overwritten with specified 512 byte data Mode 7 Overwritten with 0x00 Overwritten with 0xff Overwritten with 0x00 Overwrit ten wi...

Page 120: ...ed user and account data Registered information for secured print ing and saved files Image files SSD Low level Format Press to delete all data on the SSD by overwrit ing it and then press OK Perform this operation when disposing of this machine While the data is being deleted by being overwritten do not use the power switch to turn the machine off and on After the machine is restarted all data is...

Page 121: ...password and then press OK 4 Press Password bottom 5 Type in the new administrator password and then press OK 6 Press OK Limitations of the password rules If password rules have been applied limitations are placed on certain pass words Specified passwords must be changed to meet the conditions Passwords regulated by the password rules Administrator password User passwords Account passwords Passwor...

Page 122: ...hanged after the enhanced security settings have been applied Required settings The following settings must first be specified in order to apply the enhanced security settings Administrator mode parameters Required settings Security Settings Administrator Password Specify a password that meets the conditions of the password rules Security tab in Web Connection Authentication General Settings User ...

Page 123: ...General Settings Public Access Set to Restrict Security tab in Web Connection PKI Settings SSL TLS Settings SSL TLS Set to Enable Security tab in Web Connection PKI Settings SSL TLS Settings Encryption Strength Set to AES 256 or AES 256 3DES 168 1 Network tab in Web Connection E mail Settings S MIME E mail Text Encryption Method Set to 3DES AES 128 AES 192 or AES 256 1 Network tab in Web Connectio...

Page 124: ...l Resets all settings to their defaults After this is pressed the printer is automatically restarted Item Description User Area Only Initializes the user area printing of the hard disk After the reformatting operation is finished turn the machine off then on again User Area Scan Initializes the user area scanning of the hard disk After the reformatting operation is finished turn the machine off th...

Page 125: ...t a message appears when Tray 1 has run out of paper Tray 2 Settings ON OFF Select whether or not a message appears when Tray 2 has run out of paper Tray 3 Settings ON OFF Select whether or not a message appears when Tray 3 has run out of paper Tray 4 Settings ON OFF Select whether or not a message appears when Tray 4 has run out of paper ...

Page 126: ... Admin Settings 3 78 ...

Page 127: ...4Media Handling ...

Page 128: ...x 13 1 4 8 125 13 25 206 4 336 6 1 2 Yes Yes Yes No A4 8 2 11 7 210 0 297 0 1 2 3 4 Yes Yes Yes Yes A5 5 9 8 3 148 0 210 0 1 2 No Yes Yes No B5 JIS 7 2 10 1 182 0 257 0 1 2 3 4 Yes Yes Yes No A6 4 1 5 8 105 0 148 0 1 2 No Yes Yes No B6 5 0 7 2 128 0 182 0 1 2 No Yes Yes No Photo size 4 6 4 0 6 0 101 6 152 4 1 2 No Yes Yes No Photo size 10 15 4 0 6 0 101 6 152 4 1 2 No Yes Yes No Photo size E size ...

Page 129: ...90 0 205 0 1 No No No No Kai 16 7 3 10 2 185 0 260 0 1 2 Yes Yes Yes No Kai 32 5 1 7 3 130 0 185 0 1 2 No Yes Yes No Custom Minimum 3 6 8 5 5 8 14 0 92 0 216 0 148 0 356 0 1 2 Yes Yes Yes Yes Custom Maximum 7 2 8 5 10 0 14 0 182 0 216 0 254 0 356 0 1 2 Yes No No No Notes Tray 1 Multipurpose Tray 3 4 Plain paper only Original glass only Numerical value input Only a size within the range 182 0 216 0...

Page 130: ...e paper and heat press transfer paper Cold water transfer paper Pressure sensitive Designed specifically for inkjet printers such as superfine paper glossy film and postcards Already been printed on by another printer copier or fax machine Dusty Wet or damp Keep media between 15 and 85 relative humidity Toner does not adhere well to moist or wet media Capacity Tray 1 Up to 100 sheets depending on ...

Page 131: ...th glue tape paper clips staples ribbons hooks or buttons Acidic Any other media that is not approved Thick Stock Paper thicker than 90 g m2 24 lb bond is referred to as thick stock You can print continuously with thick stock However this could affect the media feed depending on the media quality and printing environment If problems occur stop the continuous printing and print one sheet at a time ...

Page 132: ... for laser printing with diagonal joints sharp folds and edges and ordinary gummed flaps Because the envelopes pass through heated rollers the gummed area on the flaps may seal Using envelopes with emulsion based glue avoids this problem Approved for laser printing Dry DO NOT use envelopes that have Sticky flaps Tape seals metal clasps paper clips fasteners or peel off strips for seal ing Transpar...

Page 133: ...ms occur stop the continuous printing and print one sheet at a time Check your application documentation for more information on printing labels Use label sheets that are Recommended for laser printing DO NOT use label sheets that Have labels that easily peel off or have parts of the label already removed Have backing sheets that have peeled away or have exposed adhesive Labels may stick to the fu...

Page 134: ...rd However this could affect the media feed depending on the media quality and printing environment If problems occur stop the continuous printing and print one sheet at a time Check your application documentation for more information on printing post cards Capacity Tray 1 2 Up to 20 sheets depending on their size and thickness Tray 3 4 Not supported Orientation Tray 1 Face down Tray 2 Face up Dri...

Page 135: ...y Media You can print continuously with glossy media However this could affect the media feed depending on the media quality and printing environment If problems occur stop the continuous printing and print one sheet at a time Check your application documentation for more information on printing glossy media Orientation Tray 1 Face down Tray 2 Face up Driver Media Type Postcard Duplexing Not suppo...

Page 136: ...e only paper that is Suitable for plain paper laser printers such as standard or recycled office paper Plain paper that has been printed on with same printer DO NOT use single side only paper that is Not approved for use as plain paper Orientation Tray 1 Face down Tray 2 Face up Driver Media Type Glossy 1 100 128 g m2 Glossy 2 129 158 g m2 Weight 100 to 158 g m2 Duplexing Not supported Capacity Tr...

Page 137: ...lity paper is loaded as plain paper with a weight of 60 90 g m Use special paper that is Approved for laser printers DO NOT use special paper that is Not approved for use as plain paper Capacity Tray 1 Up to 100 sheets depending on the paper weight Tray 2 Up to 250 sheets depending on the paper weight Tray 3 4 Up to 500 sheets depending on the paper weight Orientation Tray 1 Face down Tray 2 3 4 F...

Page 138: ...equired by the printer and software constraints the amount of memory available for the full page frame buffer The guaranteed imageable printable area for all media sizes is the page size minus 4 2 mm 0 165 from all edges of the media When printing in color on legal size media the following limitations apply z The printable area is 347 2 13 7 mm from the leading edge of the paper However there is a...

Page 139: ...Margins Margins are set through your application Some applications allow you to set custom page sizes and margins while others have only standard page sizes and margins from which to choose If you choose a standard format you may lose part of your image due to imageable area constraints If you can cus tom size your page in your application use those sizes given for the imagea ble area for optimum ...

Page 140: ... edges are sharp and may cause injuries When refilling media first remove any media remaining in the tray Stack it with the new media even the edges then reload it Tray 1 Manual Feed Tray For details on the types and sizes of media that can be printed from Tray 1 refer to Specifications on page 4 2 Loading Plain Paper Single Side Only and Special Paper 1 Open Tray 1 ...

Page 141: ... 15 2 Slide the media guides to pro vide more space between them 3 Press down on the center of the paper lifting plate until the left and right locking tabs white lock into place 4 Load the paper face down in the tray ...

Page 142: ...s against the edges of the paper 6 Select Copy Paper Tray 1 Change Tray Set Paper Size and Paper Type in the configuration menu and then select the setting for the size and type of paper that are loaded See also Paper on page 7 5 Other Media When loading media other than plain paper set the media mode Envelope Label Letterhead Thick 1 Thick 2 Glossy 1 Glossy 2 or Postcards in the driver for optimu...

Page 143: ...a 4 17 Loading Envelopes 1 Open Tray 1 2 Slide the media guides to pro vide more space between them 3 Press down on the center of the paper lifting plate until the left and right locking tabs white lock into place ...

Page 144: ...flaps are firmly pressed other wise the envelopes may become wrinkled or a media misfeed may occur Up to 10 envelopes can be loaded into the tray at one time For envelopes with the flap along the long edge Envelope C6 Envelope Monarch Envelope You 6 Envelope You 2 and Envelope DL load the envelopes with the flap side up 5 Slide the media guides against the edges of the envelopes ...

Page 145: ...e and Paper Type in the configuration menu and then select the setting for the size and type of paper that are loaded See also Loading Label Sheets Letterhead Postcards Thick Stock and Glossy Media 1 Open Tray 1 2 Slide the media guides to pro vide more space between them ...

Page 146: ... the media face down in the tray Up to 20 sheets can be loaded into the tray at one time 5 Slide the media guides against the edges of the media 6 Select Copy Paper Tray 1 Change Tray Set Paper Size and Paper Type in the configuration menu and then select the setting for the size and type of paper that are loaded See also Paper on page 7 5 ...

Page 147: ...edia 4 21 Tray 2 Loading Plain Paper Single Side Only and Special Paper 1 Pull out Tray 2 2 Press down the media pressure plate to lock it into place 3 Slide the media guides to pro vide more space between them ...

Page 148: ...2 4 Turn the paper selection dial to select the size of paper to be loaded 5 Load the paper face up in the tray Do not load above the mark Up to 250 sheets 80 g m2 of plain paper can be loaded into the tray at one time ...

Page 149: ...s against the edges of the paper 7 Close Tray 2 8 Select Copy Paper Tray 2 Change Tray Set Paper Size and Paper Type in the configuration menu and then select the setting for the size and type of paper that are loaded See also Paper on page 7 5 ...

Page 150: ... 4 24 Loading Label Sheets Letterhead Postcards Thick Stock and Glossy Media 1 Pull out Tray 2 2 Press down the media pressure plate to lock it into place 3 Slide the media guides to pro vide more space between them ...

Page 151: ...Loading Media 4 25 4 Turn the paper selection dial to select the size of paper to be loaded 5 Load the paper face up in the tray Up to 20 sheets can be loaded into the tray at one time ...

Page 152: ...s against the edges of the paper 7 Close Tray 2 8 Select Copy Paper Tray 2 Change Tray Set Paper Size and Paper Type in the configuration menu and then select the setting for the size and type of paper that are loaded See also Paper on page 7 5 ...

Page 153: ...Optional Lower Feeder Unit Loading Plain Paper Single Side Only and Special Paper 1 Pull out Tray 3 or Tray 4 2 Press down the media pressure plate to lock it into place 3 Slide the media guides to pro vide more space between them ...

Page 154: ...Media 4 28 4 Load the paper face up in the tray Do not load above the mark Up to 500 sheets 80 g m2 of plain paper can be loaded into the tray at one time 5 Slide the media guides against the edges of the paper ...

Page 155: ...6 Close Tray 3 or Tray 4 7 Select Copy Paper Tray 3 Change Tray Set Paper Size and Paper Type in the configuration menu and then select the setting for the size and type of paper that are loaded See also Paper on page 7 5 ...

Page 156: ...er special paper and thick stock 60 210 g m2 can be autoduplexed See Specifications on page 4 2 Duplexing envelopes labels letterheads postcards glossy media or single side only papers is not supported How do I autoduplex Check your application to determine how to set your margins for duplex double sided printing The following Binding Position settings are available If Long Edge Left is selected t...

Page 157: ...specify duplex double sided printing Layout tab in Windows 3 Click OK With autoduplexing the back side is printed first and then the front side is printed If Long Edge Bottom is selected the pages will be laid out to flip at the bottom If Left Binding is selected the pages can be folded as a left bound booklet If Right Binding is selected the pages can be folded as a right bound booklet 1 3 1 2 1 ...

Page 158: ...g down into the output tray of the machine This tray has a capacity of approximately 250 sheets A4 Letter of 80 g m2 paper If the media is stacked too high in the output tray your machine may experience media misfeeds excessive media curl or static buildup ...

Page 159: ...ia has been removed from its wrapper place it in its original pack aging and store in a cool dark place on a level surface Avoid moisture excessive humidity direct sunlight excessive heat and dust Store paper in a location with a temperature between 0 C and 30 C and humidity between 30 and 85 Avoid leaning against other objects or placing it in an upright position Before using stored media do a tr...

Page 160: ...inal glass otherwise the original glass may be damaged Documents that can be loaded into the ADF The following types of documents can be loaded into the ADF Document type Sheets books three dimensional object Document size Maximum size Legal Copy and Scan 30 216 30 356 mm Fax 140 216 148 356 mm Weight Maximum weight 3 kg Document media type Weight Plain paper 50 to 128 g m Document size Maximum si...

Page 161: ... transpar encies or diazo photosensitive paper Coated documents such as carbon backed paper Documents printed on paper thicker than 128 g m Documents with pages bound together with paper clips or staples Documents that are bound in a book or booklet Documents with pages bound together with glue Documents with pages that have had cutouts removed or are cutouts Label sheets Offset printing masters D...

Page 162: ...Loading a Document Placing a document on the original glass 1 Lift to open the ADF cover 2 Position the document on the original glass Align the document with the arrow on the left side toward the rear of the machine Document ...

Page 163: ...at no document pages remain on the original glass Load the document pages so that the top of the document is toward the back or the right side of the machine 2 Adjust the document guides to the document size For details on copying the loaded document refer to Performing Copy mode operations on page 7 1 For details on scanning refer to Scanning From a Computer Application on page 9 1 Document ...

Page 164: ...Loading a Document 4 38 ...

Page 165: ...5Using the Printer Driver ...

Page 166: ...XPS printer icon and then click Properties Windows XP Server 2003 From the Start menu choose Printers and Faxes to display the Printers and Faxes directory Right click the Color MF30 1 PCL6 or Color MF30 1 PS printer icon and choose Properties Windows 2000 From the Start menu choose Settings and then Printers to display the Printers directory Right click the Color MF30 1 PCL6 or Color MF30 1 PS pr...

Page 167: ...operating system Apply may not appear If this is the case continue with the next step 8 Select the General tab 9 Click Printing Preferences Printing Preference dialog box appears 10 Select the default settings for your printer such as the default media for mat you use in the appropriate tabs 11 Click Apply 12 Click OK to exit from the Print preference dialog box 13 Click OK to exit from the Proper...

Page 168: ...7 Vista Server 2008 XP Server 2003 From the Start menu choose All programs Printer Utilities Color MF30 1 and then Uninstall Printer Driver Windows 2000 From the Start menu choose Programs Printer Utilities Color MF30 1 and then Uninstall Printer Driver 3 When the Uninstall dialog box appears select the name of the driver to be deleted and then click the Uninstall button 4 Click Uninstall 5 Click ...

Page 169: ...and Sound and then click Printers to open the Printers directory 2 Right click the Color MF30 1 PCL6 Color MF30 1 PS or Color MF30 1 XPS printer icon and then click Printing Preferences Windows XP Server 2003 1 From the Start menu choose Printers and Faxes to display the Print ers and Faxes directory 2 Right click the Color MF30 1 PCL6 or Color MF30 1 PS printer icon and choose Printing Preference...

Page 170: ...then click Add Specify the settings described below and then click OK Name Type in the name of the settings to be saved Icon Select an icon from the icon list to easily identify the settings The selected icon appears in the drop down list Sharing Specify whether or not the settings to be saved can be used by other users logged onto the computer Comment Add a simple comment to the settings to be sa...

Page 171: ...k the button to display a sample of the settings selected in the Quality tab When this button is clicked it changes to the Printer View button This button appears only when the Quality tab is selected Printer Information Click this button to start up Web Connection This button is available only if a network connection has been estab lished Default Click the button to reset the settings to their de...

Page 172: ...riginal document Select the output media size Zoom expand reduce documents Specify the paper tray Specify the type of media Specify the number of copies Turn on off job collation Save a print job on the printer and print it later Job Retention Save a confidential job on the printer and protect it with a password Print a single copy for proofing Specify user authentication and account track setting...

Page 173: ...ting Specify booklet printing Specify binding position Adjust the binding margin Specify the position on the paper where the document is to be printed PCL printer driver only Cover Mode Tab The Cover Mode Tab allows you to Print front and back cover pages and separator pages Specify the tray that contains the paper for the front and back cover pages and separator pages Stamp Composition Tab Be sur...

Page 174: ...ownload Manager Application should be installed earlier Create a form PCL and XPS printer driver only Specify that the document and form are printed overlapping PCL and XPS printer driver only Display the form information PCL and XPS printer driver only Print the form on All Pages 1st Page Only Even Page and Odd Page Place the form in back of the document or in front on the printed docu ment PCL a...

Page 175: ...a does not hide overlay files PCL and XPS printer driver only Send a notification by E mail when printing is finished Shows the version information for the printer driver Prevent loss when printing fine lines PCL printer driver only Limitations on printer driver functions installed with Point and Print If Point and Print is performed with the following server and client combina tions there are lim...

Page 176: ...Using the Postscript PCL and XPS Printer Driver 5 12 ...

Page 177: ...6Proof Print and Memory Direct functions ...

Page 178: ...USB HDD 2 Press Proof Print 3 Select a user 4 Press OK 5 Select the job to be printed 6 Press Print If the job was saved with the Secured Job setting type in the pass word 7 Type in the number of copies to be printed and then press OK Deleting a job saved on the hard disk 1 In the home screen press USB HDD 2 Press Proof Print 3 Select a user 4 Press OK 5 Select the job to be deleted 6 Press Delete...

Page 179: ...e to be printed If the file to be printed is in a folder select the folder and then press Open To return to the folder containing the one that is currently dis played press Up At each folder level a maximum of 99 folders and files can be dis played The names of folders are displayed given priority over the names of files A maximum of eight folder levels can be displayed If JPEG and TIFF files are ...

Page 180: ...Memory Direct 6 4 Selecting the type of files to be displayed 1 In the home screen press USB HDD 2 Press Memory Direct 3 Press File Type 4 Select the type of files to be displayed 5 Press OK ...

Page 181: ...7Performing Copy mode operations ...

Page 182: ... the desired copy settings For details on specifying document size settings refer to Original Size on page 7 4 For details on specifying paper size settings refer to Paper on page 7 5 For details on specifying zoom ratio settings refer to Zoom on page 7 6 For details on specifying double sided copy settings refer to Duplex Combine on page 7 7 For details on specifying density settings refer to Den...

Page 183: ...ct the size of an original docu ment that will be scanned Before scanning the document specify its size If the size of the original document is not correctly specified some parts of the image may be lost For details on specifying the size of an original document refer to Original Size on page 7 4 When sorting or making double sided or combined copies using the original glass press Finish after all...

Page 184: ... the ADF Each document page will be copied onto paper of the same size as the original Load all document pages so that they are aligned on the left side of the ADF Item Description Standard Size Select the size of the document Select Letter Legal to copy a document containing differ ent page sizes Custom Size Specify the size of the document if it is a non standard size Press X and Y and then type...

Page 185: ...er types and sizes refer to Print Media on page 4 2 Item Description 1 4 Manually select the paper tray 3 and 4 are available if the optional lower feeder units have been installed Auto The paper is selected automatically according to the size of the original document Change Tray Set Specify the type and size of the paper loaded in the selected paper tray Paper Size Specify the paper size Standard...

Page 186: ...ios can be set between 25 0 and 200 0 Zoom settings Select a preset zoom ratio or a programmed zoom ratio Auto Select this setting for the most appropriate zoom ratio to be automatically selected based on the size of the loaded document and the specified paper size Full Size Select this setting to produce a copy that is the same size as the document 100 0 Manual Press or to enter a custom zoom rat...

Page 187: ... to produce one double sided copy from two single sided documents 2 Side 1 Side Select this setting to produce two single sided copies from one double sided document 2 2 Select this setting to produce dou ble sided copies from double sided documents Combine Select whether to make combined copies No Select this setting to not produce combined copies 2 in 1 Select this setting to copy two document p...

Page 188: ...ft or at the top Output Binding Position Select Left Bind Right Bind Top Bind or Auto as the binding position for the copies If the binding position for the copy is set to Auto the binding position is set at the left or at the top Original Direction Select Top Bottom Left or Right as the ori entation of the document loaded into the ADF or placed on the original glass Item Description Adjust the co...

Page 189: ...k text color text and shading are automatically recognized and the most appropriate image pro cessing is performed In addition processing appropriate for printed photo documents will be applied to any photos Photo Select this setting when copying documents con taining printed photos Item Description Auto Select this setting to detect whether the scanned document is in color or in black and white t...

Page 190: ...a document into the ADF on page 4 37 3 Specify the copy settings 4 Press Proof Copy 5 Press ON 6 Press OK 7 Press the Start Color key or the Start B W key A single proof copy is printed 8 Check the proof copy If the proof copy was printed as desired continue with step 9 Item Description Sort Select this setting when making multiple copies of documents containing multiple pages so that they will be...

Page 191: ...le copy job In addition the scanning location can be switched between the original glass and the ADF during the scanning operation Scanning the document in separate batches Do not load more pages into the ADF than the maximum number of pages allowed otherwise a document misfeed or damage to the docu ment may occur When sorting or making double sided or combined copies using the original glass inst...

Page 192: ...o change the scanning settings press Change Settings 7 Position the next document page or pages and then press the Start Color key or the Start B W key Scanning of the document begins 8 Repeat step 7 until all document pages have been scanned 9 After all document pages have been scanned press Finish ID Copy The back and front of a card such as an insurance card driver s license or business card ca...

Page 193: ...Start Color key or the Start B W key Scanning of the front side begins 5 Position the card back side down at the same location on the original glass To copy only the front side press Print 6 Press the Start Color key or the Start B W key Scanning of the back side begins The copy is fed out Paper Margin Copies can be printed with a binding margin so they can easily be stored in filing binders If pa...

Page 194: ...n to lighten the background Press Standard to return the density to the standard setting Contrast The image can be adjusted to make it softer or sharper Adjust the contrast to one of nine levels Select a setting in the direction to make the image sharper or select a setting in the direction to make the image softer Press 0 to return the con trast to the standard setting Sharpness The sharpness of ...

Page 195: ...8Additional copy operations ...

Page 196: ...r load it into the ADF For details on positioning the document refer to Placing a document on the original glass on page 4 36 and Loading a document into the ADF on page 4 37 3 Press the Interrupt key The indicator on the Interrupt key lights up in green and printing of the current job stops 4 Specify the copy settings 5 To make a color copy press the Start Color key To make a black and white copy...

Page 197: ...rograms screen appear 4 Press Register 5 Press Name 6 Type in the name of the copy program and then press OK For details on entering text refer to Entering text on page A 8 7 Press OK 8 Press Cancel The initial Copy mode screen appears again Deleting a copy program 1 In the home screen press Copy 2 Press the Mode Memory key The copy programs screen appear 3 Select the copy program to be deleted 4 ...

Page 198: ...a document on the original glass on page 4 36 and Loading a document into the ADF on page 4 37 3 Press the Mode Memory key The copy programs screen appear 4 Select the copy program to be recalled 5 Press Detail The settings screen appears 6 Check the copy settings stored with the selected copy program 7 Press Close 8 Press OK The initial Copy mode screen appears again 9 Press the Start Color key o...

Page 199: ...9Scanning From a Computer Application ...

Page 200: ...n area can be specified For details on the installation of the scanner driver or network TWAIN settings refer to the Installation Guide on the Documentation CD DVD 1 Position the document to be scanned For details on positioning the document refer to Placing a document on the original glass on page 4 36 and Loading a document into the ADF on page 4 37 2 Start the application to be used for scannin...

Page 201: ...splay Help information About icon Click to display the software version information Scan Objective Specify the document type Scan Type Specify the scan type Resolution Specify the resolution Auto Color Adjustment Specify the auto color adjustment settings Auto Deskew Specify settings for correcting the skew of the image Paper source Specify the paper source When scanning documents from the ADF sel...

Page 202: ... image When Advanced Mode is selected The following parameters can be set when Advanced Mode is selected Load Specify a saved settings file dat file for scanning Save Save the current settings as a settings file dat file Default Return all settings to their defaults Help icon Click to display the Help About icon Click to display the software version information Paper source Specify the paper sourc...

Page 203: ...s that appear differ depending on the setting selected for Scan Type If Auto is selected as the scanning mode scanning from the original glass is performed after a prescan is performed so that a preview image can be checked Image size Shows the data size of the scan image Rotation Select the orientation of the image to be scanned If the Rotate back side check box is selected the back side of the i...

Page 204: ...n Click to reverse the colors of the preview image Clear icon Click to erase the preview image Preview window Displays a preview image Drag the rectangle over the image to select an area Before RGB After Move the pointer in the preview window to display the color tones at the pointer s position before and after adjustments Width Height Displays the width and height for the selected area in the sel...

Page 205: ...e canned picture Custom Settings is automatically selected Adjust the quality of the scanned picture Click this message to display the Advanced Properties dialog box In the Advanced Properties dialog box settings can be specified for Brightness Contrast Resolution DPI and Picture type select from color grayscale or black and white These settings are applied when Custom Settings is selected Page si...

Page 206: ...display Help information About icon Click to display the software version information Scan Objective Specify the document type Scan Type Specify the scan type Resolution Specify the resolution Auto Color Adjustment Specify the auto color adjustment settings Auto Deskew Specify settings for correcting the skew of the image Paper source Specify the paper source When scanning documents from the ADF s...

Page 207: ...w image When Advanced Mode is selected The following parameters can be set when Advances Mode is selected Load Specify a saved settings file dat file for scanning Save Save the current settings as a settings file dat file Default Return all settings to their defaults Help icon Click to display the Help About icon Click to display the software version information Paper source Specify the paper sour...

Page 208: ...gs that appear differ depending on the setting selected for Scan Type If Auto is selected as the scanning mode scanning from the original glass is performed after a prescan is performed so that a preview image can be checked Image size Shows the data size of the scan image Rotation Select the orientation of the image to be scanned If the Rotate back side check box is selected the back side of the ...

Page 209: ...con Click to reverse the colors of the preview image Clear icon Click to erase the preview image Preview window Displays a preview image Drag the rectangle over the image to select an area Before RGB After Move the pointer in the preview window to display the color tones at the pointer s position before and after adjustments Width Height Displays the width and height for the selected area in the s...

Page 210: ...ine on the computer Confirmation before installation Before installation make sure that Network Discovery Network and Shar ing Center in Control Panel is enabled Installation procedure 1 In the Start button menu click Network The devices connected to the network appear 2 Right click the scanner icon for this machine and then click Install Depending on the settings specified on the computer a UAC U...

Page 211: ... this machine where the data will be saved For details refer to With Web Service Settings on page 10 30 Specifying the scan command from a computer 1 Start up the application used for scanning 2 In the File menu click From Scanner or Camera 3 From the Select Device list select this machine and then click OK The New Scan window appears 4 Position the document on this machine Specify the scan settin...

Page 212: ...Using a Web Service 9 14 ...

Page 213: ...10 1Scanning with the machine ...

Page 214: ...AV transmission a connection to the network is required and parameters must be specified on the TCP IP and Web DAV screens In order to perform a Web Service transmission a connection to the net work is required and parameters must be specified on the TCP IP and WSD Print screens In order to perform an E mail transmission a connection to the network is required parameters must be specified on the T...

Page 215: ...riginal Mode Sepa rate Scan to ON For details on Separate Scan refer to Original Mode Separate Scan on page 10 5 3 Specify the destination For details on specifying destinations refer to Specifying destina tions on page 10 14 In the initial Scan to E mail mode screen press Confirm to check or change the specified destinations 4 If necessary specify settings for other parameters in the Settings scr...

Page 216: ... scanned press the Start key To stop the transmission press the Stop key Specifying document settings The Simplex Duplex Original Size Original Mode Color and Original Type parameters available from the Settings screen can be used to specify document settings Simplex Duplex Select whether double sided documents are to be scanned when the ADF is used Item Description 1 sided Select this setting whe...

Page 217: ...display the initial Scan to E mail mode screen 3 With Original Mode in the Settings screen set Separate Scan to ON 4 Press the Start key The document is scanned 5 Place the next document page on the original glass and then press the Start key Repeat this step until all document pages have been scanned 6 After all pages of the document have been scanned press Finish Item Description Standard Size S...

Page 218: ...dge at the bottom Left Select this setting when the document is loaded with its top edge at the left at the right when placed on the original glass Right Select this setting when the document is loaded with its top edge at the right at the left when placed on the original glass Item Description Left Bind Select this setting to specify a binding position at the left Top Bind Select this setting to ...

Page 219: ...olor of the document and scan it with the corresponding setting OFF Select this setting to scan in full color Monotone Gray Scale Select this setting for documents with many halftones such as in black and white photos Black Select this setting for documents with dis tinct black and white areas such as in line drawings Item Description Text Select this setting when scanning documents containing onl...

Page 220: ...olor at which documents with a background color are to be scanned Nine density levels are available for the background color Density Select the density at which the document is to be scanned Nine density levels are available Select the appropriate density setting according to your document Sharpness Select the strength of outlines for example on characters and lines for scanning the docu ment To s...

Page 221: ...vidual pages or multi page data is created when multiple pages are scanned Item Description PDF Select this setting to save the data in the PDF format Compact PDF Select this setting to save the data compressed more than with the PDF format TIFF Select this setting to save data in the TIFF for mat JPEG Select this setting to save the data in the JPEG format XPS Select this setting to save data in ...

Page 222: ...on Level Yes Select this setting to enable encryption After selecting this setting set the encryp tion level to Low Middle or High No Select this setting to disable encryption User PW Type in the password required to open encrypted data up to 32 characters Document Permissions Type in the password required to change the permissions for a document up to 32 characters ...

Page 223: ... if it is allowed Level 1 Pages can be inserted deleted and rotated Level 2 Annotations can be created data can be entered in form fields and sig natures can be added to existing signature fields Level 3 All operations except page extracting can be performed Level 4 Data can be entered in form fields and signatures can be added to existing signature fields Level 5 The page layout can be changed da...

Page 224: ...address of E mail messages Item Description ON Select this setting to divide transmission data OFF Select this setting to not divide transmission data Admin Setting The setting specified with Admin Settings Ethernet Binary Division is given priority Description Settings ON OFF Specify settings for E mail encryption Description Settings ON OFF Select whether or not a digital signature is applied to...

Page 225: ...g Scan to E mail mode operations 10 13 From Specify the sender s address Select Administrator E mail Addr or User Address or type it in directly Body Type in the body text for the E mail message Item Description ...

Page 226: ...st appears when the initial Scan to E mail mode screen is displayed Select a destination from the list To specify multiple destinations for a broad cast transmission specify all destinations where the data is to be sent The setting for the Favorites list can be specified for a destination when it is registered For details refer to Registering an address book destination on page 10 34 Selecting wit...

Page 227: ... Directly typing in the address To specify a destination that is not registered with the machine directly type in the address 1 In the initial Scan to E mail mode screen press Direct Input 2 Press E mail 3 Type in the E mail address 4 Press OK To specify multiple destinations specify all destinations where the data is to be sent If Admin Settings Security Settings Security Details Manual Destinati...

Page 228: ...m destination the program destination must first be registered on the machine For details refer to Registering a program destination on page 10 35 1 Press Scan to E mail to display the initial Scan to E mail mode screen For details on the initial Fax screen refer to Initial Scan to E mail mode screen on page 2 9 2 Position the document to be scanned For details on loading the original document ref...

Page 229: ...n data set Settings Original Mode Sepa rate Scan to ON For details on Separate Scan refer to Original Mode Separate Scan on page 10 20 3 Specify the destination For details on specifying destinations refer to Specifying destina tions on page 10 26 In the initial Scan to Folder mode screen press Confirm to check or change the specified destinations 4 If necessary specify settings for other paramete...

Page 230: ...t specify its size If the size of the original document is not correctly specified some parts of the image may be lost For details on specifying the size of an original document refer to Original Size on page 10 19 If the memory becomes full while the document is being scanned scanning cannot continue To send the document pages that have already been scanned press the Start key To stop the transmi...

Page 231: ... sided Select this setting when scanning a double sided document Cover 2 sided Select this setting when scanning a double sided document with a cover page Only the front side of the cover page will be scanned and then both the front and back sides of the remain ing pages will be scanned Item Description Standard Size Select the size of the document Select Letter Legal to scan a document con tainin...

Page 232: ...parate Scan to Yes 4 Press the Start key The document is scanned 5 Place the next document page on the original glass and then press the Start key Repeat this step until all document pages have been scanned 6 After all pages of the document have been scanned press Finish Original Mode Original Direction Specify the orientation of the document Item Description Top Select this setting when the docum...

Page 233: ...t this setting to specify a binding position at the top Auto Select this setting to automatically specify the binding position If the document length is 297 mm 11 69 inches or less a binding position along the long side of the paper is selected If the document length is more than 297 mm 11 69 inches a binding position along the short side of the paper is selected Item Description Auto Color ON Sel...

Page 234: ...ng documents containing a combination of text and photos Photo Select this setting when scanning documents containing only photos Item Description Background Removal Select the density of the background color at which documents with a background color are to be scanned Nine density levels are available for the background color Density Select the density at which the document is to be scanned Nine ...

Page 235: ...set to Compact PDF Resolution can only be set to 300 300dpi Item Description 150 150dpi Select this setting to scan the document at 150 150 dpi 200 200dpi Select this setting to scan the document at 200 200 dpi 300 300dpi Select this setting to scan the document at 300 300 dpi 600 600dpi Select this setting to scan the document at 600 600 dpi Item Description PDF Select this setting to save the da...

Page 236: ...t this setting to save the data divided into individual pages Multi Page Select this setting to save the scan as multi page data Item Description Encryp tion Level Yes Select this setting to enable encryption After selecting this setting set the encryption level to Low Middle or High No Select this setting to disable encryption User PW Type in the password required to open encrypted data up to 32 ...

Page 237: ...sion level if it is allowed Level 1 Pages can be inserted deleted and rotated Level 2 Annotations can be created data can be entered in form fields and signatures can be added to existing signature fields Level 3 All operations except page extracting can be performed Level 4 Data can be entered in form fields and signatures can be added to existing signature fields Level 5 The page layout can be c...

Page 238: ...ddress on page 10 28 Selecting from the log on page 10 31 Selecting from registered destinations An address book destination or group destination can be selected from those previously registered on the machine In order to select a registered destination address book destinations and group destinations must first be registered on the machine For details refer to Registering destinations on page 10 ...

Page 239: ...een press 2 Press the desired index tab to search for destinations If the desired index tab is not displayed press or until the desired tab appears To select a group destination press and then press Group Address on the rightmost end 3 Select the destination and then press OK To specify multiple destinations specify all destinations where the data is to be sent Selecting by searching for a destina...

Page 240: ...OK To specify multiple destinations specify the various settings press Next Dest and then specify the settings for the next FTP destina tion If Admin Settings Security Settings Security Details Manual Destination Input is set to Restrict an address cannot be directly typed in For details on Manual Destination Input refer to Security Settings on page 3 69 With PC SMB 1 In the initial Scan to Folder...

Page 241: ...s OK To specify multiple destinations specify the various settings press Next Dest and then specify the settings for the next WebDAV desti nation If Admin Settings Security Settings Security Details Manual Destination Input is set to Restrict an address cannot be directly typed in For details on Manual Destination Input refer to Security Settings on page 3 69 With USB Memory 1 Plug the USB memory ...

Page 242: ...Input is set to Restrict an address cannot be directly typed in For details on Direct Input refer to Security Settings on page 3 69 With an HDD transmission only one destination can be specified Scan data saved on the hard disk can be saved to a computer by copying it with Web Connection For details refer to the Reference Guide With Web Service Settings With a Web Service transmission scan data ca...

Page 243: ...rect Input In addition destinations specified with broadcast transmissions do not appear in the log Selecting a program destination Data can be sent with a program destination previously registered on the machine Program destinations are registered with destinations where data is fre quently sent together with scan settings allowing data to easily be sent with out the trouble of specifying the var...

Page 244: ...Specifying destinations 10 32 5 Press the Start key Press the Start Color key to scan in color or press the Start B W key to scan in black and white ...

Page 245: ...dress book destination on page 10 34 Computer folder FTP SMB and WebDAV destinations are registered only from Web Connection For details refer to the Reference Guide Group Address Multiple address book destinations can be registered together as a group This is useful when sending the same scan data to multiple destinations A maximum of 100 group destinations with a maximum of 500 address book dest...

Page 246: ...n address book destination to send scan data refer to Selecting from registered destinations on page 10 26 If Admin Settings Security Settings Security Details Manual Destination Input is set to Restrict a destination cannot be regis tered from the control panel Registering an address book destination E mail transmission 1 Press the Utility Counter key 2 Press Address Registration 3 Press E mail 4...

Page 247: ...itial Scan to E mail or Scan to Folder mode screen 2 Specify settings for the various parameters available from the Settings screen For details on the parameters available from the Settings screen refer to Performing Scan to E mail mode operations on page 10 3 and Performing Scan to Folder mode operations on page 10 17 3 In the control panel press the Mode Memory key The list of program destinatio...

Page 248: ...Registering destinations 10 36 ...

Page 249: ...Registering destinations 10 37 ...

Page 250: ...Registering destinations 10 38 ...

Page 251: ...11 Replacing Consumables ...

Page 252: ... machine or on yourself When replacing the toner cartridges install only new cartridges If a used toner cartridge is installed the amount of remaining toner may not appear correctly Do not open the toner cartridge unnecessarily If toner is spilled avoid inhaling it or allowing it to come in contact with your skin If toner gets on your hands or clothes immediately wash them with soap and water If t...

Page 253: ... sponded TYPE genuine toner cartridges Keep toner cartridges In their packaging until you re ready to install them In a cool dry location away from sunlight due to heat The maximum storage temperature is 35 C 95 F and the maximum storage humidity is 85 noncondensing If the toner cartridge is moved from a cold place to a warm humid place condensation may occur degrading print quality Allow the tone...

Page 254: ...e If toner spills immediately wipe it off with a soft dry cloth When the toner is empty the message Replace Toner x appears in the touch panel Follow the instructions below to replace the toner cartridge As an example the procedure for replacing the yellow toner cartridge is described below 1 Open the machine s front cover ...

Page 255: ...the procedure to replace the toner cartridge Y 3 Grab the handle of the toner car tridge to be replaced and then pull out the cartridge The following instructions show the procedure to replace the toner cartridge Y Note Dispose of the used toner cartridge according to your local regulations Do not burn the toner cartridge For details refer to About Toner Cartridges on page 11 2 4 Check the color o...

Page 256: ...Replacing Consumables 11 6 5 Remove the toner cartridge from the bag 6 Shake the cartridge to distribute the toner 7 Peel off the protective film from the right side of the toner car tridge 3 ...

Page 257: ...e Fully insert the toner car tridge 9 Pull the lever to the right to lock it in place The front lever should be securely returned to its original position other wise the front cover of the machine cannot be closed If it is difficult to operate the lever push it in 10 Make sure that the toner car tridge is securely installed and then peel off the protective film ...

Page 258: ...Replacing Consumables 11 8 11 Close the front cover When closing the front cover press the area of the cover with small pro jections ...

Page 259: ...rum surface This could lower image quality If the messages Replace Imaging Unit appear replace the specified imaging unit As an example the procedure for replacing the black imaging unit is described below 1 Check the message window to see which color imaging unit needs replac ing ...

Page 260: ...l the front lever of the color toner cartridge indicated to the left The replacement procedure for the imaging unit is the same for all colors yellow Y magenta M cyan C and black K The following instructions show the procedure to replace the toner cartridge K Y M C K ...

Page 261: ...pull out the cartridge Do not tilt removed toner car tridge otherwise toner may spill 5 Pull up the waste toner bottle to unlock it 6 Grab the left and right handles of the waste toner bottle and then slowly pull out the bottle Do not tilt removed waste toner box otherwise waste toner may spill ...

Page 262: ...instructions show the procedure to replace the imaging unit K Note Dispose of the used imaging unit according to your local regulations Do not burn the imaging unit 8 Check the color of the new imaging unit to be installed In order to prevent toner from spilling leave the imaging unit in the bag until step 7 is being performed 9 Remove the imaging unit from the bag ...

Page 263: ...ds and then shake it twice as shown in the illustration Do not grab the bottom of the bag otherwise the imaging unit may be damaged resulting in decreased print quality 11 Remove the protective cover from the imaging unit Remove all packing tape from the imaging unit ...

Page 264: ...it Remove the protective cover from the imaging unit 13 Make sure that the new imaging unit to be installed is the same color as the machine compart ment and then install the imag ing unit in the machine 14 Press in on the waste toner bot tle until it locks into place ...

Page 265: ...nd then insert the toner cartridge into the machine Fully insert the toner car tridge 16 Pull the lever to the right to lock it in place The front lever should be securely returned to its original position other wise the front cover of the machine cannot be closed If it is difficult to operate the lever push it in ...

Page 266: ...Replacing Consumables 11 16 17 Close the front cover When closing the front cover press the area of the cover with small pro jections ...

Page 267: ...en the waste toner bottle becomes full the message Waste Toner Box Full appears in the message window The machine stops and will not start again until the waste toner bottle is replaced 1 Open the machine s front cover 2 Pull up the waste toner bottle to unlock it ...

Page 268: ... otherwise waste toner may spill 4 Remove the new waste toner bottle from its packaging Insert the used waste toner bottle into the plastic bag included in the box and then box it up Note Dispose of the used waste toner bottle according to your local regulations Do not burn the waste toner bottle 5 Press in on the waste toner bot tle until it locks into place ...

Page 269: ...ing Consumables 11 19 6 Close the front cover When closing the front cover press the area of the cover with small pro jections If the waste toner bottle is not fully inserted the front cover cannot be closed ...

Page 270: ...sfer roller unit appears Printing can continue even after this message appears however since the print quality is reduced the transfer roller should be replaced immediately 1 Pull the lever and then open the right door Before opening the right door fold up Tray 1 2 While pushing the levers to the inside move the roller presser toward you ...

Page 271: ...e continuing to press the levers remove the transfer roller 4 Prepare a new transfer roller 5 While pressing the levers insert the shaft of the transfer roller into the bearings 6 Move the levers away from you until it snaps into place ...

Page 272: ... Replacing the Transfer Belt Unit When the time to replace the transfer belt unit is reached the message Replace image transfer belt appears Printing can continue even after this message appears however since the print quality is reduced the transfer belt unit should be replaced immediately 1 Turn off the machine and discon nect the power cord and inter face cover ...

Page 273: ...emoving the toner cartridges imaging units or waste toner bottle refer to Replacing a Toner Car tridge on page 11 4 or Replacing a Imaging Unit on page 11 9 Cover the removed imag ing unit to protect it from direct sunlight Do not tilt removed toner cartridge otherwise toner may spill Do not tilt removed waste toner box otherwise waste toner may spill ...

Page 274: ...1 24 4 Pull the lever and then open the right door Before opening the right door fold up Tray 1 5 Remove the top part of the right door 6 Insert the protective sheet into the unit in the direction of the arrow until it stops ...

Page 275: ...he handles and then care fully pull out the transfer belt unit Be sure to keep the transfer belt level other wise the transfer belt may be scratched 9 Prepare a new transfer belt unit Be careful not to touch the surface of the belt Do not remove the blue lever ...

Page 276: ...ective cover from the new transfer belt unit 11 Insert the new transfer belt unit along the rails Fully insert it until it locks into place Be sure to keep the transfer belt level other wise the transfer belt may be scratched 12 Push up the guides ...

Page 277: ...Replacing Consumables 11 27 13 Pull out the protective sheet 14 Install the top part of the right door 15 Close the right door ...

Page 278: ...toner bottle For details on installing the toner cartridges imaging units or waste toner bottle refer to Replacing a Toner Car tridge on page 11 4 or Replacing a Imaging Unit on page 11 9 17 Close the front cover When closing the front cover press the area of the cover with small pro jections ...

Page 279: ...Replacing Consumables 11 29 18 Reconnect the power cord and turn on the machine 19 Reset the counter in the Admin Settings Maintenance Menu Supplies Consumables Replace Transfer Belt Unit menu ...

Page 280: ...attery Note Only use the coin shaped 3V lithium battery CR2032 It s very important to protect the machine controller board and any associated circuit boards from electrostatic damage Before performing this procedure review the antistatic caution on page 11 38 In addition always handle circuit boards by the edges only 1 Turn off the machine and discon nect the power cord and inter face cables 2 Rem...

Page 281: ...Replacing Consumables 11 31 3 Using a coin remove a screw 4 Open the cover 5 Remove the hook and then remove the backup battery ...

Page 282: ...Dispose of used batteries according to your local regulations Do not burn the backup battery 7 Reinstall the panel and tighten a screw 8 Install the cover 9 Reconnect all interface cables 10 Reconnect the power cord and turn on the machine 11 Use Date XX XX XX on the Admin Settings Machine Settings Date Time Settings menu to set the date and use Time on the Admin Settings Machine Settings Date Tim...

Page 283: ...is reduced the fuser unit should be replaced immediately 1 Turn off the machine Note There are extremely hot parts within the machine Before replacing the fuser unit wait about 20 minutes after turning off the machine and then check that the fusing section has reached room temperature otherwise you may get burnt 2 Pull the lever and then open the right door Before opening the right door fold up Tr...

Page 284: ...Replacing Consumables 11 34 4 Pull down the 2 levers 5 Remove the fuser unit 6 Prepare a new fuser unit Be careful not to touch the surface of the fuser roller ...

Page 285: ...Replacing Consumables 11 35 7 Lift up the 2 levers 8 Remove the packing material 9 Push down the 2 levers ...

Page 286: ...Replacing Consumables 11 36 10 Pull down the 2 levers of a new fuser unit 11 Insert the fuser unit until it locks into place 12 Lift up the 2 levers ...

Page 287: ...3 Close the fuser unit cover 14 Close the right door If the door cannot be closed check that the fuser unit is fully inserted 15 Reset the counter in the Admin Settings Maintenance Menu Supplies Consumables Replace Fusing Unit menu ...

Page 288: ...h one end of it to your wrist and the other end to the bare metal chassis on the back of your printer Never attach the wrist strap to any piece of equipment with an electrical current present Plastic rubber wood painted metal surfaces and telephones are not acceptable grounding points If you don t have an antistatic wrist strap discharge your body s static electric charge by touching a grounded su...

Page 289: ...12 Maintenance ...

Page 290: ...maged and an electric shock may occur CAUTION The fuser unit is hot When the right door is opened the fuser unit temperature drops gradually one hour wait time Be careful when cleaning the inside of the machine or removing media misfeeds as the fuser unit and other internal parts may be very hot Do not place anything on top of the machine Use a soft cloth to clean the machine Never spray cleaning ...

Page 291: ... the media is stocked too high your machine may experience media misfeeds and excessive media curl Make sure two people are avail able to lift the machine when moving it Keep the machine level to avoid toner spillage When lifting the machine fold up Tray 1 and then lift the machine as shown in the illustration at the right If the optional lower feeder unit is installed move it and the machine sepa...

Page 292: ...the machine 12 4 Cleaning the machine CAUTION Be sure to turn off the machine and unplug the power cord before cleaning Exterior Control Panel Ventilation Grill Machine Exterior Original Glass Original Cover Pad ...

Page 293: ...f paper dust and other debris on the media rollers can cause media feeding problems Cleaning the Media Feed Rollers Manual Feed Tray 1 Open Tray 1 2 Press down on the center of the paper lifting plate until the left and right locking tabs white lock into place ...

Page 294: ...Cleaning the machine 12 6 3 Clean the media feed rollers by wiping them with a soft dry cloth 4 Close the tray ...

Page 295: ...Cleaning the machine 12 7 Cleaning the Media Feed Rollers for Tray 2 3 4 1 Pull out the tray 2 Clean the media feed rollers by wiping them with a soft dry cloth 3 Close the tray ...

Page 296: ...llers for Tray 3 4 1 Open the right side cover of Tray 3 or Tray 4 Before opening the right side cover of Tray 3 or Tray 4 fold up Tray 1 2 Clean the media transfer rollers by wiping them with a soft dry cloth 3 Close the right side cover of Tray 3 or Tray 4 ...

Page 297: ...Cleaning the machine 12 9 Cleaning the Media Feed Rollers for the ADF 1 Open the ADF feed cover 2 Clean the media feed rollers by wiping them with a soft dry cloth 3 Close the ADF feed cover ...

Page 298: ...ur laser lenses Clean all lenses as described below The laser lens cleaning tool should be attached to the inside of the tray 2 1 Pull out the tray 2 2 Remove the cover Since the cover will be used later do not return it to its original position 3 Remove the cleaning tool from the tray 2 ...

Page 299: ...aser lens to be cleaned For details on removing the toner cartridge imaging unit or waste toner bottle refer to Replacing a Toner Car tridge on page 11 4 or Replacing a Imaging Unit on page 11 9 Do not tilt removed toner car tridge otherwise toner may spill Do not tilt removed waste toner box otherwise waste toner may spill 7 Attach the cover to the removed imaging unit ...

Page 300: ...ack and forth movement 2 or 3 times 9 Install the removed toner car tridge imaging unit and waste toner bottle For details on installing the toner cartridge imaging unit or waste toner bottle refer to Replacing a Toner Car tridge on page 11 4 or Replacing a Imaging Unit on page 11 9 10 Close the front cover 11 Pull out the tray 2 ...

Page 301: ... to its holder on the inside of the tray 2 13 Close the cover 14 Close the tray 2 15 Clean between each of the laser lenses in the same way The laser lens cleaning tool is included with the machine Safely store the laser lens cleaning tool so that it will not be lost ...

Page 302: ...Cleaning the machine 12 14 ...

Page 303: ...13 Troubleshooting ...

Page 304: ...ttings 3 Press Print Settings 4 Press Report Print 5 Press Config Page 6 Press Print 7 Press OK Printing the configuration page page 13 2 Unlocking the Scanner page 13 3 Preventing media misfeeds page 13 4 Understanding the media path page 13 5 Clearing media misfeeds page 13 6 Solving problems with media misfeeds page 13 23 Solving other problems page 13 26 Solving problems with printing quality ...

Page 305: ...Unlocking the Scanner 13 3 Unlocking the Scanner 1 Lift open the ADF cover 2 Move the scanner lock lever to 3 Close the ADF cover 4 Turn off the machine and then turn it on again ...

Page 306: ...r print quality media mis feeds and machine damage You load the media printing side up in the tray many manufacturers place an arrow on the end of the wrapper to indicate the printing side Avoid Media that is folded wrinkled or excessively curled Double feeding remove the media and fan the sheets they may be sticking together Loading more than one type size weight of media in a tray at the same ti...

Page 307: ...s 4 Fuser unit 10 Print head unit 5 Duplex 11 Imaging unit 6 Tray 1 Manual feed tray 12 Transfer belt unit 7 Tray 4 optional lower feeder unit 13 Toner cartridge 8 Tray 3 optional lower feeder unit 14 Output tray 9 Tray 2 4 11 12 13 14 6 5 10 9 8 7 3 1 2 1 ADF media feed rollers 2 Document feed tray 3 Document output tray ...

Page 308: ...as best as you can If some toner remains on your clothes use cool not hot water to rinse the toner off If toner gets on your skin wash it off with cool water and a mild soap CAUTION If you get toner in your eyes wash it out immediately with cool water and consult a doctor If after clearing the media misfeed the misfeed message in the control panel window persists open and close the engine cover Th...

Page 309: ...Clearing Media Misfeeds 13 7 Clearing a Media Misfeed in Tray 2 1 Pull the lever and then open the right door Before opening the right door fold up Tray 1 2 Carefully pull out the misfed media ...

Page 310: ...levers may result in burns If you get burned immediately cool the skin under cold water and then seek professional medical attention Note Decreased print quality may result if the surface of the image transfer belt or the transfer roller is touched Be careful not to touch the surface of the image transfer belt or transfer roller ...

Page 311: ...Clearing Media Misfeeds 13 9 3 Close the right side door 4 Pull out Tray 2 and then remove all media from the tray 5 Fan the media you removed and then align it well ...

Page 312: ...Clearing Media Misfeeds 13 10 6 Load the media face up in Tray 2 Make sure that the media is flat Do not load paper above the mark Slide the media guides against the edges of the paper 7 Close Tray 2 ...

Page 313: ...ing a Media Misfeed in Tray 3 4 1 Open the right side cover of Tray 3 or Tray 4 Before opening the right side cover of Tray 3 or Tray 4 fold up Tray 1 2 Carefully pull out the misfed media 3 Close the right side cover of Tray 3 or Tray 4 ...

Page 314: ...emove all paper from the tray 5 Fan the paper you removed and then align it well 6 Load the paper face up in Tray 3 or Tray 4 Make sure that the paper is flat Do not load paper above the mark Slide the media guides against the edges of the paper 7 Close Tray 3 or Tray 4 ...

Page 315: ...Clearing Media Misfeeds 13 13 Clearing a Media Misfeed from the ADF 1 Open the ADF feed cover 2 Remove the document from the ADF document feed tray 3 Lift to open the ADF cover ...

Page 316: ...Clearing Media Misfeeds 13 14 4 Remove any misfed media 5 Close the ADF cover 6 Close the ADF feed cover ...

Page 317: ...edia Misfeeds 13 15 Clearing a Media Misfeed from the Duplex 1 Pull the lever and then open the right door Before opening the right door fold up Tray 1 2 Carefully pull out the misfed media 3 Close the right door ...

Page 318: ...g Media Misfeeds 13 16 Clearing a Media Misfeed from the Fuser Unit 1 Pull the lever and then open the right door Before opening the right door fold up Tray 1 2 Lift up the 2 levers 3 Open the fuser unit cover ...

Page 319: ...Clearing Media Misfeeds 13 17 4 Carefully pull out the misfed media If the misfed media cannot be removed by pulling it down pull it from the top of the fuser unit ...

Page 320: ...levers may result in burns If you get burned immediately cool the skin under cold water and then seek professional medical attention Note Decreased print quality may result if the surface of the image transfer belt or the transfer roller is touched Be careful not to touch the surface of the image transfer belt or transfer roller ...

Page 321: ...Clearing Media Misfeeds 13 19 5 Close the fuser unit cover 6 Push down the 2 levers 7 Close the right door ...

Page 322: ...Misfeeds 13 20 Clearing a Media Misfeed from Tray 1 Manual Feed Tray and Transfer Roller 1 Pull the lever and then open the right door Before opening the right door fold up Tray 1 2 Carefully pull out the misfed media ...

Page 323: ...levers may result in burns If you get burned immediately cool the skin under cold water and then seek professional medical attention Note Decreased print quality may result if the surface of the image transfer belt or the transfer roller is touched Be careful not to touch the surface of the image transfer belt or transfer roller ...

Page 324: ...Clearing Media Misfeeds 13 22 3 Close the right door ...

Page 325: ...pened and closed again to reset the machine Open and close the front cover again Some media remains misfed in the machine Check the media path again to make sure that you have removed all of the misfed media Duplex mis feeds Unsupported media wrong size thick ness type etc is being used Use approved media See Special Paper on page 4 11 Plain paper recycled paper special paper Thick 1 and Thick 2 c...

Page 326: ...tly positioned in the tray Remove the misfed media and reposi tion the media properly in the tray The number of sheets in the tray exceeds the maximum allowed Remove the excess media and reload the correct number of sheets in the tray The media guides are not correctly adjusted to the media size Adjust the media guides in the Tray 1 to match the size of the media Warped or wrinkled media is loaded...

Page 327: ...n Tray 1 Load the envelopes in Tray 1 with the flaps facing up If the flaps are on the long edge load the envelopes with the flap edge toward the machine and the flap side facing up Unsupported media wrong size thick ness type etc is being used Use approved media See Specifications on page 4 2 The media feed roller is dirty Clean the media feed roller For more details refer to Media Roll ers on pa...

Page 328: ...tch off O position then turn it back to the on I position The machine is con nected to an outlet with a voltage or fre quency that does not match the machine specifications Use a power source with the specifica tions listed in appendix A Technical Specifications The control panel dis plays Toner is low much sooner than expected One of the toner car tridges may be defec tive Remove the toner cartri...

Page 329: ...sing regular paper make sure that the media type is set properly in the driver The machine is set to power saving mode It takes time for printing to start in power saving mode The job is very com plex Wait No action needed A toner cartridge for a different region or an unapproved toner cartridge is installed Incorrect toner car tridge is displayed in the message win dow Install a correct toner car...

Page 330: ...rienc ing duplex problems Media or settings are not correct Make sure that you are using correct media See Specifications on page 4 2 Do not duplex custom sized media envelopes labels postcards letter head or glossy media Make sure that you have not mixed media types in the tray In the Windows printer driver Layout Print Type choose 2 Sided Set duplex Double Sided copying For details on setting du...

Page 331: ... scanned image are missing Acrobat 8 Macintosh version is used for scanning the image With the Acrobat Scan setting turn off the OCR and Filtering functions The web based utility cannot be accessed The Web Connection Administrator s pass word is incorrect The Web Connection Administrator password has a 0 character minimum and an 16 character maximum For details of the Web Connection admin istrator...

Page 332: ...r and then type in the necessary information before printing The hard disk was automati cally format ted The hard disk was full When the control panel displays HDD is low on disk space delete print jobs and resources fonts forms etc which were saved on the hard disk using Download Manager or Web Con nection A network connection cannot be established with an IPv4 address Duplicate detection of the ...

Page 333: ... for media storage Remove the moist media and replace it with new dry media The media set in the printer driver mis matches the media loaded in the machine Load the correct media in the machine Several sheets are being fed at the same time Remove the media from the tray and check for static electricity Fan plain paper or other media and replace it in the tray Entire sheet is printed in black or co...

Page 334: ...cards thick stock glossy media single side only paper or spe cial paper specify the appropriate media type in the printer driver Image is too dark The copy density is set too dark Select a lighter copy density The document was not pressed close enough against the original glass Position the document so that it is pressed close enough against the orig inal glass For details on positioning the docum...

Page 335: ... toner cartridges may be defective or low Remove the toner cartridges and check for damage If it is damaged replace it One or more of the imaging units is defective Remove the imaging units and check for damage If it is damaged replace it The machine is not level Place the machine on a flat hard level surface Irregular print or mot tled image appears The media is moist from humidity Adjust the hum...

Page 336: ...he toner cartridges are defective or installed incorrectly Remove the toner cartridges and check for damage If it is damaged replace it There are toner smudges on the back side of the page whether or not it has been duplexed The media transfer roller is dirty Clean the media transfer roller If you think the transfer roller should be replaced contact Technical Support with the error information The...

Page 337: ...e abnormal image Replace it with a new toner cartridge One or more of the imaging units may be defective Remove the imaging units and check for damage If it is damaged replace it Lateral lines or bands appear on image The machine is not level Place the machine on a flat hard level surface The media path is dirty with toner Print several sheets and the excess toner should disappear One or more of t...

Page 338: ...ttings menu to ON and then perform the AIDC color cali bration For details refer to Print Set tings on page 3 48 The front cover is opened during the calibration One or more of the toner cartridges may be defective Remove the toner cartridges and check for damage If it is damaged replace it The media is moist from humidity Remove the moist media and replace it with new dry media The color has a po...

Page 339: ... steps Status messages Message Cause Solution Initializing The machine was turned on No action is required Restarting The machine is being restarted Enter Power Save mode The machine is enter ing normal operation mode from Power Save mode Calibrating The image is being adjusted Warming up The machine is warm ing up or AIDC is being performed Check setting Tray x The paper specified from the touch ...

Page 340: ...toner x Toner empty Replace toner and close front door x The time to replace the toner cartridge has been reached Replace the indicated toner cartridge Replace image transfer belt Replace transfer belt unit The time to replace the transfer belt unit has been reached Replace the transfer belt unit After replacing the transfer belt unit reset its counter For details refer to Maintenance Menu on page...

Page 341: ...l proper toner cartridge x A toner cartridge incompatible with the machine has been installed Replace the indicated toner cartridge with a correct one Incorrect Imaging Unit Install proper imaging unit x An imaging unit incompatible with the machine has been installed Replace the indicated imaging unit with a cor rect one Replace transfer roller unit Replace transfer roller unit The time to replac...

Page 342: ...ine off then on again Message Cause Solution Configuration of Options Changed Configuration of Options Changed Power Off and ON An optional lower feeder unit was installed or removed while the machine is on Turn the machine off wait a few seconds and then it on again Cover Open Cover is open Close all covers properly The cover is open Close the indicated cover Misfeed Detected Misfeed was detected...

Page 343: ...ridge has been reached Replace the appropri ate toner cartridge Paper Size Mismatch Load xxx in Tray x or can cel job The paper size speci fied from the touch panel is different from the size of paper loaded in the paper tray Load paper of the cor rect size into the indi cated paper tray Otherwise cancel the job Paper Setting for Manual feed Load xx xxxx in bypass tray Touch Print Tray 1 has been ...

Page 344: ... the paper from the output tray Memory Full Insufficient memory Cancel the job The print data sent from the computer has caused the memory to become full Cancel the job Stored Job Error Stored job specification not correct Tray x Tray 3 Tray 4 was specified for printing a stored job when Tray 3 Tray 4 is not installed on the machine When trying to print a stored job the installed memory had been c...

Page 345: ... not available xxxxx Paper of the same size as the document cannot be selected with the Auto Paper setting selected in Copy mode Load the paper tray with paper of the same size as the document Out of the Range of Auto Zoom Zoom ratio for paper size is outlying Select other paper or zoom ratio An appropriate zoom ratio cannot be selected with the Auto Zoom setting selected Specify a zoom ratio betw...

Page 346: ...der reached limit The job is cancelled The number of image files on the hard disk has reached the maximum possible Cancel the job Connection Failed Check if the destination is correct The job is cancelled The machine failed to connect to the FTP server Wait a while The error is canceled Error Occurred during Writing Check whether it is write protected or out of space The machine failed to write da...

Page 347: ...in If the problem persists contact your local vendor or authorized service provider Message Cause Solution Service Call Error occurred Power OFF and ON or contact Service with Trouble Code xxxx An error has been detected with the item indicated by xxxx in the service message Restart the machine This often clears the service message and machine operation can resume If the problem persists contact t...

Page 348: ...Status error and service messages 13 46 ...

Page 349: ...14 Installing Accessories ...

Page 350: ... 14 2 Introduction Note Use of accessories not manufactured or supported by manufacuture will void your warranty For details of accessories visit our web site Lower Feeder Unit Tray 3 Tray 4 500 sheet tray included ...

Page 351: ... Lower Feeder Unit PF P08 You can install up to one optional lower feeder unit Tray 3 4 The lower feeder unit increases your machine s media feed capacity by 500 sheets Kit Contents Lower feeder unit with a tray 500 sheet capacity ...

Page 352: ...it in order to prevent accidental spills 1 Turn off the machine and discon nect the power cord and inter face cables 2 Prepare the lower feeder unit Be sure to place the lower feeder unit on a level surface 3 Open the right side cover of the lower feeder unit The right side cover of the lower feeder must be opened before the feeder can be installed onto the machine ...

Page 353: ...sitioning pins on the lower feeder unit correctly fit into the holes on the bottom of the machine WARNING This machine weighs approximately 39 kg 86 lbs when it is fully loaded with consumables The machine must be lifted by two people 5 Close the right side cover of the lower feeder unit 6 Reconnect all interface cables 39 kg 86 lbs ...

Page 354: ...Lower Feeder Unit PF P08 14 6 7 Reconnect the power cord and turn on the machine 8 Declare Paper Source Unit 3 4 in the Windows printer driver Properties Configure tab ...

Page 355: ...Appendix ...

Page 356: ...e Sheets books and other three dimen sional objects Size Maximum Legal Weight Maximum 3 kg First print Black and white color 12 9 seconds or less with plain A4 paper 12 8 seconds or less with plain Letter paper First copy Black and white 10 1 seconds or less with plain Letter A4 paper Color 12 seconds or less with plain Letter A4 paper Print speed copy speed Simples sin gle sided Plain paper A4 30...

Page 357: ...er width 1 92 to 216 mm Paper length 148 to 356 mm 1 Envelopes with a width of 220 mm can be printed from Tray 1 manual feed tray Tray 3 Tray4 optional A4 B5 Executive Letter Government Legal Legal Paper types Plain paper 60 to 90 g m2 Recycled 60 to 90 g m2 Envelopes Letterhead Label Thick 1 91 to 150 g m2 Thick 2 151 to 210 g m2 Postcard Glossy 1 100 to 128 g m2 Glossy 2 129 to 158 g m2 Single s...

Page 358: ...e loss width Printing Leading edge trailing edge right edge left edge 4 2 mm or less Copying Leading edge trailing edge right edge left edge 4 0 mm or less Output capacity 250 sheets Operating temperature 10 to 30 C 50 to 86 F Fluctuations of no more than 10 C 18 F within an hour Operating humidity 15 to 85 Fluctuations of no more than 10 within an hour Power supply 120 V 60 Hz 220 to 240 V 50 to ...

Page 359: ...nd the manual feed tray Weight Approximately 34 6 kg 76 3 lb without consum ables Approximately 39 0 kg 86 0 lb with consumables Interface USB 2 0 High Speed compliant 10Base T 100Base TX 1000Base T Ethernet Host USB USB device printing Standard memory 1536 MB Hard disk 120 GB Machine life Maximum 400 000 pages and no more than 5 years ...

Page 360: ...me a small amount of each tonerduring the initialization operation when the machine is turned on or off and during automatic adjustments to main tain print quality Even if an operating error occurred during black and white printing color toner is consumed and may need to be replaced Item Average Life Expectancy Toner cartridge Standard in box Cartridge 6 000 pages or more continuous Replacement Ca...

Page 361: ...Technical specifications A 7 Service Replaceable Item Average Life Expectancy Media feed roller 300 000 pages ...

Page 362: ...ter that you want to enter To enter uppercase letters press To enter symbols press To enter special characters such as accented characters press To delete the character to the right of the cursor press Delete To move the cursor press or Numbers can also be typed in with the keypad in the control panel To clear all entered text press the C key ...

Page 363: ...chine meets the ENERGY STAR Guidelines for energy efficiency What is an ENERGY STAR product An ENERGY STAR product has a special feature that allows it to automati cally switch to a low power mode after a period of inactivity An ENERGY STAR product uses energy more efficiently saves you money on utility bills and helps protect the environment ...

Page 364: ...Our Concern for Environmental Protection A 10 ...

Page 365: ...stration 3 42 Authentication 3 43 Copy Settings 3 47 Ethernet 3 44 Fax Settings 3 62 HDD Format 3 76 Job Timeout 3 47 Machine Settings 3 40 Maintenance Menu 3 62 Memory Direct Print 3 47 Paper Empty 3 77 Print Settings 3 48 Restore Defaults 3 76 Scan Settings 3 68 Security Settings 3 69 C Consumables Backup Battery 11 30 Fuser Unit 11 33 Imaging Unit 11 9 Toner Cartridge 11 2 Transfer Belt Unit 11...

Page 366: ... Loading 4 14 Path 13 5 Preventing misfeeds 13 4 Media Misfeed ADF 13 13 Duplex 13 15 Fuser Unit 13 16 Transfer Roller 13 20 Tray 1 13 20 Tray 2 13 7 Tray 3 4 13 11 Media Path 13 5 Memory Direct 6 3 Messages Error messages 13 38 Operator messages 13 40 Service messages 13 45 Status messages 13 37 Warning messages 13 38 Meter Count 3 7 Misfeed problems 13 23 Mode Memory 8 3 O Original cover pad 1 4...

Page 367: ...ignature 10 12 Simplex Duplex 10 4 Scan to Folder mode 10 17 Background Density 10 22 Color 10 21 File Setting 10 23 10 24 FTP 10 28 HDD 10 30 Original Mode 10 20 10 21 Original Size 10 19 Original Type 10 22 PC SMB 10 28 Resolution 10 23 Simplex Duplex 10 19 URL Notification 10 26 URL Notification Address 10 26 USB Memory 10 29 Web Service Settings 10 30 WebDAV 10 29 Scanner lock lever 1 4 Scanne...

Page 368: ...Index A 14 W Waste toner bottle 1 4 WIA Driver 9 7 ...

Reviews: