Phone 1800 636 091 • Email info@devi.com.au • Web www.devi.com.au
Devireg
™
535
Programming Instructions
Introduction
The devireg™ 535 allows you to program your heating system by using pre-set program modes. Follow the steps
below to ensure the most desireable outcome to suit your heating requirements. The first step is to configure the
thermostat:
• If your devireg™ 535 has not already been configured by an electrician or installer, go to the section “Configuring the
Thermostat”. Otherwise, skip this step.
• After your devireg™ 535 has been configured: There are 4 program modes to choose from. Depending on your requirements,
go to either the section “Manual Mode” or “Program Mode” and follow the steps provided to set up your thermostat.
Configuring the Thermostat
If your thermostat has already been configured by your installer or electrician, there is no need to configure
the thermostat.
1
Remove
front cover
To configure or re-configure your thermostat, you will need to remove the front cover. Depending on the type of cover,
the method of removal is slightly different. Refer to the images above for guidance.
Snap-lock Devireg
™
535 Front Cover:
Insert a paper clip into the slot (as shown in the diagram above) to snap-release the cover. Gently squeeze both sides of
the cover whilst removing it. Press the top circular button located on the right hand side of the thermostat with a pencil.
Original Devireg
™
535 Front Cover (if no slot on the bottom of the cover):
With a small screwdriver, gently press the release tabs on both sides of the thermostat (third groove from the bottom),
then remove the cover. Press the top circular button located on the right hand side of the thermostat with a pencil.
2
Select
sensor mode
If your under floor heating is in a bathroom or wet area, we recommend you select the floor sensor mode . If it is in a dry
area like a bedroom or living room, we recommend floor and room sensor mode . To change the selection press the
Select (•) button and then use the arrows (
) until the correct symbols appear. Then press the Select (•) button to save.
Move on to the next screen by using the right hand arrow (
). If you have chosen room sensor mode, go to Step 5.
3
Select
maximum
floor
temperature
The maximum floor temperature setting should now be displayed on the screen. To change the setting, press the
Select (•) button. Set the temperature by using the arrows (
) and then press the Select (•) button to select.
Depending on your floor structure and floor covering, we recommend the following:
Floor Construction
Tiles
Timber
Carpet
Timber base
32°C
27°C
30°C
Concrete or F/C base
45°C
27°C
40°C
Now move to the next screen by pressing the right hand arrow (
). If you have chosen floor and room sensor mode,
go to Step 5.
4
Choose the
scale
We recommend using “°C” for floor and room sensing or room sensing only, or 1-6 for floor sensing only. To change
the current setting, press the Select (•) button and change using the arrows (
), then press Select (•) to save.
5
Save your
selection
Press the top circular button with a pencil to go back to the original screen. Replace the front cover.
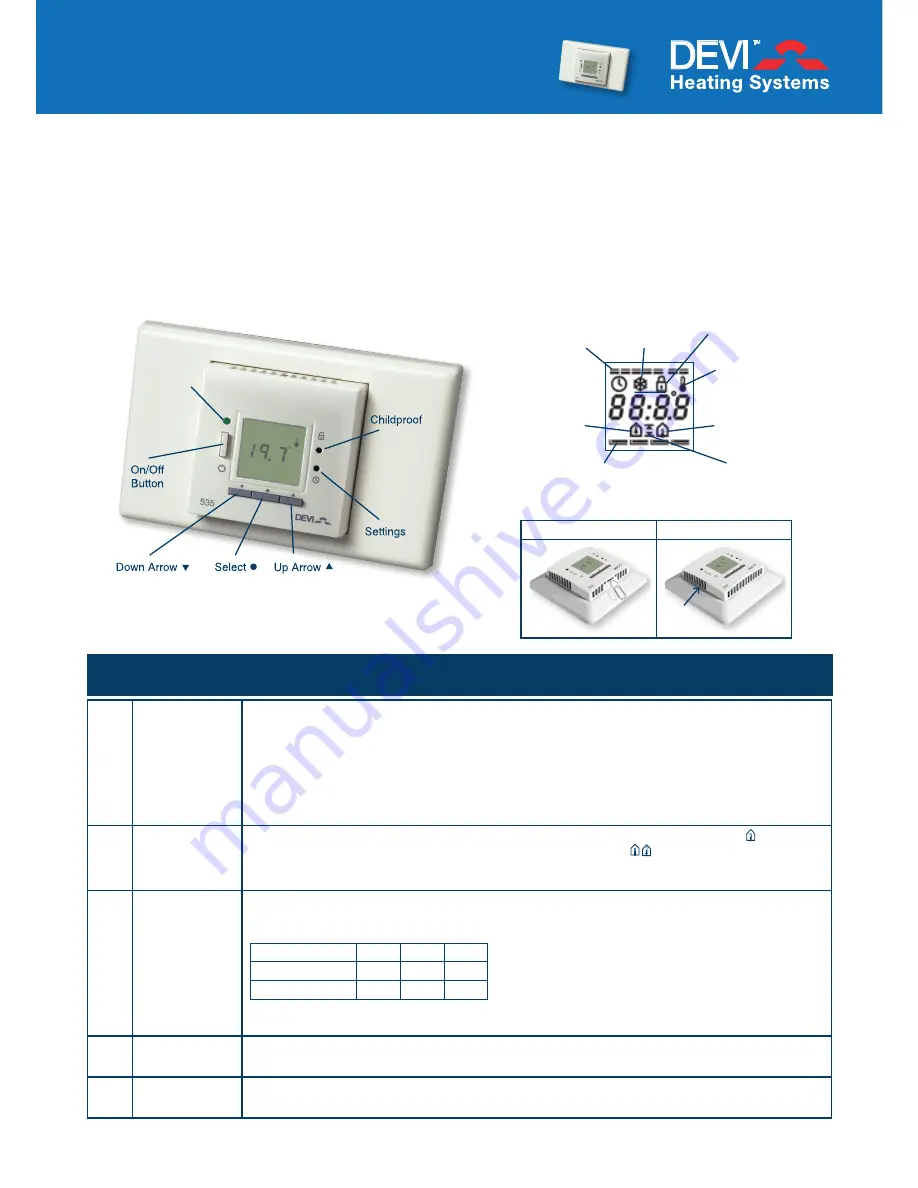
Time Periods (“Morning”,
“Day”, “Evening” & “Night”)
Weekdays
Settings
Room
Sensor
Floor
Sensor
Actual
Temperature
is displayed
Childproof
Frost
Protection
Maximum/
Minimum
Heat Indicator:
Red: Heating
Green: At temperature
Note: This is the maximum
temperature, not your preferred
operating temperature.
BROCDEV002.4
Snap-lock Devireg
™
535
Original Devireg
™
535
third
groove


