background image

6

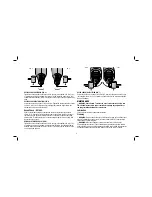
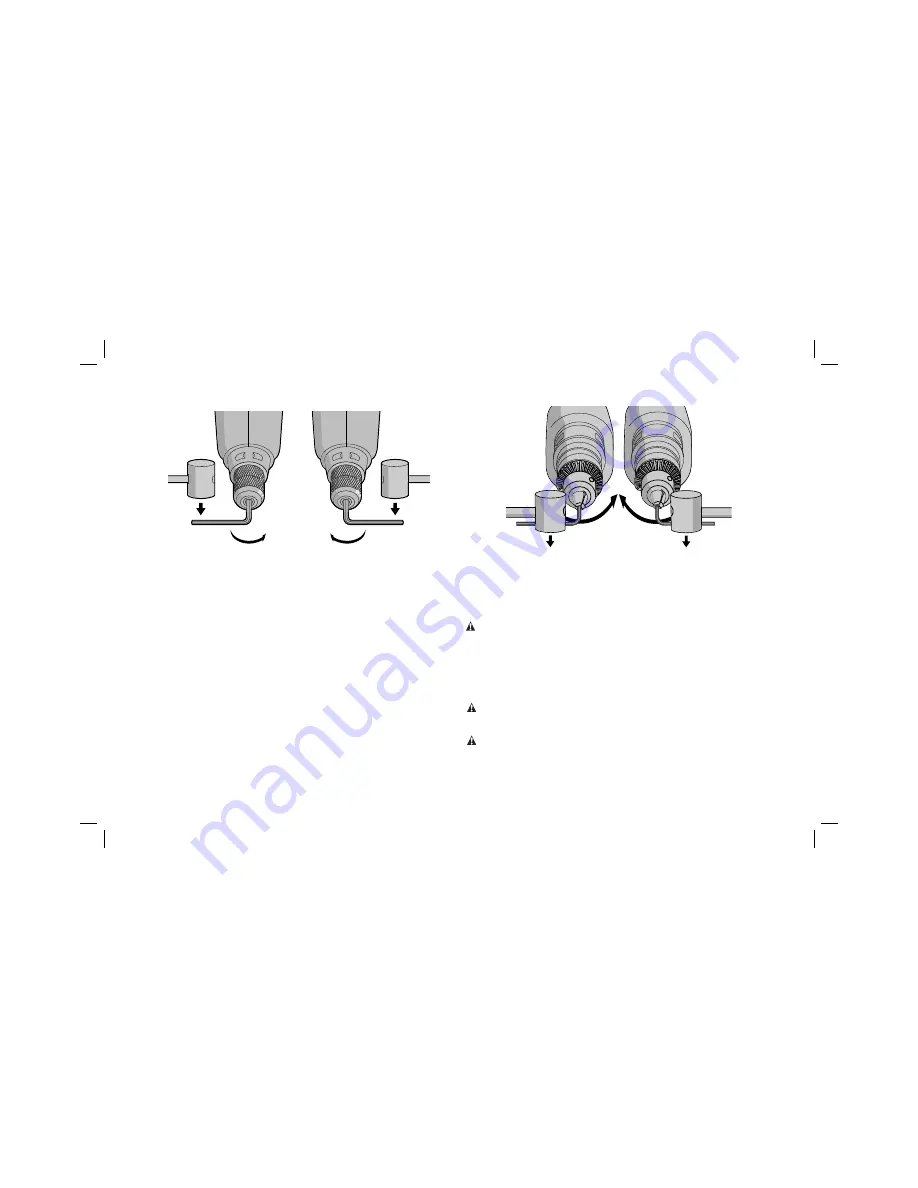
FIG. 5

FIG. 4

KEYLESS CHUCK REMOVAL (FIG. 4)

Tighten the chuck around the shorter end of a hex key (not supplied) of 6 mm (1/4") 

or greater size. Using a soft hammer or piece of wood, strike the longer end in the 

counterclockwise direction. This will loosen the chuck so that it can be unscrewed by 

hand.

KEYLESS CHUCK INSTALLATION (FIG. 5)

Screw the chuck on by hand as far as it will go. Tighten the chuck around the shorter 

end of a 6 mm (1/4") or larger hex key (not supplied) strike the longer end in the 

clockwise direction with a soft hammer.

Keyed Chuck – D21002

Open the chuck jaws by turning collar by hand and insert the shank of the bit about 

19 mm (3/4") into chuck. Tighten the chuck collar by hand. Place chuck key in each of 

the three holes, and tighten in clockwise direction. It’s important to tighten chuck with 

all three holes. To release the bit, turn the chuck counterclockwise in just one hole, then 

loosen the chuck by hand. 

REMOVAL OF KEYED CHUCK (FIG. 6)

Tighten the chuck around the shorter end of a hex key (not supplied) of 6 mm (1/4") 

or greater size. Using a soft hammer, strike the key sharply in the counterclockwise 

direction when viewed from the front of the tool. This will loosen the chuck so that it 

can be removed by hand.

FIG. 6

FIG. 7

KEYED CHUCK INSTALLATION (FIG. 7)

Screw the chuck on by hand as far as it will go. Insert the shorter end of a hex key 

(not supplied) of 6 mm (1/4") or greater size and strike it in the clockwise direction 

with a soft hammer.

MAINTENANCE

WARNING: Shock Hazard. To reduce the risk of serious personal injury, turn 

tool off and disconnect from power source before making any adjustments or 

removing/installing attachments or accessories.

Lubrication

Your power tool requires no additional lubrication.

Cleaning

WARNING:

 Blow dirt and dust out of all air vents with clean, dry air at least once 

a week. To minimize the risk of eye injury, always wear ANSI Z87.1 approved eye 

protection when performing this. 

WARNING:

 Never use solvents or other harsh chemicals for cleaning the 

non-metallic parts of the tool. These chemicals may weaken the plastic materials 

used in these parts. Use a cloth dampened only with water and mild soap. Never let 

any liquid get inside the tool; never immerse any part of the tool into a liquid.

Summary of Contents for D21002-XE

Page 1: ...D21002 XE D21008 XE DRILL INSTRUCTION MANUAL ...

Page 2: ......

Page 3: ...nd refrigerators There is an increased risk of electric shock if your body is earthed or grounded c Do not expose power tools to rain or wet conditions Water entering a power tool will increase the risk of electric shock d Do not abuse the cord Never use the cord for carrying pulling or unplugging the power tool Keep cord away from heat oil sharp edges or moving parts Damaged or entangled cords in...

Page 4: ...or binding of moving parts breakage of parts and any other condition that may affect the power tool s operation If damaged have the power tool repaired before use Many accidents are caused by poorly maintained power tools f Keep cutting tools sharp and clean Properly maintained cutting tools with sharp cutting edges are less likely to bind and are easier to control g Use the power tool accessories...

Page 5: ... of these chemicals are lead from lead based paints crystalline silica from bricks and cement and other masonry products and arsenic and chromium from chemically treated lumber CCA Your risk from these exposures varies depending on how often you do this type of work To reduce your exposure to these chemicals work in a well ventilated area and work with approved safety equipment such as those dust ...

Page 6: ...injury turn tool off and disconnect tool from power source before making any adjustments or removing installing attachments or accessories WARNING To reduce the risk of personal injury ALWAYS ensure workpiece is anchored or clamped firmly If drilling thin material use a wood back up block to prevent damage to the material Drilling 1 Use sharp drill bits only For WOOD use the low speed setting and ...

Page 7: ...are cast iron and brass which should be drilled dry NOTE Large 8 mm 5 16 to 13 mm 1 2 holes in steel can be made easier if a pilot hole 4 mm 5 32 to 5 mm 3 16 is drilled first DRILLING IN WOOD Start drilling with slow speed and increase to full power while applying firm pressure on the tool Holes in wood can be made with the same twist drills used for metal These bits may overheat unless pulled ou...

Page 8: ...of 6 mm 1 4 or greater size Using a soft hammer strike the key sharply in the counterclockwise direction when viewed from the front of the tool This will loosen the chuck so that it can be removed by hand FIG 6 FIG 7 KEYED CHUCK INSTALLATION FIG 7 Screw the chuck on by hand as far as it will go Insert the shorter end of a hex key not supplied of 6 mm 1 4 or greater size and strike it in the clockw...

Page 9: ...mation call AUS 1800 654 155 or NZ 0800 339258 This warranty does not apply to Accessories Damage caused where repairs have been made or attempted by others Damage due to misuse neglect wear and tear alteration or modification This warranty gives you specific legal rights and you may have other rights under the provisions of the Consumer Guarantee Act 1993 New Zealand only Trade Practices Act 1974...

Page 10: ...8 ...

Page 11: ...9 ...

Page 12: ...09 Part No N040496 D21002 XE D21008 XE Copyright 2009 DEWALT The following are trademarks for one or more DEWALT power tools the yellow and black color scheme the D shaped air intake grill the array of pyramids on the handgrip the kit box configuration and the array of lozenge shaped humps on the surface of the tool ...

Reviews: