background image

11

 Mounting and Using Wire Brushes and Wire Wheels

Wire cup brushes or wire wheels screw directly on the grinder spindle without the use 

of flanges. Use only wire brushes or wheels provided with a 14M2 threaded hub. A 

Type 27 guard is required when using wire brushes and wheels.

WARNING: Wear work gloves when handling wire brushes and wheels. 

They can 

become sharp.

CAUTION: 

Wheel or brush must not touch guard when mounted or while in use. 

Undetectable damage could occur to the accessory, causing wires to fragment from 

accessory wheel or cup.

MOUNTING WIRE CUP BRUSHES AND WIRE WHEELS

WARNING: Turn off and unplug the tool before making any adjustments or 

removing or installing attachments or accessories.

 Before reconnecting the tool, 

turn the switch on and off as previously described to ensure that the tool is off.
  1.  Thread the wheel on the spindle by hand.
  2.  Depress spindle lock button and use a wrench on the hub of the wire wheel or 

brush to tighten the wheel.

  3.  To remove the wheel, reverse the above procedure.
CAUTION: Failure to properly seat the wheel hub before turning the tool on may result 

in damage to tool or wheel.

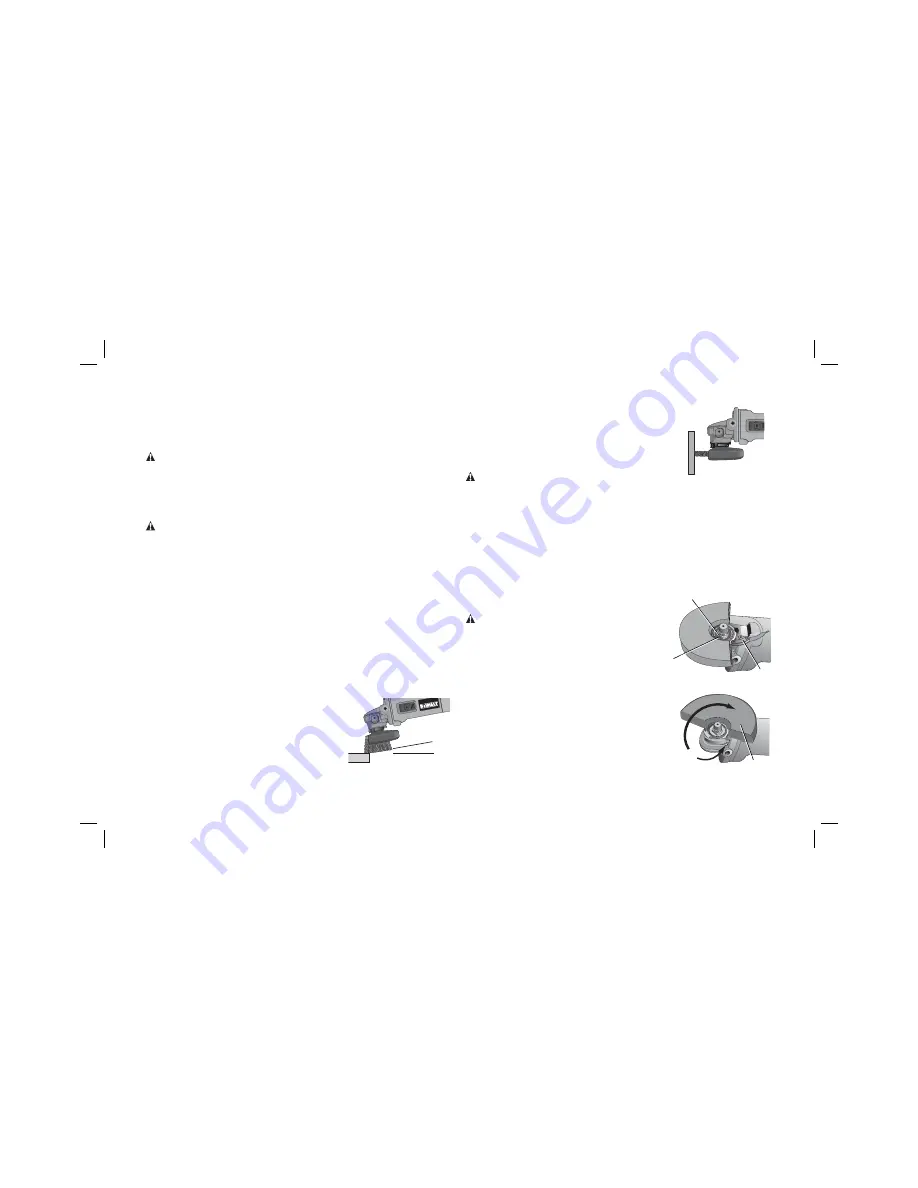
USING WIRE CUP BRUSHES AND WIRE WHEELS

Wire wheels and brushes can be used for removing rust, scale and paint, and for 

smoothing irregular surfaces.
  1.  Allow the tool to reach full speed before touching the tool to the work surface. 
  2.  Apply minimum pressure to work surface, allowing the tool to operate at high 

speed. Material removal rate is greatest when the tool operates at high speed.

  3.  Maintain a 5

˚

 to 10

˚

 angle between the tool and 

5

˚

-10

˚

work surface for wire cup brushes.

  4.  Maintain contact between the edge of the wheel 

and the work surface with wire wheels. 

  5.  Continuously move the tool in a forward and 

back motion to avoid creating gouges in the 

work surface. Allowing the tool to rest on the 

work surface without moving, or moving the tool in       


a circular motion causes burning and swirling marks 

on the work surface. 

  6.  Remove the tool from the work surface before turning 

the tool off. Allow the tool to stop rotating before 

setting it down.

CAUTION: 

Use extra care when working over an edge, 

as a sudden sharp movement of grinder may be 

experienced. 

Mounting and Using Cutting (Type 1) Wheels 

Cutting wheels include diamond wheels and abrasive discs. Abrasive cutting wheels 

for metal and concrete use are available. Diamond blades for concrete cutting can 

also be used.
WARNING: A closed, 2-sided cutting wheel guard is not included with this tool but 

is required when using cutting wheels. Failure to use proper flange and guard can 

result in injury resulting from wheel breakage and wheel contact. See page 8 for more 

information.

MOUNTING CLOSED (TYPE 1) GUARD

WARNING: Turn off and unplug the tool before    

O

N

M


making any adjustments or removing or installing 

attachments or accessories.

 Before reconnecting 

the tool, turn the switch on and off as previously 

described to ensure that the tool is off.
  1.  Open the guard latch (M). Align the lugs  (N) on 

the guard with the slots (O) on the gear case.

  2.  Push the guard down until the guard lug engages    

I


and rotates freely in the groove on the gear case 

hub.

  3.  Rotate guard (I) into desired working position. 

The guard body should be positioned between 

the spindle and the operator to provide maximum 

operator protection.

Summary of Contents for D28106-XE

Page 1: ...D28106 XE D28113 XE D28130 XE D28132 XE D28135 XE D28139 XE D28402 XE D28402N XE HEAVY DUTY SMALL ANGLE GRINDERS INSTRUCTION MANUAL ...

Page 2: ......

Page 3: ... power tools to rain or wet conditions Water entering a power tool will increase the risk of electric shock d Do not abuse the cord Never use the cord for carrying pulling or unplugging the power tool Keep cord away from heat oil sharp edges or moving parts Damaged or entangled cords increase the risk of electric shock e When operating a power tool outdoors use an extension cord suitable for outdo...

Page 4: ...ng tools sharp and clean Properly maintained cutting tools with sharp cutting edges are less likely to bind and are easier to control g Use the power tool accessories and tool bits etc in accordance with these instructions and in the manner intended for the particular type of power tool taking into account the working conditions and the work to be performed Use of the power tool for operations dif...

Page 5: ...y will be detected Never start the tool with a person in line with the wheel This includes the operator Avoid bouncing the wheel or giving it rough treatment If this occurs stop the tool and inspect the wheel for cracks or flaws Direct sparks away from operator bystanders or flammable materials Sparks may be produced while cutting and or grinding Sparks may cause burns or start fires Always use si...

Page 6: ...orkpiece as the tool is restarted Support large panels to minimize the risk of wheel pinching and kickback Large panels tend to sag under their own weight Support must be placed under the panel on both sides near the line of cut and near the edge of the panel WARNING ALWAYS use safety glasses Everyday eyeglasses are NOT safety glasses Also use face or dust mask if cutting operation is dusty ALWAYS...

Page 7: ...sing become separated by more than 6 mm 1 4 the tool must be serviced and re assembled by a DEWALT service center Failure to have the tool serviced may cause brush motor and bearing failure 3 Re install screws to attach the gear case to the motor housing Tighten screws to 2 nm 18 in lbs torque Overtightening could cause screws to strip Accessories It is important to choose the correct guards backi...

Page 8: ...sition 5 To remove the guard open the guard latch rotate the guard so that the arrows are aligned and pull up on the guard NOTE The guard is pre adjusted to the diameter of the P gear case hub at the factory If after a period of time the guard becomes loose tighten the adjusting screw P with clamp lever in the closed position CAUTION If guard cannot be tightened by adjusting clamp do not use tool ...

Page 9: ...ool such as the activation of a ground fault interrupter throwing of a circuit breaker accidental unplugging or power failure If the switch is locked on when the power is connected the tool will start unexpectedly To start the tool slide the ON OFF switch L toward the front of the tool To stop the tool release the ON OFF switch For continuous operation slide the switch toward the front of the tool...

Page 10: ...before making any adjustments or removing or installing attachments or accessories Before reconnecting the tool depress and release the paddle switch to ensure that the tool is off Hubbed wheels install directly on the 14M2 threaded spindle Thread of accessory must match thread of spindle 1 Backing flange is retained to the grinder by an O ring on the spindle Remove backing flange by pulling and t...

Page 11: ...he wheel depress the spindle lock button and loosen the threaded clamp nut with a wrench NOTE If the wheel spins after the clamp nut is tightened check the orientation of the threaded clamp nut If a thin wheel is installed with the pilot on the clamp nut against the wheel it will spin because the height of the pilot prevents the clamp nut from holding the wheel SURFACE GRINDING WITH GRINDING WHEEL...

Page 12: ...wire wheel applications after sanding applications are complete 1 Place or appropriately thread backing pad Q on the spindle 2 Place the sanding disc R on the backing pad 3 While depressing spindle lock thread clamp nut H on spindle piloting the raised hub on the clamp nut into the center of sanding disc and backing pad 4 Tighten the clamp nut by hand Then depress the spindle lock button while tur...

Page 13: ...le between the tool and 5 10 work surface for wire cup brushes 4 Maintain contact between the edge of the wheel and the work surface with wire wheels 5 Continuously move the tool in a forward and back motion to avoid creating gouges in the work surface Allowing the tool to rest on the work surface without moving or moving the tool in a circular motion causes burning and swirling marks on the work ...

Page 14: ... 1 Allow tool to reach full speed before touching tool to work surface 2 Apply minimum pressure to work surface allowing tool to operate at high speed Cutting rate is greatest when the tool operates at high speed 3 Once a cut is begun and a notch is established in the workpiece do not change the angle of the cut Changing the angle will cause the wheel to bend and may cause wheel breakage 4 Remove ...

Page 15: ...8 This warranty does not apply to Accessories Damage caused where repairs have been made or attempted by others Damage due to misuse neglect wear and tear alteration or modification This warranty gives you specific legal rights and you may have other rights under the provisions of the Consumer Guarantee Act 1993 New Zealand only Trade Practices Act 1974 and State Legislation Australia only In addi...

Page 16: ...28106 XE D28113 XE D28130 XE D28132 XE D28135 XE D28139 XE D28402 XE D28402N XE Copyright 2006 2008 2010 DEWALT The following are trademarks for one or more DEWALT power tools the yellow and black color scheme the D shaped air intake grill the array of pyramids on the handgrip the kit box configuration and the array of lozenge shaped humps on the surface of the tool ...

Reviews: