4
WARNING:
Never load nails with the contact trip or trigger activated.
Personal injury may result.
1. Lock OFF trigger.
2. Disconnect the air supply from the tool.
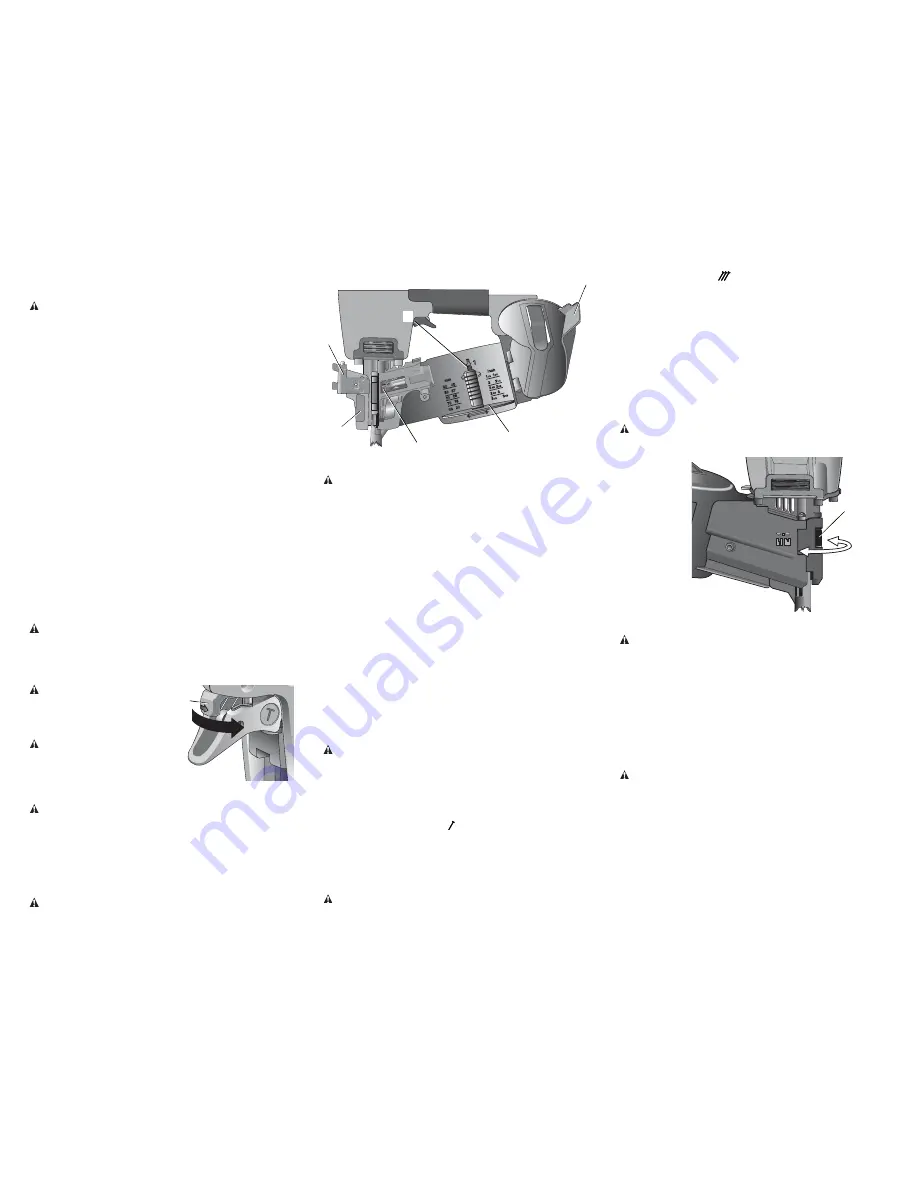
3. Pull the door latch (L) to open the door (K).
4. Rotate the canister door (H) open.
5. Adjust the nail platform (I) to properly accommodate the nail length
being used.
Pull up on the nail platform (I) for shorter nails.
Push in the nail platform adjustment button (G) and push down on the
nail platform (I) for longer nails.
6. Place the coil on the nail platform (I).
7. Uncoil enough nails [approximately 3" (8 cm)] to reach the nose of the
tool.
8. Insert the first nail into the nose and the second nail between the two
rails of the feed pawl (J).
NOTE:
Be careful not to deform the coil of nails during the loading process.
Otherwise, the nail guide door will not close and the nails might not feed
consistently.
9. Close the canister door (H) completely.
10. Close the door (K) making sure the door latch (L) is completely
engaged.
Actuating Tool
WARNING:
To reduce the risk of injury,
ALWAYS
wear proper eye [ANSI
Z87.1 (CAN/CSA Z94.3)] and hearing protection [ANSI S12.6 (S3.19)]
when operating this tool.
The tool can be actuated using one of two modes: single sequential action
trigger mode and bump action trigger mode. The trigger installed on the tool
as described in the
Trigger
section of this manual determines the mode of
operation.
SEQUENTIAL ACTION TRIGGER -
(GRAY)
The sequential action trigger’s intended use is for intermittent nailing where
very careful and accurate placement is desired.
To operate the nailer in sequential action mode:
1. Depress the contact trip firmly against the work surface.
2. Depress the trigger.
WARNING:
A nail will fire each time the trigger is depressed as long as
the contact trip remains depressed.
BUMP ACTION TRIGGER -
(BLACK)
The bump action trigger’s intended use is for rapid nailing on flat, stationary
surfaces.
Using the bump action trigger, two methods are available:
place actuation
and
bump actuation
.
To operate the tool using the PLACE ACTUATION method:
1. Depress the contact trip against the work surface.
2. Depress the trigger.
To operate the tool using the BUMP ACTUATION method:
1. Depress the trigger.
2. Push the contact trip against the work surface. As long as the trigger
is depressed, the tool will fire a nail every time the contact trip is
depressed. This allows the user to drive multiple nails in sequence.
WARNING:
Do not keep trigger depressed when tool is not in use. Keep
the lock-off switch rotated to the right (OFF) when the tool is not in use.
FIG. 5
M
Adjusting Depth (Fig. 5)
WARNING: To reduce risk of serious injury from accidental actuation
when attempting to adjust depth,
ALWAYS:
• Lock OFF trigger.
• Disconnect air supply.
• Avoid contact with trigger during adjustments.
The depth that the fastener is driven can be adjusted using the depth
adjustment next to the trigger of the tool.
1. To drive the nail shallower, rotate the depth setting wheel (M) to the
right.
2. To drive a nail deeper, rotate the depth setting wheel (M) to the left.
Clearing a Jammed Nail (Fig. 4)
WARNING
: Lock off trigger, disconnect air line from tool and remove
fasteners from magazine before making adjustments or personal injury may
result.
If a nail becomes jammed in the nosepiece, keep the tool pointed away
from you and follow these instructions to clear:
1. Lock OFF trigger.
2. Disconnect the air supply from the tool.
3. Open the door (K).
4. Open the canister door (H).
5. Remove the jammed nail.
6. Correct any deformation that may have occurred to the nail coil.
NOTE:
Should nails continue to jam frequently in nosepiece, have tool
serviced by an authorized D
E
WALT service center.
OPERATION
Preparing the Tool
WARNING:
Read the section titled
Important Safety Instructions for
Pneumatic Tools
at the beginning of this manual. Always wear eye and ear
protection when operating this tool. Keep the nailer pointed away from
yourself and others. For safe operation, complete the following procedures
and checks before each use of the nailer.
CAUTION:
To reduce the risk of damage to the tool, only use D
E
WALT
Pneumatic Tool Oil or a non-detergent S.A.E. 20 weight oil. Oil with
additives or detergent will damage tool parts.
1. Before you use the nailer, be sure that the compressor tanks have been
properly drained.
2. Lubricate tool:
a.
Use
D
E
WALT Pneumatic Tool Oil or a non-detergent S.A.E. 20 weight
oil. DO NOT use detergent oil or additives as they will damage O-rings
and rubber parts.
b. Use a filter and regulator when possible.
c. Add 5 to 7 drops of oil in the air fitting a least twice a day.
3. Wear eye and ear protection.
4. Ensure canister is empty of all fasteners.
5. Check for smooth and proper operation of contact trip. Do not use tool
if assembly is not functioning properly. NEVER tamper with the contact
trip. NEVER use a tool that has the contact trip restrained in the actuated
position.
6. Check air supply: Ensure air pressure does not exceed recommended
operating limits; 70 to 120 psi, (4.9 to 8.3 bar, 5 to 8.5 kg/cm
2
).
7. Keep tool pointed away from yourself and others.
8. Lock off trigger.
9. Connect air hose.
10. Check for audible leaks around valves and gaskets. Never use a tool that
leaks or has damaged parts.
WARNING:
To reduce the risk of personal injury, disconnect tool from
air supply before performing maintenance, clearing a jammed fastener,
leaving work area, moving tool to another location or handing the tool to
another person.
Using the Lock-off (Fig. 3)
F
FIG. 3
WARNING:
To reduce the risk of
injury,
ALWAYS
wear proper eye
[ANSI Z87.1 (CAN/CSA Z94.3)] and
hearing protection [ANSI S12.6
(S3.19)] when operating this tool.
WARNING:
Do not keep trigger
depressed when tool is not in use.
Keep the lock-off switch rotated to
the right (OFF) when the tool is not in
use. Serious personal injury may
result.
WARNING:
Lock off trigger, disconnect air line from tool and remove
fasteners from magazine before making adjustments or personal injury
may result.
Each D
E
WALT nailer is equipped with a trigger lock-off switch (F) which
when rotated to the right, prevents the tool from actuating. When the switch
is centered, the tool will be fully operational. The trigger should always be
locked off whenever any adjustments are made or when tool is not in use.
Loading the Tool (Fig. 4)
WARNING:
Keep the tool pointed away from yourself and others. Serious
personal injury may result.
FIG. 4
K
G
H
I
L
J


