background image

10

The center position of the control button locks the tool in the OFF position. When 

changing the position of the control button, be sure the trigger is released.

NOTE: 

The first time the tool is run after changing the direction of rotation, you may 

hear a click on start up. This is normal and does not indicate a problem. 

Worklights (Fig. 2)

There are three worklights (G) located around the chuck collar (C). The worklights 

are activated when the trigger switch is depressed. When the trigger is released, the 

worklight will stay illuminated for up to 20 seconds. If the trigger switch remains 

depressed, the worklights will remain on.

NOTE:

 The worklights are for lighting the immediate work surface and are not 

intended to be used as a flashlight. 

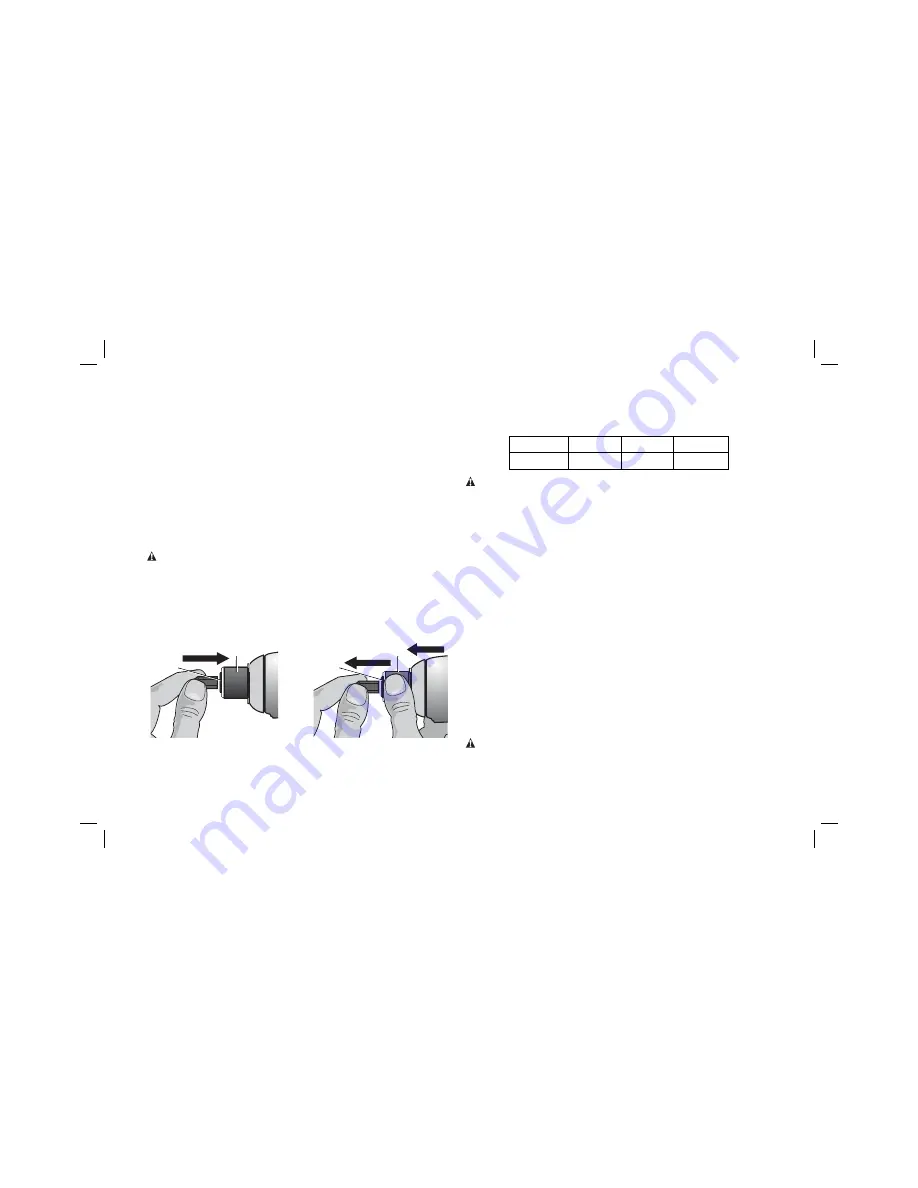
Quick-Release Chuck (Fig. 2, 6, 7)

WARNING:

 Use only impact accessories. Non-impact accessories may break and 

cause a hazardous condition. Inspect accessory prior to use to ensure that it con tains 

no cracks.

NOTE:

 The chuck accepts 6.35 mm (1/4") hex accessories and 25.4 mm (1") bit tips 

only.

Place the forward/reverse button (B) in the lock-off (center) position or remove battery 

pack before changing accessories.

FIG. 6

C

D

FIG. 7

C

D

To install an accessory,

 fully insert the accessory. The accessory is locked into place 

(Fig. 6).

To remove an accessory

, pull the chuck collar (C) away from the front of the tool. 

Remove the accessory (Fig. 7).

Usage

Your impact tool can generate the following maximum torque: 

Cat #

Ft.-Lbs.

In.-Lbs.

Nm

DCF886-XE

125

1500

165

CAUTION: 

Ensure fastener and/or system will withstand the level of torque 

generated by the tool. Excessive torque may cause breakage and possible personal 

injury.
  1.  Place the accessory on the fastener head. Keep the tool pointed straight at the 

fastener. 

  2.  Press switch to start operation. Release switch to stop operation. Always check 

torque with a torque wrench, as the fastening torque is affected by many factors 

including the following:

• Voltage:


Low voltage, due to a nearly discharged battery, will reduce fastening 

torque.

• Accessory size: 

Failure to use the correct accessory size will cause a reduction 

in fastening torque.

• Bolt size: 

Larger bolt diameters generally require higher fastening torque. 

Fastening torque will also vary according to length, grade, and torque 

coefficient.

• Bolt: 

Ensure that all threads are free of rust and other debris to allow proper 

fastening torque.

• Material: 

The type of material and surface finish of the material will affect 

fastening torque. 

• Fastening time: 

Longer fasten ing time results in increased fastening torque. 

Using a longer fastening time than recommended could cause the fasteners to 

be overstressed, stripped or damaged.

MAINTENANCE

WARNING: To reduce the risk of serious personal injury, turn the tool off and 

disconnect the battery pack before making any adjustments or removing/installing 

attachments or accessories. 

An accidental start-up can cause injury.

Summary of Contents for DCF886-XE

Page 1: ...DCF886 XE 18V 6 35 mm 1 4 BRUSHLESS CORDLESS IMPACT DRIVER INSTRUCTION MANUAL ...

Page 2: ......

Page 3: ...rdance with a standardised test given in EN 60745 and may be used to compare one tool with another It may be used for a preliminary assessment of exposure WARNING The declared vibration emission level represents the main applications of the tool However if the tool is used for different applications with different accessories or poorly maintained the vibration emission may differ This may signific...

Page 4: ...hile operating power tools may result in serious personal injury b Use personal protective equipment Always wear eye protection Protective equipment such as dust mask non skid safety shoes hard hat or hearing protection used for appropriate conditions will reduce personal injuries c Prevent unintentional starting Ensure the switch is in the off position before connecting to power source and or bat...

Page 5: ...WALT tools are factory tested if this tool does not operate check the power supply Your DEWALT tool is double insulated therefore no earth wire is required Young children and the infirm This appliance is not intended for use by young children or infirm persons without supervision This appliance is not intended for use by persons including children with reduced physical sensory or mental capabiliti...

Page 6: ...less WARNING ALWAYS wear approved protective safety equipment complying with the following standards Eye protection AS NZS1337 Eye Protectors for Industrial Applications Hearing protection AS NZS1270 Acoustics Hearing Protection Respiratory protection AS NZS1716 Respiratory Protective Devices WARNING Some dust created by power sanding sawing grinding drilling and other construction activities cont...

Page 7: ... and water If battery liquid gets into the eye rinse water over the open eye for 15 minutes or until irritation ceases If medical attention is needed the battery electrolyte is composed of a mixture of liquid organic carbonates and lithium salts Contents of opened battery cells may cause respiratory irritation Provide fresh air If symptoms persist seek medical attention WARNING Burn hazard Battery...

Page 8: ... sure the pack is fully seated in charger The red charging light will blink continuously indicating that the charging process has started 3 The completion of charge will be indicated by the red light remaining ON continuously The pack is fully charged and may be used at this time or left in the charger Indicator Light Operation PACK CHARGING PACK CHARGED x HOT COLD DELAY PROBLEM PACK OR CHARGER PR...

Page 9: ...harger to your local service center 5 The battery pack should be recharged when it fails to produce sufficient power on jobs which were easily done previously DO NOT CONTINUE to use under these conditions Follow the charging procedure You may also charge a partially used pack whenever you desire with no adverse effect on the battery pack 6 Foreign materials of a conductive nature such as but not l...

Page 10: ...k and bit clip in place then reassemble on the opposite side Be sure to securely tighten the screw OPERATION WARNING To reduce the risk of serious personal injury turn the tool off and disconnect the battery pack before making any adjustments or removing installing attachments or accessories An accidental start up can cause injury Installing and Removing the Battery Pack Fig 3 NOTE For best result...

Page 11: ...ion Fig 5 WARNING To reduce the risk of serious personal injury ALWAYS use proper hand position as shown in Figure 5 WARNING To reduce the risk of serious personal injury ALWAYS hold securely in anticipation of a sudden reaction Proper hand position requires one hand on the main handle as shown FIG 5 Variable Speed Trigger Switch Fig 2 To turn the tool on squeeze the trigger switch A To turn the t...

Page 12: ...Remove the accessory Fig 7 Usage Your impact tool can generate the following maximum torque Cat Ft Lbs In Lbs Nm DCF886 XE 125 1500 165 CAUTION Ensure fastener and or system will withstand the level of torque generated by the tool Excessive torque may cause breakage and possible personal injury 1 Place the accessory on the fastener head Keep the tool pointed straight at the fastener 2 Press switch...

Page 13: ...ions Repairs This charger and battery pack are not serviceable Servicing at an authorized service centre is required to avoid damage to static sensitive internal components To assure product SAFETY and RELIABILITY repairs maintenance and adjustment including brush inspection and replacement should be performed by certified service centers or other qualified service organizations always using ident...

Page 14: ......

Page 15: ......

Page 16: ...X X 40 40 60 X X DW9096 18 2 4 X X X X 60 X 60 20 X 60 X 60 60 X X X 60 X 60 X X 60 60 DE9095 XJ 18 2 0 X X X X 60 X 60 20 X 60 X 60 60 X X X 60 X 60 X X 60 60 DC9091 14 4 2 4 60 60 60 60 60 15 60 15 60 60 60 60 60 X X X 60 X 60 X X 60 60 DC9144 14 4 2 0 X X X X X X X X X X X X X X X X 60 X 60 X X X 60 DCB141 14 4 1 5 X X X X X X X X X X X X X X X X X X 30 30 40 X X DCB142 14 4 4 0 X X X X X X X X...

Reviews: