
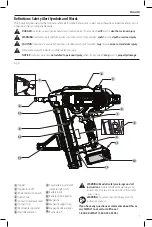


English
7
•
Do not disassemble the charger; take it to an
authorized service center when service or repair
is required.
Incorrect reassembly may result in a risk of
electric shock, electrocution or fire.
•
Disconnect the charger from the outlet before
attempting any cleaning. This will reduce the risk of
electric shock.
Removing the battery pack will not reduce
this risk.
•
NEVER
attempt to connect 2 chargers together.
•
The charger is designed to operate on standard
120V household electrical power. Do not attempt to
use it on any other voltage.
This does not apply to the
vehicular charger.
WARNING:
Shock hazard. Do not allow any liquid to
get inside the charger. Electric shock may result.
WARNING:
Burn hazard. Do not submerge the
battery pack in any liquid or allow any liquid to
enter the battery pack. Never attempt to open the
battery pack for any reason. If the plastic housing of
the battery pack breaks or cracks, return to a service
center for recycling.
CAUTION:
Burn hazard. To reduce the risk of injury,
charge only
D
e
WALT
rechargeable battery packs.
Other types of batteries may overheat and burst
resulting in personal injury and property damage.
NOTICE:
Under certain conditions, with the charger
plugged into the power supply, the charger can
be shorted by foreign material. Foreign materials
of a conductive nature, such as, but not limited to,
grinding dust, metal chips, steel wool, aluminum
foil or any buildup of metallic particles should be
kept away from the charger cavities. Always unplug
the charger from the power supply when there is no
battery pack in the cavity. Unplug the charger before
attempting to clean.
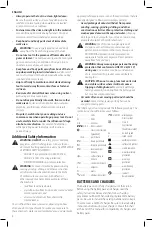
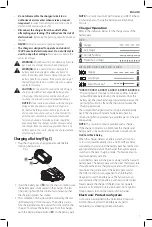
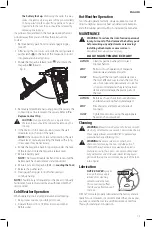
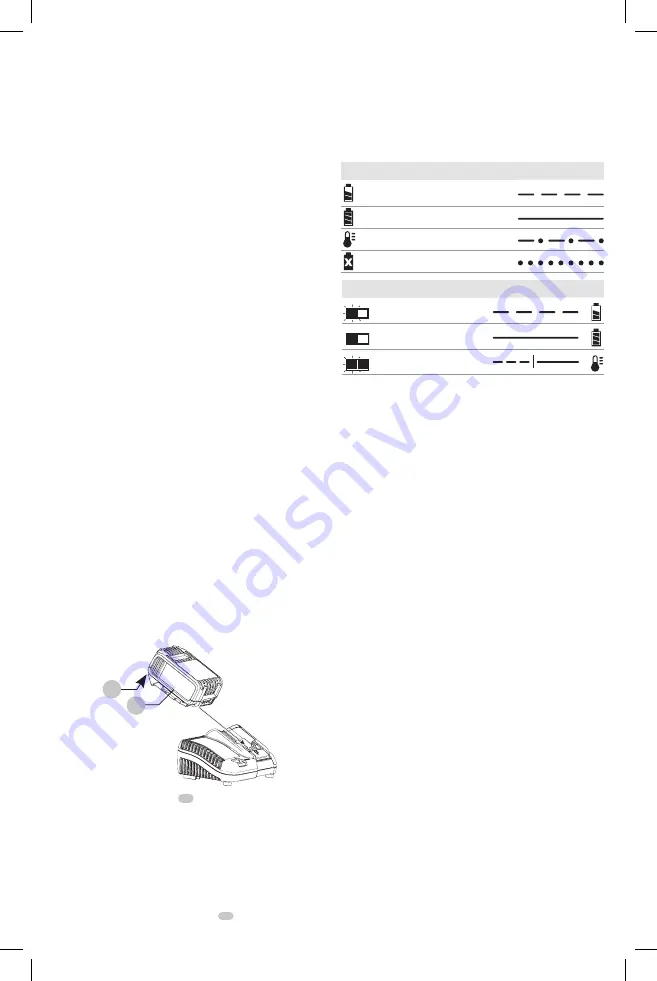
Charging a Battery (Fig. C)
1. Plug the charger into an appropriate outlet before
inserting battery pack.
10
11
Fig. C
2. Insert the battery pack
10
into the charger, making sure
the battery pack is fully seated in the charger. The red
(charging) light will blink continuously indicating that
the charging process has started.
3. The completion of charge will be indicated by the red
light remaining ON continuously. The battery pack is
fully charged and may be used at this time or left in the
charger. To remove the battery pack from the charger,
push the battery release button
11
on the battery pack.
nOTE:
To ensure maximum performance and life of lithium-
ion battery packs, charge the battery pack fully before
first use.
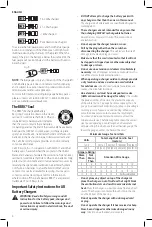
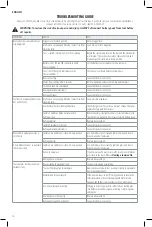
Charger Operation
Refer to the indicators below for the charge status of the
battery pack.
DCB101
Charging
Fully Charged
Hot/Cold Pack Delay
Problem Pack or Charger
DCB107, DCB112, DCB113, DCB115, DCB118, DCB132
Charging
Fully Charged
Hot/Cold Pack Delay*
* DCB107, DCB112, DCB113, DCB115, DCB118, DCB132:
The red light will continue to blink, but a yellow indicator
light will be illuminated during this operation. Once the
battery pack has reached an appropriate temperature, the
yellow light will turn off and the charger will resume the
charging procedure.
The compatible charger(s) will not charge a faulty battery
pack. The charger will indicate faulty battery pack by
refusing to light or by displaying a problem pack or charger
blink pattern.
nOTE:
This could also mean a problem with a charger.
If the charger indicates a problem, take the charger and
battery pack to be tested at an authorized service center.
hot/Cold Pack Delay
When the charger detects a battery pack that is too hot
or too cold, it automatically starts a Hot/Cold Pack Delay,
suspending charging until the battery pack has reached an
appropriate temperature. The charger then automatically
switches to the pack charging mode. This feature ensures
maximum battery pack life.
A cold battery pack will charge at a slower rate than a warm
battery pack. The battery pack will charge at that slower rate
throughout the entire charging cycle and will not return to
maximum charge rate even if the battery pack warms.
The DCB118 charger is equipped with an internal fan
designed to cool the battery pack. The fan will turn on
automatically when the battery pack needs to be cooled.
Never operate the charger if the fan does not operate
properly or if ventilation slots are blocked. Do not permit
foreign objects to enter the interior of the charger.
Electronic Protection System
Li-Ion tools are designed with an Electronic Protection
System that will protect the battery pack against
overloading, overheating or deep discharge.
Summary of Contents for DCN891
Page 59: ......