background image

8

To adjust the clock manually:

(FM and DAB mode)

  1. Press the Menu button (E).
  2. Use the arrow buttons (C) to scroll to 

Clock Adjust

 on the LCD display and press 

the Enter/Display button (G).

 3. Scroll to 

Date & Time 

and press the Enter/Display button (G).

  4. Set the date and time using left and right arrow buttons (C).
  5. Once the desired time is set press the Enter/Display (G) button to commit.
Other

 Clock Adjust

 menu options:

  •  Time format: Select a 12h or 24h time display format
  •  Date format: Select the date display format, MM/DD/YYYY, YYYY/MM/DD or DD/

MM/YYYY.

TO ADJUST THE EQ

Sound can be adjusted by changing the equalization of the bass or treble of the radio.
  1. Press the Menu button (E) and scroll using the left or right arrow buttons (C) to 

select 

Sound EQ

. Select by pressing the Enter/Display button (G).

  2. Press the right arrow button to increase the bass or the left arrow button to 

decrease it.

  3. Once desired adjustment is achieved, press the Enter/Display button (G).
  4. Repeat steps 2 and 3 for treble adjustment.

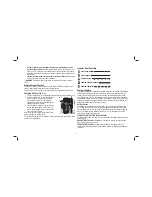
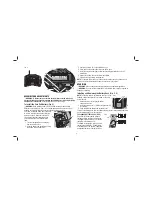
Important Radio Notes (Fig. 6)

  1. The radio will run up to 8 hours on a fully charged 4.0 amp hour battery. Using 

batteries of lower voltage or capacity will result in less run time.

  2. Reception will vary depending on location and strength of radio signal.
  3. Certain generators may cause background noise.

To Seek:  

Press and hold the right arrow button (C) once and release. The tuner fre-
quency will increase to seek the first radio station with acceptable clarity and 
stop at that station. The right arrow button may be pressed again to continue 
seeking a radio station at higher frequencies. The left arrow button may be 
pressed to seek radio stations at lower frequencies. The seek function is 
available in AM and FM modes.

PROGRAMMING THE MEMORY BUTTONS

Ten DAB and ten FM radio stations may be independently set. After programming 
the buttons, pressing 1, 2, 3, 4 or 5 will instantly change the frequency to the preset 
station.
  1. Set the radio to desired station (see 

Tuning

).

  2. Press and hold one of the desired memory buttons (F) until the preset number 

begins flashing in the LCD display (H). Release the button and wait for the preset 
display to stop flashing.

  3. Each memory button can store two preset stations. To store a second preset 

repeat step 1.

  4. Press and hold one of the desired memory buttons (F) until the preset number 

begins flashing in the LCD display (H). Press the preset button a second time so 
that the next preset number displays. Release the button and wait for the preset 
display to stop flashing.

PROGRAMMING THE CLOCK

The time and date can be updated manually or automatically synchronised with 
national time signals broadcast over DAB (where available).

To synchronise the clock automatically:

(DAB mode ONLY)
NOTE:

 When the radio is first used it will enter DAB mode and automatically scan for 

stations.
  1. Press the Menu button (E).
  2. Use the arrow buttons (C) to scroll to 

Clock Adjust

 and press the Enter/Display 

button (G).

 3. Scroll to 

Sync Time Now 

press the Enter/Display button to select. This


automatically synchronises clock with national time signals.

Summary of Contents for DCR017-XE

Page 1: ...DCR017 XE CHARGER RADIO INSTRUCTION MANUAL ...

Page 2: ......

Page 3: ...l sensory or mental capabilities or lack of experience and knowledge unless they have been given supervision or instruction concerning use of the appliance by a person responsible for their safety Charger radio shall not be exposed to dripping or splashing no objects filled with liquids such as vases shall be placed on it No exposed flame sources such as lighted candles should be placed on the cha...

Page 4: ...ger radio in a position away from any heat source Do not operate charger radio with damaged cord or plug have them replaced immediately Do not operate charger radio if it has received a sharp blow been dropped or otherwise damaged in any way Take it to an authorised service center Do not disassemble charger radio take it to an authorised service center when service or repair is required Incorrect ...

Page 5: ...t the chart at the end of this manual for compatibility of batteries and chargers Charge the battery packs only in designated DEWALT chargers DO NOT splash or immerse in water or other liquids Do not store or use the tool and battery pack in locations where the temperature may reach or exceed 40 C 105 F such as outside sheds or metal buildings in summer For best life store battery packs in a cool ...

Page 6: ... faulty battery pack The charger will indicate faulty battery pack by refusing to light or by displaying problem pack or charger If battery contents come into contact with the skin immediately wash area with mild soap and water If battery liquid gets into the eye rinse water over the open eye for 15 minutes or until irritation ceases If medical attention is needed the battery electrolyte is compos...

Page 7: ...take the tool battery pack and charger to your local service center 5 The battery pack should be recharged when it fails to produce sufficient power on jobs which were easily done previously DO NOT CONTINUE to use under these conditions Follow the charging procedure You may also charge a partially used pack whenever you desire with no adverse effect on the battery pack 6 Foreign materials of a con...

Page 8: ...e diagram inside the coin cell battery area 6 Replace the battery door insert screw and tighten 7 Securely close the battery compartment NOTE To reset the LCD display clock and presets remove the coin cell battery and re install it Follow this procedure if the screen seems to lock in place OPERATION WARNING Always observe the safety instructions and applicable regulations WARNING Do not place the ...

Page 9: ...ations NOTE When moving locations or if reception was poor in the original scan possible if the antenna was not up this may result in an empty or incomplete list of available stations Manually running an Auto Scan will find all available broadcast stations To perform an Auto Scan 1 Press the menu button E scroll through the options by pressing the right arrow button C until you reach Auto Scan and...

Page 10: ...tation with acceptable clarity and stop at that station The right arrow button may be pressed again to continue seeking a radio station at higher frequencies The left arrow button may be pressed to seek radio stations at lower frequencies The seek function is available in AM and FM modes PROGRAMMING THE MEMORY BUTTONS Ten DAB and ten FM radio stations may be independently set After programming the...

Page 11: ...ny liquid get inside the tool never immerse any part of the tool into a liquid CHARGER CLEANING INSTRUCTIONS WARNING Shock hazard Disconnect the charger from the AC outlet before cleaning Dirt and grease may be removed from the exterior of the charger using a cloth or soft non metallic brush Do not use water or any cleaning solutions Repairs This charger and battery pack are not serviceable Servic...

Page 12: ...dewalt co nz APR13 Part No N294527 DCR017 XE Copyright 2013 DEWALT The following are trademarks for one or more DEWALT power tools the yellow and black color scheme the D shaped air intake grill the array of pyramids on the handgrip the kit box configuration and the array of lozenge shaped humps on the surface of the tool ...

Reviews: