background image

2

function. Check for alignment of moving parts, binding of moving
parts, breakage of parts, mounting, and any other conditions that
may affect its operation. A guard or other part that is damaged
should be properly repaired or replaced by an authorized service
center unless otherwise indicated elsewhere in this instruction
manual. Have defective switches replaced by authorized service
center. Do not use tool if switch does not turn it on and off.

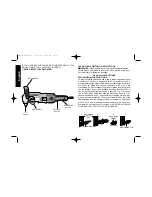
CAUTION: When drilling or driving into walls, floors or wherever live

electrical wires may be encountered, DO NOT TOUCH ANY METAL
PARTS OF THE TOOL! Hold the tool only by insulated grasping
surfaces to prevent electric shock if you drill or drive into a live wire.

• Always use the side handle supplied with the tool. Keep a firm

grip on the tool at all times. Do not attempt to operate this tool
without holding it with both hands. Operating this tool with one hand
will result in loss of control. Breaking through or encountering hard
materials such as re-bar may be be hazardous as well.

WARNING: Some dust created by power sanding, sawing, grinding,

drilling, and other construction activities contains chemicals known to
cause cancer, birth defects or other reproductive harm. Some
examples of these chemicals are:

• lead from lead-based paints,
• crystalline silica from bricks and cement and other masonry

products, and 

• arsenic and chromium from chemically-treated lumber (CCA).

Your risk from these exposures varies, depending on how often you
do this type of work. To reduce your exposure to these chemicals:  work
in a well ventilated area, and work with approved safety equipment,
such as those dust masks that are specially designed to filter out
microscopic particles.

Avoid prolonged contact with dust from power sanding, sawing,
grinding, drilling, and other construction activities. Wear protective
clothing and wash exposed areas with soap and water. Allowing
dust to get into your mouth, eyes, or lay on the skin may promote
absorption of harmful chemicals.

English

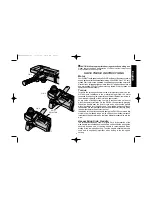
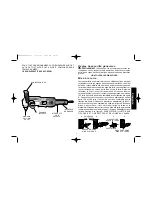
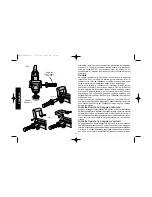
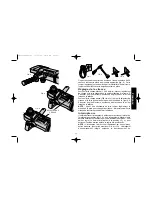
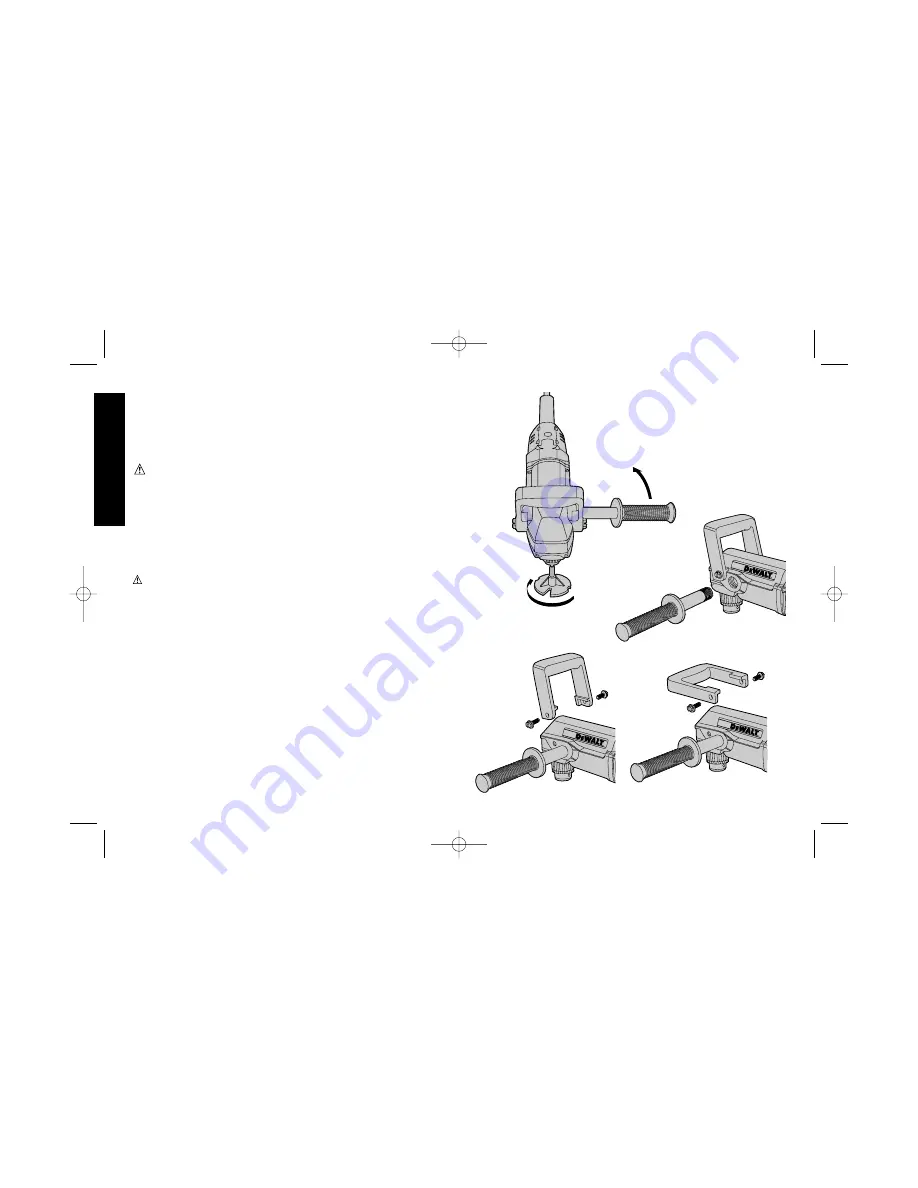
FIG. 1

TORQUE

REACTION

DIRECTION

DRILLING

DIRECTION

FIG. 3

FIG. 2

DW124/384086-01   11/15/02  12:35 PM  Page 2

Summary of Contents for DW124

Page 1: ...24 Copyright 2002 The following are trademarks for one or more DEWALT power tools the yellow and black color scheme the D shaped air intake grill the array of pyramids on the handgrip the kit box configuration and the array of lozenge shaped humps on the surface of the tool DW124 384086 01 11 15 02 12 35 PM Page 2 ...

Page 2: ...ur charpente de 13 mm 1 2 po Taladro para vigas verticales y horizontales de 13 mm 1 2 INSTRUCTIVO DE OPERACIÓN CENTROS DE SERVICIO Y PÓLIZA DE GARANTÍA ADVERTENCIA LÉASE ESTE INSTRUCTIVO ANTES DE USAR EL PRODUCTO Questions See us on the World Wide Web at www dewalt com DW124 384086 01 11 15 02 12 35 PM Page 3 ...

Page 3: ... a plug that looks like that shown in sketch D An adapter sketches B and C is available for connecting sketch A type plugs to 2 prong receptacles The green colored rigid ear lug or the like extending from the adapter must be connected to a permanent ground such as a properly grounded outlet box No adapter is available for a plug as shown in sketch D ADAPTER SHOWN IN FIGURES B and C IS NOT FOR USE ...

Page 4: ...essories Inspect tool cords periodically and if damaged have repaired by authorized service facility Inspect extension cords periodically and replace if damaged Keep handles dry clean and free from oil and grease DISCONNECT OR LOCK OFF TOOLS when not in use before servicing and when changing accessories such as blades bits cutters REMOVE ADJUSTING KEYS AND WRENCHES Form habit of checking to see th...

Page 5: ...rough or encountering hard materials such as re bar may be be hazardous as well WARNING Some dust created by power sanding sawing grinding drilling and other construction activities contains chemicals known to cause cancer birth defects or other reproductive harm Some examples of these chemicals are lead from lead based paints crystalline silica from bricks and cement and other masonry products an...

Page 6: ...he drill which the operator restrains On the DW124 the operator is grasping the switch handle near the point of cord entry and the side handle which is screwed into the gear case The gripping surfaces of these two handles are at significant distances from the drill bit thereby giving the operator ample control over the tool In addition to the optimized handle design the DW124 contains a slip clutc...

Page 7: ... the trigger is released Avoid reversing the drill s direction while it is still coasting to a stop Operation CAUTION Always unplug the tool when attaching or changing bits or accessories 1 Open the chuck jaws by turning collar with fingers and insert bit fully into the chuck Tighten chuck collar by hand Place chuck key in each of the three holes and tighten in clockwise direction It s important t...

Page 8: ...he brittle materials A smooth even flow of dust indicates the proper drilling rate Chuck Key Holder 1 Push double hole end of holder through the slot in other end of holder Figure 7 2 Slip loop over electric plug and draw loop tight around cord Figure 8 3 Push ends of chuck key handle through two holes in end of holder Figure 9 Cleaning With the tool motor running blow dirt and dust out of all air...

Page 9: ... any defects due to faulty materials or workmanship For warranty repair information call 1 800 4 DEWALT This warranty does not apply to accessories or damage caused where repairs have been made or attempted by others This warranty gives you specific legal rights and you may have other rights which vary in certain states or provinces In addition to the warranty DEWALT tools are covered by our 30 DA...

Page 10: ... doté d une fiche semblable à celle illustrée à la figure A Lorsque l outil est conçu pour recevoir une alimentation variant entre 150 et 250 volts il est doté d une fiche semblable à celle illustrée à la figure D On peut se procurer un adaptateur fig B et C pour brancher une fiche semblable à celle de la figure A dans des prises à deux orifices Il faut alors relier la tige la cosse ou le disposit...

Page 11: ...N ABUSIVE Ne pas transporter l outil par le cordon ni tirer sur ce dernier pour le débrancher de la prise Éloigner le cordon des sources de chaleur des flaques d huile et des arêtes tranchantes ASSUJETTIR LA PIÈCE Immobiliser la pièce à l aide de brides ou d un étau On peut alors se servir des deux mains pour faire fonctionner l outil ce qui est plus sûr NE PAS DÉPASSER SA PORTÉE Toujours demeurer...

Page 12: ...cies les meules les perceuses ou certains autres outils de construction peuvent soulever de la poussière contenant des produits chimiques susceptibles d entraîner le cancer des malformations congénitales ou pouvant être nocifs pour le système reproductif Parmi ces produits chimiques on retrouve le plomb dans les peintures à base de plomb la silice cristalline dans les briques et le ciment et autre...

Page 13: ...bonne maîtrise de l outil Outre la conception optimisée des poignées le modèle DW124 comporte un embrayage de glissement à basse vitesse qui amortit le choc mécanique exercé sur l utilisateur lorsqu un gros couteau entame le matériau Installation de la poignée latérale Les deux bossages filetés illustrés à la figure 2 servent à l installation de la poignée latérale Installer la poignée latérale co...

Page 14: ...rsqu on le relâche NOTE Il peut être nécessaire de faire tourner légèrement le mandrin à la main pour changer de vitesse Ne jamais modifier la vitesse de l outil lorsque ce dernier fonctionne Interrupteurs Il suffit d enfoncer l interrupteur à détente pour actionner l outil et de le relâcher pour arrêter l outil Il y a un interrupteur à glissière juste derrière l interrupteur à détente qui sert d ...

Page 15: ...s en tirant la poignée vers soi Répéter à plusieurs reprises l interrupteur à glissière lorsque la détente est enfoncée Éviter de modifier le sens de marche de l outil avant l immobilisation complète de ce dernier Fonctionnement MISE EN GARDE Toujours débrancher l outil lorsqu on en change les forets ou les accessoires 1 Ouvrir les mâchoires du mandrin en tournant la bague à la main et y insérer à...

Page 16: ...en servir de nouveau Balais du moteur Les outils DEWALT sont dotés d un système perfectionné de vérification des balais qui arrête automatiquement l outil lorsque les balais sont usés afin d empêcher d endommager le moteur Accessoires On peut se procurer séparément les accessoires recommandés pour l outil chez les détaillants ou au centre de service de la région MISE EN GARDE L utilisation de tout...

Page 17: ...uelque raison que ce soit l outil industriel de service intensif DEWALT ne donne pas entière satisfaction il suffit de le retourner chez le marchand participant dans les 30 jours suivant la date d achat afin d obtenir un remboursement complet Il faut retourner port payé l outil complet On peut exiger une preuve d achat REMPLACEMENT GRATUIT DE L ÉTIQUETTE Si vos étiquettes d avertissement deviennen...

Page 18: ... conductor de 3 cables y una clavija para conexión a tierra de tres patas para acoplarse a la toma de corriente aterrizada apropiada El conductor verde o verde con amarillo es el de conexión a tierra Nunca conecte el conductor verde o verde con amarillo a una terminal viva Si su unidad está diseñada para emplearse con menos de 150 V tendrá una clavija como la que se ilustra en la figura A Si es pa...

Page 19: ... tomas de corriente de 3 polos que acepten la clavija de la herramienta Repare o reemplace los 16 Instrucciones de seguridad para todas las herramientas CONSERVE LIMPIA LA ZONA DE TRABAJO Las superficies y los bancos con objetos acumulados en desorden propician los accidentes OTORGUE PRIORIDAD AL AMBIENTE DE TRABAJO No deje las herramientas eléctricas expuestas a la lluvia No las utilice en lugare...

Page 20: ...zado a menos que se diga otra cosa en el manual del usuario Haga que se 17 Español cambien los interruptores dañados en un centro de servicio autorizado No emplee ninguna herramienta que tenga inutilizado o estropeado el interruptor Utilice siempre el mango lateral provisto con la herramienta Sujete siempre la herramienta firmemente No intente utilizar esta herramienta con una sola mano El hacerlo...

Page 21: ...ortan la pieza de trabajo Ensamblaje del mango lateral El mango lateral se instala como se muestra en la figura 2 a cualquiera de ambos lados del taladro Instale el mango y apriételo con firmeza a mano El uso del mango lateral se recomienda cuando taladre a baja velocidad Siempre debe utilizar el mango lateral y es especialmente importante cuando taladre a baja velocidad Ensamblaje del mango en ar...

Page 22: ... del gatillo para operar en reversa Para taladrar coloque este interruptor en la posición F para operaciones en reversa coloque el interruptor en la posición R NOTA El interruptor con el que cuenta esta herramienta es una pieza común utilizada en otras herramientas Ignore las marcas HI LO para este taladro Un seguro mecánico evita la operación del interruptor deslizable a menos que el gatillo esté...

Page 23: ...s desde los tres orificios Para sacar una broca gire el portabrocas en sentido contrario a las manecillas del reloj desde uno de los orificios 2 Utilice exclusivamente brocas afiladas Para taladrar MADERA emplee brocas helicoidales brocas de horquilla o brocas sierra Para taladrar METAL use brocas helicoidales de alta velocidad o brocas sierra Para taladrar MAMPOSTERIA ladrillo cemento etc utilice...

Page 24: ...e al 326 7100 PRECAUCION El empleo de cualquier accesorio no recomendado para utilizarse con esta herramienta puede ser peligroso Por seguridad en el uso los siguientes accesorios deberán utilizarse solamente en tamaños iguales o menores a los señalados en la tabla a continuación CAPACIDADES MAXIMAS RECOMENDADAS EMBRAGUE BAJA ALTA OPERATIVO VELOCIDAD VELOCIDAD R P M 300 1200 Brocas para metal NO 1...

Page 25: ...n año a partir de la fecha de entrega contra cualquier defecto en su funcionamiento así como en materiales y mano de obra empleados para su fabricación Nuestra garantía incluye la reparación o reposición del producto y o componentes sin cargo alguno para el cliente incluyendo mano de obra así como los gastos de transportación razonablemente erogados derivados del cumplimiento de este certificado P...

Page 26: ... OAXACA Av Hidalgo 1303 Col Centro 951 514 46 12 SINALOA Blvd Manuel J Clouther 3027 Col Lomas del Blvd 667 717 89 99 SAN LUIS POTOSI Av Universidad 1525 Col San Luis 444 814 23 83 SONORA Nayarit 217 Col San Benito 662 210 25 50 TABASCO Periferico 2047 Col Periferico 993 350 38 72 TAMAULIPAS Tiburcio Garza Zamora 1185 Col Beatty 813 374 24 16 YUCATAN Calle 63 No 459 Col Centro 999 923 08 49 TAMPIC...

Reviews: