en - 5
17
E N G L I S H
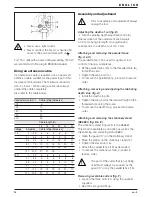
• Slide the cutter (22) out of its holder.
• Reverse the cutter or replace it.
Always replace both cutters.
• Slide the cutter into the holder. At the rabbeting
side (i.e. the side where the side guard is mounted),
the cutter must be flush with the planing shoe.
• Tighten the three bolts (21).
Fitting the shavings discharge cassette (fig. G)
Although this planer was primarily designed for right-
hand side shavings discharge, it can also be used
for left-hand side shavings discharge.
For right-hand side shavings discharge, the planer
can be used with or wothout the cassette.
The cassette must be used in combination with the
dust extraction adaptor when connecting a vacuum
extractor.
• Push the cassette with its head end (23) into the
right-hand side shavings discharge outlet (24)
until it clicks in place. Please note that the figure
shows the left-hand side of the tool.
For left-hand side shavings discharge, the cassette
must always be used.
When using left-hand side shavings
discharge, always use the dust
extraction adaptor and a vacuum
extractor as described below to prevent
clogging. See fig. G.
• Push the cassette with its head end (23) into the
left-hand side shavings discharge outlet (24) until
it clicks in place.
• Connect the adaptor (25) to a vacuum extractor.
• To remove the cassette, depress the head end (23)
and pull out the cassette.
Instructions for use
Always observe the safety instructions
and applicable regulations.
Prior to operation:
• Adjust the depth of cut.
• If necessary, fit and adjust the parallel fence.
• Attach the shavings discharge cassette.
Use sharp cutters only.
Switching ON and OFF (fig. A)
Your Planer is equipped with a safety switch to
prevent inadvertent operation.
• Switching ON: press the lock-off button (2) and
subsequently press the ON/OFF-switch (1).
• Release the lock-off button (2).
• Switching OFF: release the ON/OFF-switch (1).
Always switch OFF the tool when work is finished
and before unplugging.
Dust extraction
Since woodworking with a planer produces dust,
always install a dustbag or connect a vacuum
extractor designed in compliance with the applicable
Directives regarding dust emission.
Your planer is supplied with an adapter for
connecting a dustbag or a vacuum extractor.
The dustbag is standard for K-models and available
as an option for all other models.
• Attach the dustbag to the shavings discharge
cassette using the adaptor for right-hand side
ejection only.
• Alternatively, for either left-hand or right-hand
side ejection, connect the planer to a vacuum
cleaner using the adaptor (25).
When using left-hand side shavings
discharge, always connect the planer to
a suitable vacuum extractor to prevent
clogging.
Planing (fig. A)
• Switch the tool ON as described.
• Slowly move the Planer over the workpiece.
• The feed speed should not be too high,
especially when using the maximum
depth of cut and planing width.
Summary of Contents for DW678
Page 1: ... DW678 ...
Page 3: ...A2 3 7 8 10 9 12 2 1 4 5 6 7 11 A1 ...
Page 4: ...B D C 14 13 4 16 13 20 17 18 19 15 ...
Page 5: ...E G F 21 22 9 1 MM 13 24 3 23 25 ...
Page 85: ......
Page 86: ......
Page 87: ......


