background image

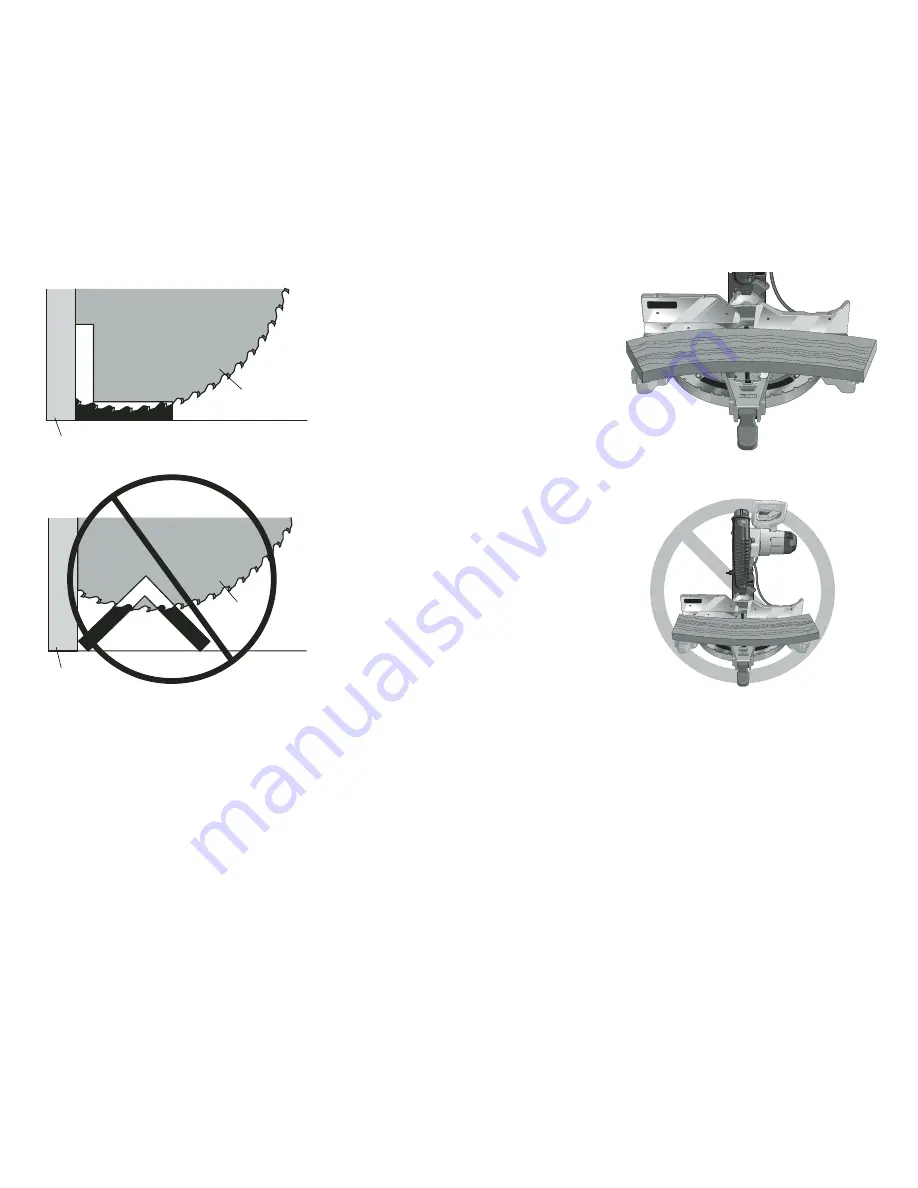
FIG. 21

FIG. 21A

RIGHT

WRONG

12

Special Cuts

NEVER MAKE ANY CUT UNLESS THE MATERIAL IS SECURED ON THE
TABLE AND AGAINST THE FENCE.

ALUMINUM CUTTING

ALWAYS USE THE APPROPRIATE SAW BLADE MADE ESPECIALLY FOR
CUTTING ALUMINUM. Certain workpieces, due to their size, shape or
surface finish, may require the use of a clamp or fixture to prevent
movement during the cut. Position the material so that you will be cutting
the thinnest cross section, as shown in Figure 20. Figure 20A illustrates
the wrong way to cut these extrusions. Use a stick wax cutting lubricant
when cutting aluminum. Apply the stick wax directly to the saw blade
before cutting. Never apply stick wax to a moving blade.
The wax, available at most hardware stores and industrial mill supply
houses, provides proper lubrication and keeps chips from adhering to the
blade.
Be sure to properly secure workpiece. Refer to page 3 for correct saw
blade.

FIG. 20

BLADE

FENCE

RIGHT

FIG. 20A

BLADE

FENCE

WRONG

Normal wear parts are not covered in this service. Carbon brushes worn
more then 50% will be replaced.

NOTE: 

Three Year Warranty is not applicable to items deemed as con-

sumables. Radial arm saws are covered by a one (1) year warranty only.
D

E

WALT Reserves the right to review its warranty policy |prior to launch

of any new business 
development products.

30 DAY NO SATISFACTION GUARANTEE

If you are dissatisfied with any D

E

WALT power tool, laser or nailer, for any

reason, simply return it to 
the point of purchase with your sales receipt within 30 days for a replace-
ment unit or a full refund.

FREE WARNING LABEL REPLACEMENT: 

If your warning labels become

illegible or are missing, call (AUS) 1800 654 155 or (NZ) 09 526 2556
for a free replacement.

BOWED MATERIAL

When cutting bowed material always position it as shown in Figure 21
and never like that shown in Figure 21A. Positioning the material incor-
rectly will cause it to pinch the blade near the completion of the cut.

CUTTING PLASTIC PIPE OR OTHER ROUND MATERIAL

Plastic pipe can be easily cut with your saw. It should be cut just like
wood and 

CLAMPED OR HELD FIRMLY TO THE FENCE TO KEEP IT

FROM ROLLING

. This is extremely important when making angle cuts.

CUTTING LARGE MATERIAL

Occasionally you will encounter a piece of wood a little too large to fit
beneath the blade guard. If this occurs, simply place your right thumb on
the upper side of the guard and roll the guard up just enough to clear the
workpiece, as shown in Figure 16. Avoid doing this as much as possible,
but if need be, the saw will operate properly and make the bigger cut.
NEVER TIE, TAPE, OR OTHERWISE HOLD THE GUARD OPEN WHEN
OPERATING THIS SAW.

Maintenance

1. All bearings are sealed. They are lubricated for life and need no 

further maintenance.

2. Periodically clean all dust and wood chips from around AND UNDER

the base and the rotary table. Even though slots are provided to allow
debris to pass through, some dust will accumulate.

3. The brushes are designed to give you several years of use. If they

ever need replacement follow the instructions on page 7 or return the
tool to the nearest service center for repair. Service center locations
are packed with your tool. 

Repairs

To assure product SAFETY and RELIABILITY, repairs, maintenance and
adjustments should be performed by a D

E

WALT factory service center, a

D

E

WALT authorized service center or other qualified service personnel.

Always use identical replacement parts.

Guarantee

Applicable to hand held Power Tools, Lasers and Nailers.

Three Year Limited Warranty

D

E

WALT will repair, without charge, any defects due to faulty materials or

workmanship for three years from the date of purchase. Please return the
complete unit, transportation prepaid, to any D

E

WALT Service Centre, or

any authorised service station.  
For warranty repair information, call (AUS) 1800 654 155 or (NZ) 09 526
2556.
This warranty does not apply to 

• Accessories 
• Damage caused where repairs have been made or attempted by

others. 

• Damage due to misuse, neglect, wear and tear, alteration or

modification.

This warranty gives you specific legal rights and you may have other rights
under the provisions of the Consumer Guarantee Act 1993 (New Zealand
only), Trade Practices Act 1974 and State Legislation (Australia only).
In addition to the warranty, D

E

WALT tools are covered by our:

FREE ONE YEAR SERVICE CONTRACT

D

E

WALT will also maintain the tool for free at any time during the first

year of purchase. This includes labour, parts and lubrication required to
restore the product to sound mechanical and/or electrical condition.

Summary of Contents for DW715-XE

Page 1: ...DW715 XE 230 VOLT 305MM 12 COMPOUND MITER SAW INSTRUCTION MANUAL Questions See us on the World Wide Web at www dewalt com ...

Page 2: ...L STOP ADJUSTMENT 6 FENCE ADJUSTMENT 6 AUTOMATIC ELECTRIC BRAKE 7 GUARD ACTUATION AND VISIBILITY 7 MITER LOCK ADJUSTMENT 7 BRUSHES 7 CONTROLS 7 OPERATION 7 SWITCH 7 CUTTING WITH YOUR SAW 7 CROSSCUTS 7 BEVEL CUTS 8 QUALITY OF CUT 8 BODY AND HAND POSITION 8 CLAMPING THE WORKPIECE 8 SUPPORT FOR LONG PIECES 8 CUTTING PICTURE FRAMES SHADOW BOXES AND OTHER FOUR SIDED PROJECTS 9 CUTTING TRIM MOLDING AND ...

Page 3: ...ECTRIC TOOLS NEAR FLAMMABLE LIQUIDS OR IN GASEOUS OR EXPLOSIVE ATMOSPHERES Motors in these tools may spark and ignite fumes EXTENSION CORDS Make sure your extension cord is in good condition When using an extension cord be sure to use one heavy enough to carry the current your product will draw An undersized cord will cause a drop in line voltage resulting in loss of power and overheating The foll...

Page 4: ... intended for use by young children or infirm persons without supervision Young children should be supervised to ensure that they do not play with this appliance Replacement of the supply cord If the supply cord is damaged it must be replaced by the manufacturer or an authorised DEWALT Service Centre in order to avoid a hazard Accessories Recommended accessories for use with your tool are availabl...

Page 5: ... the parts are Press down lightly on the operating handle and pull out the lock down pin as shown in Figure 2 Gently release the downward pressure and hold the arm allowing it to rise to its full height Use the lock down pin when carrying the saw from one place to another Always use the carrying handle to transport the saw or the hand indentations shown in Figure 2 Bench Mounting Holes are provide...

Page 6: ...ANT SAFETY INSTRUCTIONS Changing or Installing a New Saw Blade Fig 3 CAUTION Never depress the spindle lock button while the blade is under power or coasting Do not cut ferrous metal containing iron or steel or masonry or fiber cement product with this miter saw A B D FIG 3 Removing the Blade 1 Unplug the saw 2 Raise the arm to the upper position and raise the lower guard A as far as possible 3 Lo...

Page 7: ...nsure the 45 bevel override levers N are pushed inward to obtain an accurate adjustment To adjust the left 45 bevel stop first loosen the bevel lock knob L and tilt the head to the left If the pointer does not indicate exactly 45 turn the left bevel stop screw until the pointer reads 45 ADJUSTING THE BEVEL STOP TO 33 85 FIG 8 NOTE Adjust the 33 85 bevel angle only after performing the 0 bevel angl...

Page 8: ...ich will be discussed briefly here For more information on these controls see the respective sections later in the manual MITER CONTROL FIG 5 The miter lock adjustment lever and trigger allows you to miter your saw 50 left and right To miter the saw unlock miter lock lever J by pulling upward squeeze the detent trigger K and set the miter angle desired on the miter scale Lock miter lock handle by ...

Page 9: ...de of the saw blade Sight through the guard louvers when following a pencil line CLAMPING THE WORKPIECE TURN OFF AND UNPLUG SAW If you cannot secure the workpiece on the table and against the fence by hand irregular shape etc or your hand would be less than 150mm 6 from the blade a clamp or other fixture must be used For best results use the DW7082 clamp made for use with your saw It is available ...

Page 10: ...ngle A Figure 14 use the upper right arc Find 26 on the arc scale Follow the horizontal intersecting line to either side to get miter angle setting on saw 42 Likewise follow the vertical intersecting line to the top or bottom to get the bevel angle setting on the saw 18 Always try cuts on a few scrap pieces of wood to verify settings on saw VERNIER SCALE Your saw is equipped with a vernier scale f...

Page 11: ... 8 and 173mm 6 3 4 vertically follow the directions on this page CUTTING BASE MOLDING UP TO 25 4mm 1 THICK BY 91 x 173mm 3 5 8 6 3 4 WIDE 25 4mm 1 VERTICALLY AGAINST THE FENCE Position molding as shown in Figure 15 All cuts made with the back of the molding against the fence INSIDE CORNER Left side 1 Position molding with bottom of molding against the base of the saw 2 Miter left 45 3 Save left si...

Page 12: ...Save left end of cut RIGHT SIDE INSIDE CORNER 33 85 1 Bottom of molding against fence 2 Miter table set left 31 62 3 Save left end of cut LEFT SIDE OUTSIDE CORNER 33 85 1 Bottom of molding against fence 2 Miter table set left 31 62 3 Save right end of cut RIGHT SIDE OUTSIDE CORNER 33 85 1 Top of molding against fence 2 Miter table set right 31 62 3 Save right end of cut When setting bevel and mite...

Page 13: ...e cuts CUTTING LARGE MATERIAL Occasionally you will encounter a piece of wood a little too large to fit beneath the blade guard If this occurs simply place your right thumb on the upper side of the guard and roll the guard up just enough to clear the workpiece as shown in Figure 16 Avoid doing this as much as possible but if need be the saw will operate properly and make the bigger cut NEVER TIE T...

Page 14: ...60 60 60 70 70 70 80 80 80 TABLE 1 COMPOUND MITER CUT Position wood with broad flat side on the table and the narrow edge against the fence SET THIS MITER ANGLE ON SAW S Q U A R E B O X 6 S I D E D B O X SET THIS BEVEL ANGLE ON SAW 8 S I D E D B O X ...

Page 15: ... BLADE DOES NOT COME UP TO SPEED WHAT S WRONG WHAT TO DO 1 Extension cord too light or too long 1 Replace with adequate size cord See page 2 2 Low house voltage 2 Contact your electric company TROUBLE MACHINE VIBRATES EXCESSIVELY WHAT S WRONG WHAT TO DO 1 Saw not mounted securely to stand or work bench 1 Tighten all mounting hardware See page 4 2 Stand or bench on uneven floor 2 Reposition on flat...

Page 16: ...a JUL05 Form No 633365 00 DW715 XE Copyright 2005 DEWALT The following are trademarks for one or more DEWALT power tools the yellow and black color scheme the D shaped air intake grill the array of pyramids on the handgrip the kit box configuration and the array of lozenge shaped humps on the surface of the tool ...

Reviews: