6
English
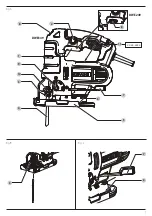
Description (Fig. A)
WARNING:
Never modify the power tool or any part of it.
Damage or personal injury could result.
1
On/off switch
2
Lock‑on button
3
Saw blade locking lever
4
Saw blade
5
Shoe sleeve
6
Shoe
7
Shoe beveling lever
8
Speed control dial
9
Pendulum stroke selector
10
Blade holder
Date Code Position (Fig. A)
The date code
11
, which also includes
the year of manufacture,
is printed into the housing.
Example:
2020 XX XX
Year of Manufacture
Markings on Tool
The following pictograms are shown on the tool:
a
Read instruction manual before use.
g
Wear ear protection.
f
Wear eye protection.
Package Contents
The package contains:
1 Jigsaw
1 Jig saw blade
1 Anti‑scratch shoe cover
1 Instruction manual
• Check for damage to the tool, parts or accessories which may
have occurred during transport.
• Take the time to thoroughly read and understand this manual
prior to operation.
WARNING:
No connection is to be made to the
earth terminal.
Follow the fitting instructions supplied with good quality plugs.
Recommended fuse: 13 A.
Using an Extension Cable
If an extension cable is required, use an approved 3–core
extension cable suitable for the power input of this tool (see
Technical Data
).The minimum conductor size is 1.5 mm
2
; the
maximum length is 30 m.
When using a cable reel, always unwind the cable completely.
Electrical Safety
The electric motor has been designed for one voltage only.
Always check that the power supply corresponds to the voltage
on the rating plate.
i
Your
D
e
WALT
tool is double insulated in accordance
with EN62841; therefore no earth wire is required.
If the supply cord is damaged, it must be replaced only by
D
e
WALT
or an authorised service organisation.
Mains Plug Replacement
(U.K. & Ireland Only)
If a new mains plug needs to be fitted:
• Safely dispose of the old plug.
• Connect the brown lead to the live terminal in the plug.
• Connect the blue lead to the neutral terminal.
Additional Safety Warnings for Jigsaws
•
Hold the power tool by insulated gripping surfaces,
when performing an operation where the cutting
accessory may contact hidden wiring or its own cord.
Cutting accessory contacting a “live” wire may make exposed
metal parts of the power tool “live” and could give the operator
an electric shock.
•
Use clamps or another practical way to secure and
support the workpiece to a stable platform.
Holding the
workpiece by hand or against your body leaves it unstable and
may lead to loss of control.
•
Keep hands away from cutting area. Never reach
underneath the workpiece for any reason.
Do not insert
fingers or thumb into the vicinity of the reciprocating blade
and blade clamp. Do not stabilize the saw by gripping
the shoe.
•
Keep blades sharp.
Dull or damaged blades may cause
the saw to swerve or stall under pressure. Always use the
appropriate type of saw blade for the workpiece material and
type of cut.
•
When cutting pipe or conduit, make sure that they are
free from water, electrical wiring, etc.
•
Do not touch the workpiece or the blade immediately
after operating the tool.
They can become very hot.
•
Be aware of hidden hazards, before cutting into walls,
floors or ceilings, check for the location of wiring
and pipes.
•
The blade will continue to move after releasing the
switch.
Always switch the tool off and wait for the saw blade
to come to a complete standstill before putting the tool down.
h )
Keep handles and grasping surfaces dry, clean and
free from oil and grease.
Slippery handles and grasping
surfaces do not allow for safe handling and control of the
tool in unexpected situations.
5) Service
a )
Have your power tool serviced by a qualified repair
person using only identical replacement parts.
This
will ensure that the safety of the power tool is maintained.
Summary of Contents for DWE249
Page 1: ...DWE249 DWE349 ...
Page 2: ...B Copyright DeWALT English original instructions 4 Pусский перевод с оригинала инструкции 10 ...
Page 3: ...1 Fig A Fig B Fig C 4 3 10 9 1 2 8 7 5 6 3 6 7 11 xx xx xxxx 8 DWE249 DWE349 ...
Page 4: ...2 Fig D Fig F Fig E 13 12 9 6 5 DWE249 DWE349 8 8 ...
Page 5: ...3 Fig G Fig H ...
Page 21: ......
Page 22: ......
Page 23: ......
Page 24: ...N814529 RUS 05 20 ...


