background image

3

English

Safety Information


WARNING: ALWAYS 

use safety glasses. Everyday 

eyeglasses are NOT safety glasses. Also use face or 
dust mask if cutting operation is dusty. ALWAYS WEAR 
CERTIFIED SAFETY EQUIPMENT:
•  ANSI Z87.1 eye protection (CAN/CSA Z94.3),
•  ANSI S12.6 (S3.19) hearing protection,
•  NIOSH/OSHA/MSHA respiratory protection.


WARNING: 

Some dust created by power sanding, 

sawing, grinding, drilling, and other construction 
activities contains chemicals known to the State 
of California to cause cancer, birth defects or 
other reproductive harm. Some examples of these 
chemicals are:
•  lead from lead-based paints,
•  crystalline silica from bricks and cement and other 

masonry products, and

•  arsenic and chromium from chemically-

treated lumber.

Your risk from these exposures varies, depending on how 
often you do this type of work. To reduce your exposure to 
these chemicals: work in a well ventilated area, and work with 
approved safety equipment, such as those dust masks that are 
specially designed to filter out microscopic particles.
• 

Avoid prolonged contact with dust from power 
sanding, sawing, grinding, drilling, and other 
construction activities. Wear protective clothing and 
wash exposed areas with soap and water. 

Allowing 

dust to get into your mouth, eyes, or lay on the skin may 
promote absorption of harmful chemicals.


WARNING: Always wear proper personal hearing 
protection that conforms to ANSI S12.6 (S3.19) 
during use. 

Under some conditions and duration 

of use, noise from this product may contribute to 
hearing loss.


WARNING:


(Air and Supply)

•  Do not use oxygen, combustible gases, or bottled 

gases as a power source for this tool as tool may 
explode, possibly causing injury.

•  Do not use supply sources which can potentially 

exceed 200 P.S.I.G. (14kg/cm2)  as tool may burst, 
possibly causing injury.

•  The connector on the tool must not hold pressure 

when air supply is disconnected. If a wrong fitting 
is used, the tool can remain charged with air 
after disconnecting and thus will be able to drive 
a fastener even after the air line is disconnected 
possibly causing injury.

•  Do not pull trigger or depress contact arm while 

connected to the air supply as the tool may cycle, 
possibly causing injury.

•  Always disconnect air supply: 1.) Before making 

adjustments; 2.) When servicing the tool; 3.) When 
clearing a jam; 4.) When tool is not in use; 5.) When 
moving to a different work area, as accidental 
actuation may   occur, possibly causing injury.


WARNING:


When operating the tool:

•  Always handle the tool with care:


-

Never engage in horseplay;


-

Never pull the trigger unless nose is directed 
toward the work;


-

 Keep others a safe distance from the tool 
while tool is in operation as accidental 
actuation may occur, possibly causing injury.

•  The operator must not hold the trigger pulled 

on contact arm tools except during fastening 
operation as serious injury could result if the trip 
accidentally contacted someone or something, 
causing the tool to cycle.

•  Keep hands and body away from the discharge 

area of the tool. A contact arm tool may bounce 
from the recoil of driving a fastener and an 
unwanted second fastener may be driven possibly 
causing injury.

•  Check operation of the contact arm mechanism 

frequently. Do not use the tool if the arm is not 
working correctly as accidental driving of a 
fastener may result. Do not interfere with the 
proper operation of the contact arm mechanism.

•  Do not drive fasteners on top of other fasteners 

or with the tool at an overly steep angle as this 
may cause deflection of fasteners which could 
cause injury. 

•  Do not drive fasteners close to the edge of the 

work piece as the wood may split, allowing the 
fastener to be deflected possibly causing injury.

•  This nailer produces SPARKS during operation. NEVER 

use the nailer near flammable substances, gases or 
vapors including lacquer, paint, benzine, thinner, 
gasoline, adhesives, mastics, glues or any other 
material that is -- or the vapors, fumes or byproducts 
of which are -- flammable, combustible or explosive. 
Using the nailer in any such environment could cause 
an EXPLOSION resulting in personal injury or death to 
user and bystanders.


WARNING:


When maintaining the tool:

•  When working on air tools note the warnings in 

this manual and use extra care when evaluating 
problem tools.


WARNING:


When loading tool:

•  Never place a hand or any part of body in fastener 

discharge area of tool;

•  Never point tool at anyone;
•  Do not pull the trigger or depress the trip as 

accidental actuation may occur, possibly 
causing injury.

Summary of Contents for DWFP12569

Page 1: ... Pour toute question ou tout commentaire nous contacter Si tiene dudas o comentarios contáctenos 1 800 4 DeWALT Instruction Manual Guide D utilisation Manual de instrucciones DWFP12569 2 N 1 Flooring Tool Outil à Plancher 2 En 1MC Herramienta 2 En 1 Para Instalación de Pisos ...

Page 2: ...English English original instructions 1 Français traduction de la notice d instructions originale 9 Español traducido de las instrucciones originales 18 ...

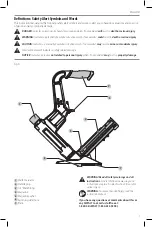
Page 3: ...which if not avoided may result in minor or moderate injury Used without word Indicates a safety related message NOTICE Indicates a practice not related to personal injury which if not avoided may result in property damage WARNING Read all safety warnings and all instructions Failure to follow the warnings and instructions may result in electric shock fire and or serious injury WARNING To reduce t...

Page 4: ...e air to operate at the rate of 60 fasteners per minute at 80 p s i 5 6 kg cm2 Take the actual rate at which the tool will be run to determine the amount of air required For instance if your fastener usage averages 30 fasteners per minute you need 50 of the tool s c f m of free air which is required to operate the tool at 60 fasteners per minute Limited Warranty U S and Canada Only DeWALT warrants...

Page 5: ... arm while connected to the air supply as the tool may cycle possibly causing injury Always disconnect air supply 1 Before making adjustments 2 When servicing the tool 3 When clearing a jam 4 When tool is not in use 5 When moving to a different work area as accidental actuation may occur possibly causing injury WARNING When operating the tool Always handle the tool with care Never engage in horsep...

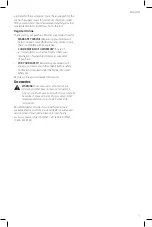
Page 6: ...sage Prep Air Supply and Connections WARNING Do not use oxygen combustible gases or bottled gases as a power source for this tool as tool may explode possibly causing injury Fittings Install a male plug on the tool which is free flowing and which will release air pressure from the tool when disconnected from the supply source Hoses Air hoses should have a minimum of 150 p s i 10 6 kg cm2 working p...

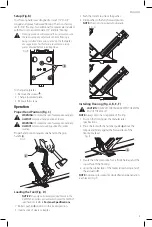
Page 7: ... flooring 1 Position the flooring per the manufacture s specifications 2 Place the tool with the fastener guide 6 above the tongue and firmly against the forward face of the flooring material Fig E 6 3 Ensure that the composite foot is firmly held against the top surface of the flooring 4 Using the rubber face of the mallet strike the top end of the acctuator 1 NOTE Adjust air pressure until desir...

Page 8: ...the blade should be removed and the top pin end just barely dressed off with a stone It is not necessary to do more than smooth off the top to get the necessary side play Do not grind Reinsert the blade and pin in the stem and test for side play once more Repeat as necessary to get this small amount of side play Carefully examine the large threaded portion of the piston stem A nylon lock can be se...

Page 9: ...upply from the tool to the supply source for restrictive connectors swivel fittings low points containing water and anything else that would prevent full volume flow of air to the tool Register Online Thank you for your purchase Register your product now for WARRANTY SERVICE Registering your product will help you obtain more efficient warranty service in case there is a problem with your product C...

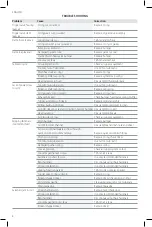
Page 10: ...se driver to clean Cylinder sleeve not seated correctlyon bottom bumper Disassemble to correct Head valve dry Disassemble lubricate Air pressure too low Check air supply equipment Skipping fasteners intermittent feed Worn bumper Replace bumper Tar dirt in driver channel Disassemble and clean nose and driver Air restriction inadequate air flow through quick disconnect socket and plug Replace quick ...

Page 11: ...rées Si utilisé sans aucun terme Indique un message propre à la sécurité AVIS indique une pratique ne posant aucun risque de dommages corporels mais qui par contre si rien n est fait pour l éviter pourrait poser des risques de dommages matériels AVERTISSEMENT lire tous les avertissements de sécurité et toutes les directives Le non respect des avertissements et des directives pourrait se solder par...

Page 12: ...ite ou l exclusion des dommages accessoires ou indirects n étant pas reconnues dans certains États et pays les limitations ou exclusions précitées peuvent ne pas vous être adressées Cette garantie vous confère des droits juridiques spécifiques qui s ajoutent aux autres droits éventuels qui peuvent varier d une province d un État ou d un pays à l autre Pour obtenir aux États Unis des services liés ...

Page 13: ...tation pouvant excéder 14 kg cm2 200 P S I G car l outil risque d exploser pouvant provoquer des blessures corporelles Le raccord sur l outil ne doit pas maintenir de pression quand l alimentation en air est déconnectée Si un mauvais raccord est utilisé l outil risque de rester chargé en air après avoir été déconnecté et sera donc capable d enfoncer une fixation même après que la conduite d air ai...

Page 14: ...que sur la surface Un essai devrait être effectué avant chaque projet pour cause des différences de finition et de l état de l outil Votre cloueuse est un outil pneumatique professionnel NE PAS le laisser à la portée des enfants Une supervision est nécessaire auprès de tout utilisateur non expérimenté AVERTISSEMENT entretien de l outil Lorsque vous travaillez sur des outils pneumatiques prenez not...

Page 15: ...ces de l outil Lubrification Une lubrification fréquente mais pas excessive est nécessaire pour de meilleures performances Utilisez un lubrifiant pour outil pneumatique comme le Mobil Velocite N 10 ou équivalent N utilisez pas d huile ou d additifs détergents car ces lubrifiants provoqueront une usure accélérée des joints et des embouts de protection de l outil provoquant de mauvaises performances...

Page 16: ...che de l enfonceur hors de la tige Cela libérera l enfonceur 4 Insérez le nouvel enfonceur dans la fente à l extrémité de la tige du piston d entraînement et montez la broche de l enfonceur Testez le jeu latéral dans l enfonceur en saisissant la tige du piston d entraînement d une main et l enfonceur de l autre et en bougeant l enfonceur latéralement aligné avec la fente dans la tige Il doit y avo...

Page 17: ...Parker O LUBE ou équivalent sur tous les joints toriques Recouvrez chaque joint torique d O LUBE avant d assembler Utilisez une petite quantité d huile sur toutes les surfaces mobiles et les pivots Après l assemblage ajoutez quelques gouttes de lubrifiant pour outils pneumatiques DeWALT par le raccord du conduit d air avant de l essayer Pression et volume de l alimentation d air Le volume d air es...

Page 18: ...brifiant Utilisez un lubrifiant pour outil pneumatique Joints toriques de la soupape principale usés Remplacez les joints toriques Ressort de la tête du cylindre cassé Remplacez le ressort de la tête du cylindre Soupape principale coincée dans la tête Démonter vérifier lubrifier Manque de puissance l outil tourne au ralenti Outil sec manque de lubrifiant Utilisez un lubrifiant pour outil pneumatiq...

Page 19: ...trop courtes pour l outil N utilisez que les fixations recommandées Fixations tordues Ne plus utiliser ces fixations Fixations de dimension incorrecte N utilisez que les fixations recommandées Fuite au joint d étanchéité de tête Serrez les vis remplacez le joint d étanchéité Joint torique de la vanne de la gâchette coupé usé Remplacez le joint torique Entraînement cassé abîmé Remplacez l entraînem...

Page 20: ...alabras de alerta de seguridad Este manual de instrucciones utiliza los siguientes símbolos y palabras de alerta de seguridad para alertarle de situaciones peligrosas y del riesgo de lesiones corporales o daños materiales PELIGRO Indica una situación de peligro inminente que si no se evita provocará la muerte o lesiones graves ADVERTENCIA Indica una situación de peligro potencial que si no se evit...

Page 21: ...a implícita ni la exclusión o limitación de daños fortuitos o consecuenciales de modo que las limitaciones o exclusiones anteriores pueden no corresponder a su caso Esta garantía le concede derechos legales específicos y usted puede tener también otros derechos que varían de un estado a otro y de un país a otro Para obtener servicio bajo garantía en los EE UU devuelva el producto junto con el comp...

Page 22: ...los 200 PSIG 14 kg cm2 ya que la herramienta puede explotar y posiblemente causar lesiones El conector de la herramienta no debe retener presión cuando se desconecta el suministro de gas Si se usa un accesorio incorrecto la herramienta puede permanecer cargada con aire después de la desconexión y así podrá colocar un remache incluso después de desconectar la línea de aire lo que producirá potencia...

Page 23: ...amienta continúa experimentando problemas funcionales PARA PREVENIR LESIONES ACCIDENTALES Nunca coloque la mano ni otra parte del cuerpo en el área de descarga de clavos de la herramienta mientras el aire de suministro está conectado Nunca apunte la herramienta a otra persona Nunca participe en juegos con ella Nunca accione la herramienta a menos que la nariz esté apuntando al trabajo Siempre mane...

Page 24: ...colocación del sujetador en piezas de desecho de madera antes de instalar el piso Fig B 8 Para cambiar las placas de pie 1 Retire los tornillos 8 2 Cambie a la placa deseada 3 Vuelva a colocar los tornillos Consulte las Especificaciones de la herramienta para ajustar la presión correcta de funcionamiento para la herramienta Filtro El polvo y el agua en el suministro de aire son causas importantes ...

Page 25: ...productos químicos pueden debilitar los materiales plásticos utilizados en estas piezas Utilice un paño humedecido sólo con agua y jabón neutro Nunca permita que penetre líquido dentro de la herramienta ni sumerja ninguna de las piezas en un líquido Piezas de repuesto Se recomienda usar piezas de repuesto de DeWALT No use piezas modificadas ni piezas que no proporcionen un rendimiento equivalente ...

Page 26: ...Al reparar una herramienta asegúrese de que las partes internas estén limpias y lubricadas Use Parker O LUBE o equivalente en todas las juntas tóricas Recubra cada junta tórica con O LUBE antes del ensamblaje Use una pequeña cantidad de aceite en todas las superficies móviles y pivotes Después del reensamblaje agregue unas gotas de lubricante para herramientas neumáticas DeWALT por el accesorio de...

Page 27: ...re Revise el equipo de suministro de aire Herramienta seca falta de lubricación Use lubricante para herramientas neumáticas Juntas tóricas de la válvula del cabezal desgastadas Reemplace las juntas tóricas Resorte de la tapa del cilindro roto Reemplace el resorte de la tapa del cilindro Válvula del cabezal atascada en la tapa Desensamble Revise Lubrique Falta de corriente accionamiento lento Herra...

Page 28: ...la herramienta Tornillos flojos de la nariz del cargador Ajuste todos los tornillos Remaches demasiado cortos para la herramienta Use solo remaches recomendados Remaches doblados Deje de utilizar estos remaches Junta de la tapa del cabezal con fugas Ajuste los tornillos reemplace la junta Junta tórica de la válvula del gatillo cortada desgastada Reemplace la junta tórica Transmisión rota desgastad...

Page 29: ......

Page 30: ......

Page 31: ......

Page 32: ...DeWALT Industrial Tool Co 701 East Joppa Road Towson MD 21286 Copyright 2017 08 17 Part No 9R217397 ...

Reviews: