6
English
FEATURES
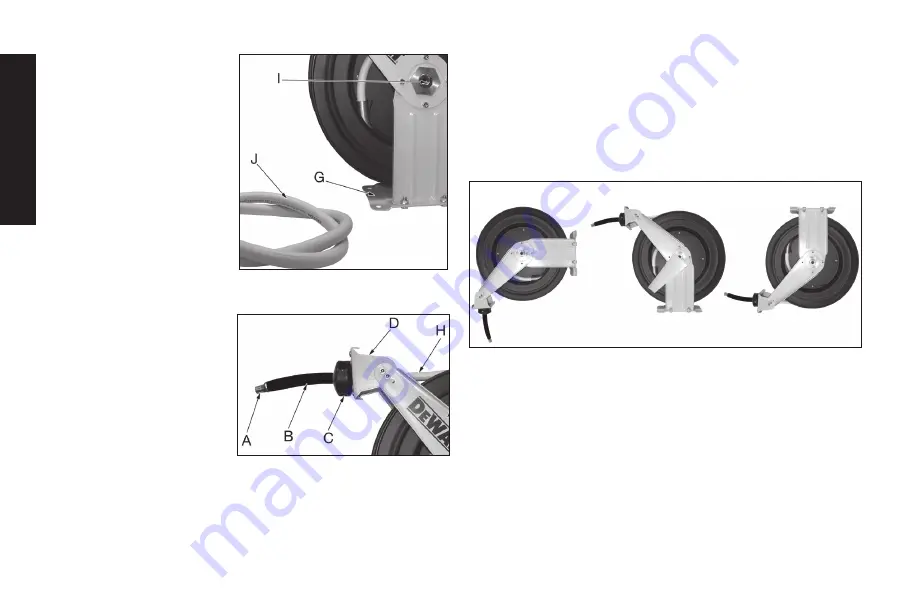
AIR LINE INLET
The air line inlet (I) is 1/4"
NPT and is located on the on
the side of the hose reel.
MOUNTING BRACKET
The mounting bracket (G) is a
powder coated metal plate that
can be easily mounted on a
wall, ceiling or floor.
LEAD-IN AIR HOSE
The lead-in hose (J) is
3/8" x 4' long and has
a swivel connection
on one end to prevent the hose from twisting or
kinking. This gets attached to the air line inlet (I).
AIR LINE OUTLET
The air line outlet (A) is 1/4"
NPT and is located on the end
of the air hose (H) for
convienient connection to air
accessories or tools.
AIR HOSE
The air hose (H) is 3/8" x 50'
and is attached to the hose
reel.
BALL STOP
The ball stop (C) is adjustable and allows the desired length of hose
to be permanently stored outside the hose real.
HOSE BEND RESTRICTOR
The hose restrictor (B) reduces bending stress near the fitting,
preventing damage and extending the life of the hose (H).
INSTALLATION
1. Choose a mounting location that is free of electrical wiring or
other obstructions and is sturdy enough to support the weight of
the hose reel and hose as well as the force used to extend and
retract it. The hose reel can be mounted on the floor, ceiling or
wall (see Figure 2).
Figure 2
Wall
Floor
Ceiling
2. Use the included mounting template to mark and drill the hole
locations.
3 Mount the hose reel in the desired location. Purchase the appro-
priate fasteners at your local hardware store.
Different mounting
positions require different types of hardware.
4. If an adjustment needs to made to increase or decrease the
length of hose that is outside of the hose reel, pull out the hose
slowly until it latches at the desired length. Loosen the ball stop
(C) bolts and slide the hose stop to a position close to the hose
guide roller bracket (D). Retighten the ball stop bolts. Do not
overtighten the bolts.


