background image

DCN690-XE , DCN691-XE, DCN692-XE

18 V CORDLESS FRAMING NAILER

INSTRUCTION MANUAL

Summary of Contents for XR Li-ION DCN690-XE

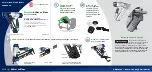
Page 1: ...DCN690 XE DCN691 XE DCN692 XE 18 V CORDLESS FRAMING NAILER INSTRUCTION MANUAL ...

Page 2: ......

Page 3: ...ht without battery pack kg 3 3 3 LPA sound pressure dB A 84 84 84 KPA sound pressure uncertainty dB A 3 3 3 LWA sound power dB A 95 95 95 KWA sound power uncertainty dB A 3 3 3 Vibration total values triax vector sum determined according to EN 60745 Vibration emission value ah ah m s 3 8 3 8 3 8 Uncertainty K m s 1 5 1 5 1 5 The vibration emission level given in this information sheet has been mea...

Page 4: ... or unplugging the power tool Keep cord away from heat oil sharp edges or moving parts Damaged or entangled cords increase the risk of electric shock e When operating a power tool outdoors use an extension cord suitable for outdoor use Use of a cord suitable for outdoor use reduces the risk of electric shock f If operating a power tool in a damp location is unavoidable use a residual current devic...

Page 5: ...cts that can make a connection from one terminal to another Shorting the battery terminals together may cause burns or a fire d Under abusive conditions liquid may be ejected from the battery avoid contact If contact accidentally occurs flush with water If liquid contacts eyes additionally seek medical help Liquid ejected from the battery may cause irritation or burns 6 SERVICE a Have your power t...

Page 6: ... alter or modify the tool in any way Always assume that the tool contains fasteners will discharge a fastener causing an injury Do not actuate the tool unless the tool is placed firmly against the workpiece If the tool is not in contact with the workpiece the fastener may be deflected away from your target Disconnect the tool from the power source when the fastener jams in the tool While removing ...

Page 7: ...e fastener may follow the grain of the wood shiner causing it to protrude unexpectedly from the side of the work material Drive the chisel point of the fastener perpendicular to the grain to reduce risk of injury Figs E F Do not drive nails onto the heads of other fasteners or with the tool at too steep an angle Personal injury from strong recoil jammed nails or ricocheted nails may result Fig G K...

Page 8: ... AS NZS1270 Acoustics Hearing Protection Respiratory protection AS NZS1716 Respiratory Protective Devices WARNING Some dust created by power sanding sawing grinding drilling and other construction activities contains chemicals known to cause cancer birth defects or other reproductive harm Some examples of these chemicals are lead from lead based paints crystalline silica from bricks and cement and...

Page 9: ... or damaged do not insert into the charger Do not crush drop or damage the battery pack Do not use a battery pack or charger that has received a sharp blow been dropped run over or damaged in any way e g pierced with a nail hit with a hammer stepped on Damaged battery packs should be returned to the service center for recycling WARNING Fire hazard Do not store or carry the battery pack so that met...

Page 10: ...red light remaining ON continuously The Important Safety Instructions for All Battery Chargers SAVE THESE INSTRUCTIONS This manual contains important safety and operating instructions for battery chargers Before using the charger read all instructions and cautionary markings on the charger battery pack and product using the battery pack WARNING Shock hazard Do not allow any liquid to get inside th...

Page 11: ...lashing the red light with two fast blinks followed by a pause This indicates the power source is out of limits Important Charging Notes 1 Longest life and best performance can be obtained if the battery pack is charged when the air temperature is between 18 24 C 65 F and 75 F DO NOT charge the battery pack in an air temperature below 4 C 40 F or above 40 C 105 F This is important and will prevent...

Page 12: ...y place out of the charger for optimal results NOTE Battery packs should not be stored completely depleted of charge The battery pack will need to be recharged before use NOTICE Do not store tool with battery pack installed To prevent damage to the pack and to ensure best battery life store battery packs out of the tool or charger in a cool dry location SAVE ALL WARNINGS AND INSTRUCTIONS FOR FUTUR...

Page 13: ...Pack Fig 3 NOTE For best results make sure your battery pack is fully charged To install the battery pack L into the tool handle align the battery pack with the rails inside the tool s handle and slide it into the handle until the battery pack is firmly seated in the tool and ensure that it does not disengage To remove the battery pack from the tool press the FIG 3 FIG 4 L P N release button P and...

Page 14: ...itch I to the right shown in Figure 6 To operate the tool using the place actuation method FIG 5 FIG 6 WARNING A nail will fire each time the trigger is depressed as long as the contact trip remains depressed 1 Depress the contact trip against the work surface 2 Depress the trigger To operate the tool using the bump actuation method 1 Depress the trigger 2 Push the contact trip against the work su...

Page 15: ...ed when tool is not in use Keep the trigger lock off switch LOCKED Fig 7 when the tool is not in use NOTICE Do not store tool with battery pack installed To prevent damage to the pack and to ensure best battery life store battery packs out of the tool or charger in a cool dry location Each DEWALT nailer is equipped with a trigger lock off B which when pushed to the right as shown in Figure 7 preve...

Page 16: ...ils are not held to the magnetized nose piece Adjusting Depth Fig 10 The depth that the nail is driven can be adjusted using the depth adjustment wheel C on the nose of the tool WARNING To reduce risk of serious FIG 10 C injury from accidental actuation when attempting to adjust depth ALWAYS Remove battery pack Engage trigger lock off Always point the nose of the nailer away from you Avoid contact...

Page 17: ...e tool pointed away from you and follow these instructions to clear 1 Remove battery pack from tool and engage trigger lock off 2 Slide the spring loaded pusher latch to the base of the magazine to lock it into place and unload nail strip 3 Using the hex tool K provided loosen the two hex bolts O at the top of the magazine 4 Rotate the magazine G forward 5 Remove jammed bent nail using pliers if n...

Page 18: ...ION Clean magazine pusher and contact trip mechanism WHY Permits smooth operation of magazine reduces wear and prevents jams HOW Blowing off the tool with compressed air is the most effective way to clean the tool The use of oils lubricants periodically or solvents is not recommended as they tend to attract debris and or damage the plastic parts of the tool ACTION Before each use check to ensure a...

Page 19: ...d verification of inclusion The kit also contains a packet of Loctite adhesive for use in step 8 Refer to Fig 20 TO CHANGE BROKEN RETURN SPRINGS NOTE Springs should be replaced as a pair using only the correct DEWALT accessory spring replacement kit 1 Using the key K provided loosen the two screws aa on either side of the unit Refer to Figure 15 2 Remove the return system bb from the unit Refer to...

Page 20: ...ng noise from the unit If this happens remove and reseat the return system 9 Once the return system is correctly seated open the provided sachet of Loctite and apply a small amount on the thread of the two screws aa and remount the two screws using the key and tighten securely FIG 19 FIG 20 aa WARNING Always test the unit by firing short nails in to soft wood to ensure that the tool is working pro...

Page 21: ...n medical attention If on skin rinse well with water If on clothes remove clothes Loctite is a registered trademark of Henkel Corp Recommended accessories for use with your tool are available at extra cost from your local service center If you need any assistance in locating any accessory please contact Stanley Black Decker 82 Taryn Drive Epping VIC 3076 Australia or call 1800 338 002 or NZ 0800 3...

Page 22: ...re dirty or damaged See authorised DEWALT repair agent Damaged internal electronics See authorised DEWALT repair agent Damaged trigger See authorised DEWALT repair agent Battery is hot Let the battery cool or replace it with a cool pack Tool is hot Let the tool cool down before continuing use Motor does not run with contact trip depressed Trigger lock in locked position Unlock trigger lock Dry fir...

Page 23: ... is not too rigorous an application Debris in nosepiece Clean nose area and watch closely for small pieces of broken nails stuck in the track Tool is not yet run in New tools can take 500 1000 nails for parts to mesh and wear in together Drive shorter nails during this period if experiencing difficulty driving nails flush Use of incorrect speed DCN692 only If trying to drive longer ring shank nail...

Page 24: ...thorised DEWALT repair agent Material and fastener length If the unit continues to stall forcing the need to rotate the Stall release lever choose the appropriate material and fastener length that is not too rigorous an application Debris in nosepiece Clean nose area and watch closely for small pieces of broken nails stuck in the track Worn magazine Replace magazine See authorised DEWALT repair ag...

Page 25: ......

Page 26: ...24 ...

Page 27: ...25 ...

Page 28: ...X X X X X X X X X 55 55 X 140 90 90 90 X X DCB141 14 4 1 5 X X X X X X X X X X X X X X X X X X X 30 30 X 70 45 45 40 X X DCB142 14 4 4 0 X X X X X X X X X X X X X X X X X X X 90 90 X 185 120 120 117 X X DCB143 14 4 2 0 X X X X X X X X X X X X X X X X X X X 40 40 X 90 60 60 60 X X DCB144 14 4 5 0 X X X X X X X X X X X X X X X X X X X 90 90 240 240 150 150 150 X X DCB145 14 4 1 3 X X X X X X X X X X...

Reviews: